TOPODRONE Air2S PPK KIT
- Disclaimer
- General description TOPODRONE DJI AIR 2S PPK
- Product parameters
- TOPODRONE AIR 2S Features
- TOPODRONE PPK Upgrade operation guide
- Description of the TOPODRONE DJI AIR 2S PPK
- Route Planning for TOPODRONE DJI Air 2S PPK
- Base Station Installation and Phase Center Coordination
- Setting and coordinating control points
- Turning on the drone and initializing the TOPODRONE receiver
- Compass calibration TOPODRONE DJI AIR 2S PPK
- Photo settings and camera focus
- Launching a drone on a flight mission
- Charging, storage and operation of batteries
- Requirements and recommendations for operating conditions.
Disclaimer
The TOPODRONE DJI AIR 2 PPK UPGRADE KIT is a high-precision surveying instrument. We strongly recommend that you handle geodetic equipment carefully to increase its service life.
DO NOT use the TOPODRONE DJI AIR 2 PPK UPGRADE KIT in any way not described in this User Manual.
DO NOT expose the TOPODRONE DJI AIR 2S PPK UPGRADE KIT to shock or vibration, especially when the device is turned on.
DO NOT place the TOPODRONE DJI AIR 2S PPK UPGRADE KIT in direct sunlight, in areas with poor ventilation, or near a source of heat or cold.
DO NOT expose the TOPODRONE DJI AIR 2S PPK UPGRADE KIT to moisture, heavy rain, snow, sand and dust.
DO NOT insert foreign objects into the memory card, LEMO 6-Pin, or external GNSS antenna slots, or install the memory card upside down or attempt to connect incompatible slots.
DO NOT insert or remove the MicroSD card while the TOPODRONE DJI AIR 2S PPK UPGRADE KIT is in operation, as this may cause the card to malfunction and/or result in data loss.
Safe storage of TOPODRONE DJI AIR 2S PPK UPGRADE KIT
When TOPODRONE DJI AIR 2S PPK UPGRADE KIT is not in use, it is recommended to store the device indoors, under conditions of relative humidity not exceeding 40% and temperature 20±5°C. to open the outer cover.
If the TOPODRONE DJI AIR 2S PPK UPGRADE KIT gets wet from rain, snow or fog during operation, wipe it with a clean, dry paper or microfiber cloth. Then leave it in a dry room for an hour to dry completely.
Technological requirements
Structurally, the TOPODRONE DJI AIR 2S PPK UPGRADE KIT does not have protection against moisture and dust, so using the equipment in a humid (above 90%) and dusty environment may cause it to malfunction, deteriorate its performance, or start corrosion processes, with the possibility of the device failing.
In case of intentional or accidental violation of any of the above requirements, the manufacturer does not warrant the performance of the TOPODRONE DJI AIR 2S PPK UPGRADE KIT
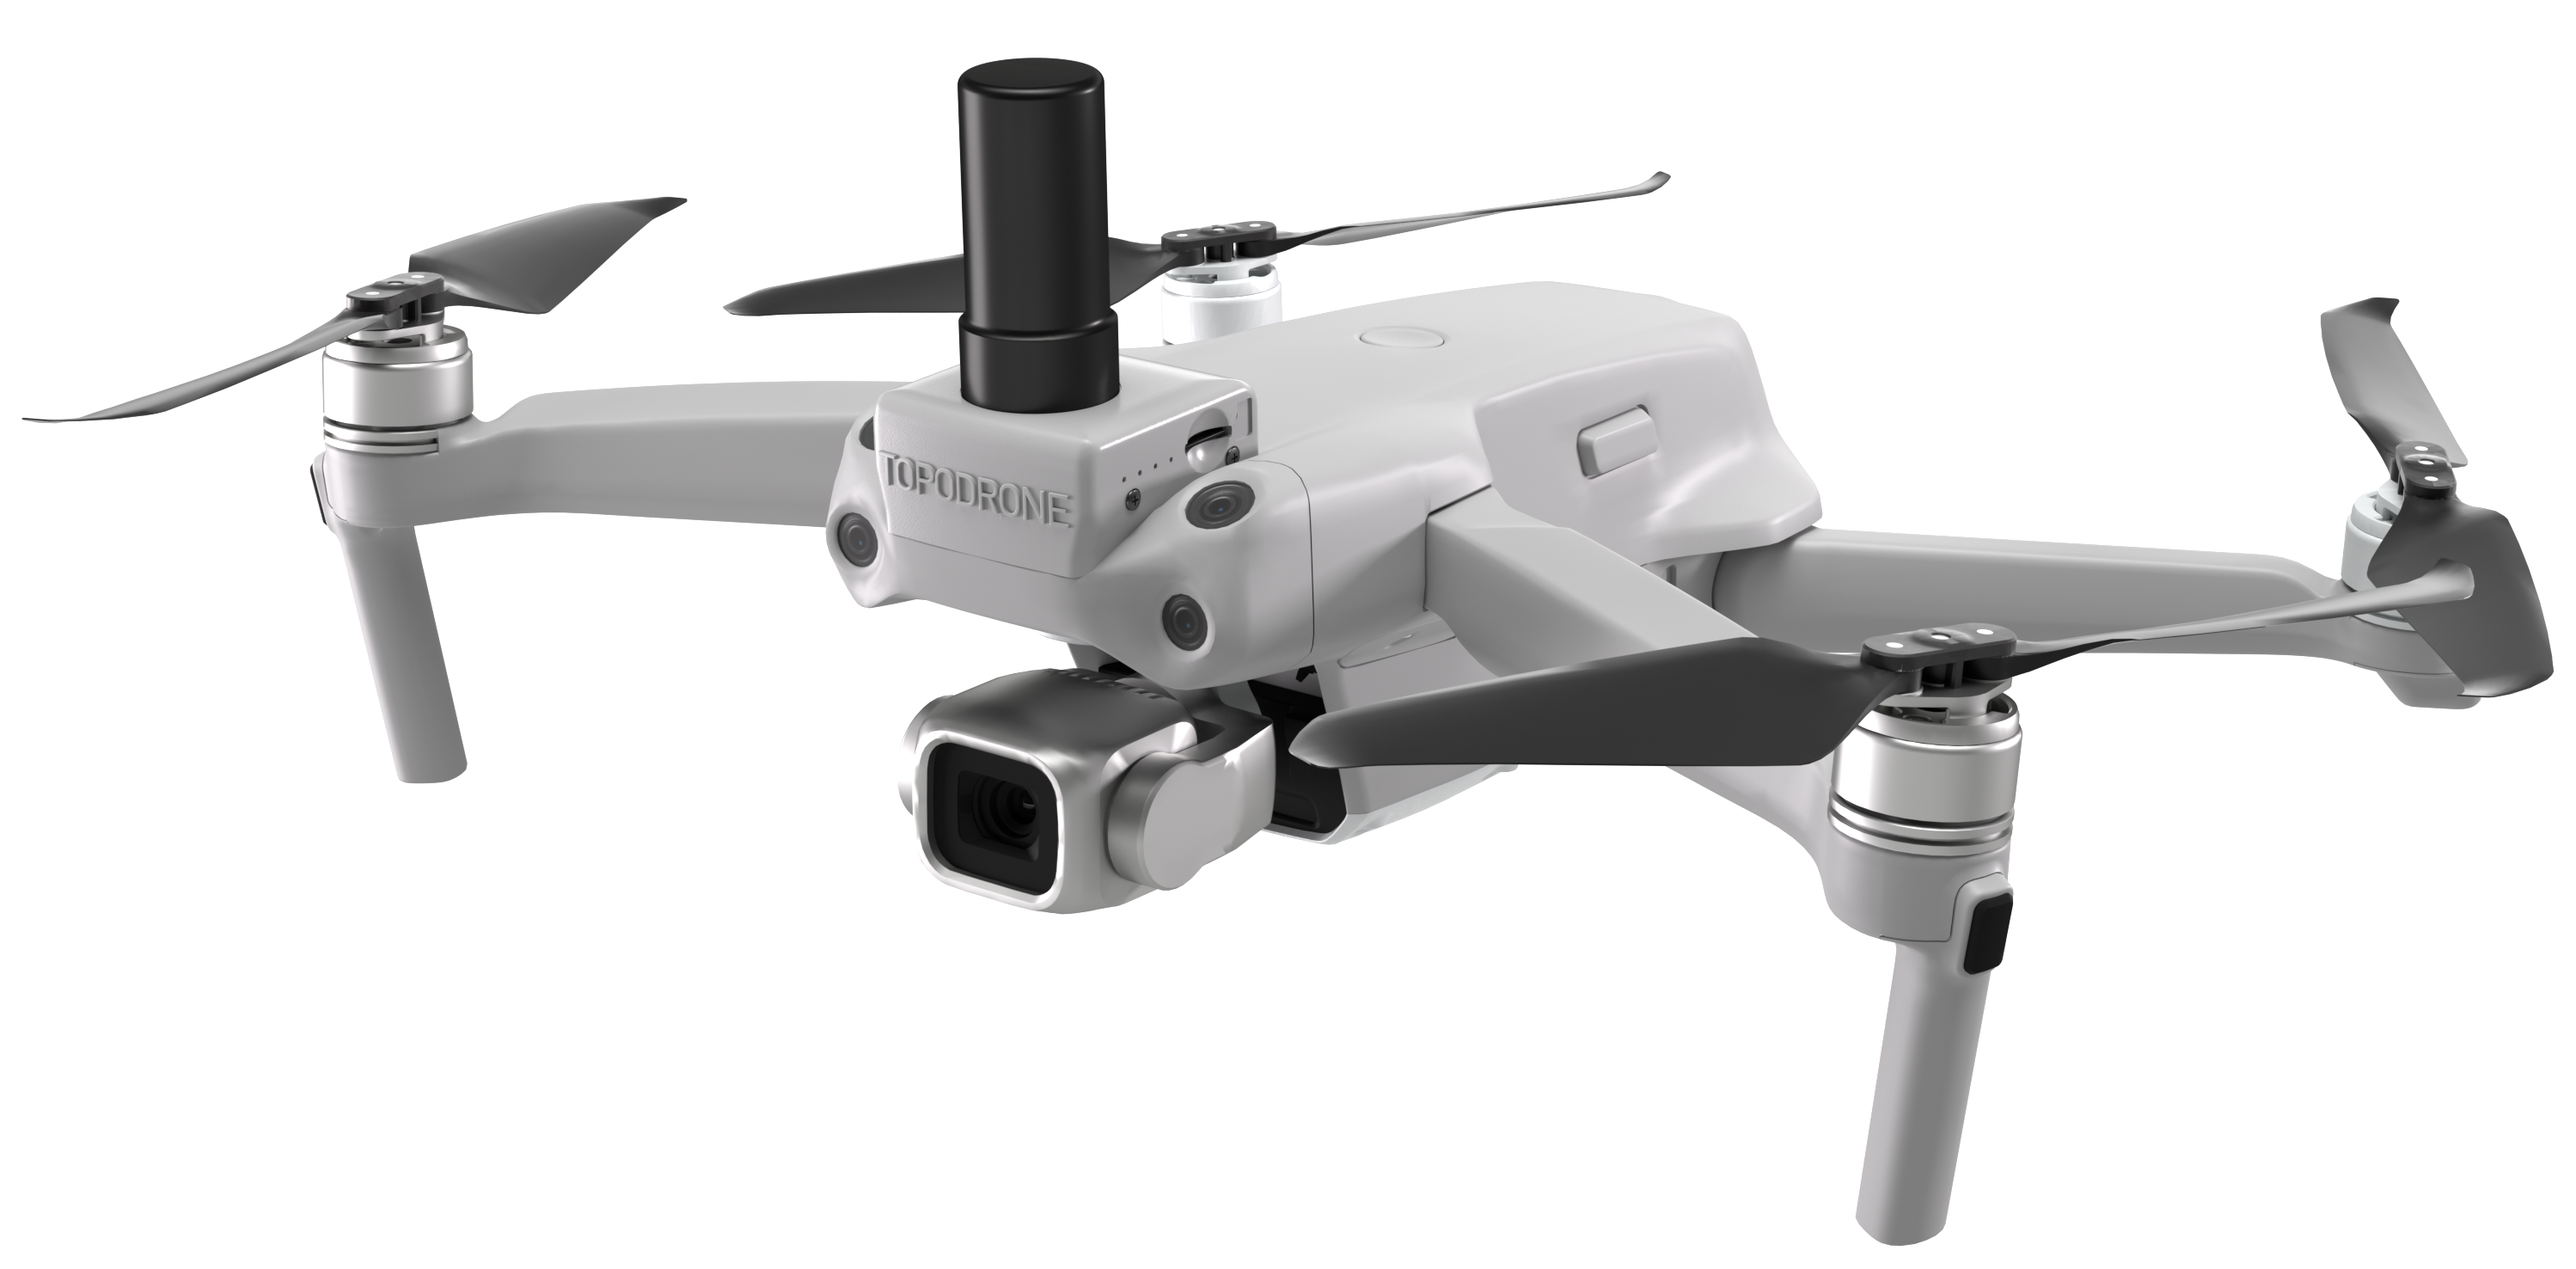
General description TOPODRONE DJI AIR 2S PPK
TOPODRONE DJI AIR 2S PPK is a complex consisting of a DJI Air 2S drone and a compact GNSS receiver. TOPODRONE DJI AIR 2S PPK allows you to perform high-precision aerial photography for geodesy, cartography, surveying, volume calculation and other tasks. With TOPODRONE DJI AIR 2S PPK you can perform high-precision aerial photography in manual, semi-automatic and automatic modes (point-to-point flight). Using Post Processing Kinematic (PPK) technology, it is possible to obtain highly accurate photo centers by post-processing method using data from the base station without connecting to it directly during flight. If all recommendations are followed, the accuracy of the final TOPODRONE DJI AIR 2S PPK materials after photogrammetric post-processing is 2-3 cm.
 |
 |
Topodrone DJI Air 2S PPK
Product parameters
TOPODRONE DJI AIR 2S PPK Upgrade KIT is an upgrade module installed on the DJI Air 2S drone, which is connected to the camera shutter and allows you to record raw GNSS measurements along with timestamps of the shutter triggering moments. This module consists of the following main parts:
Upgrade TOPODRONE DJI Air 2S PPK Upgrade KIT
-
-
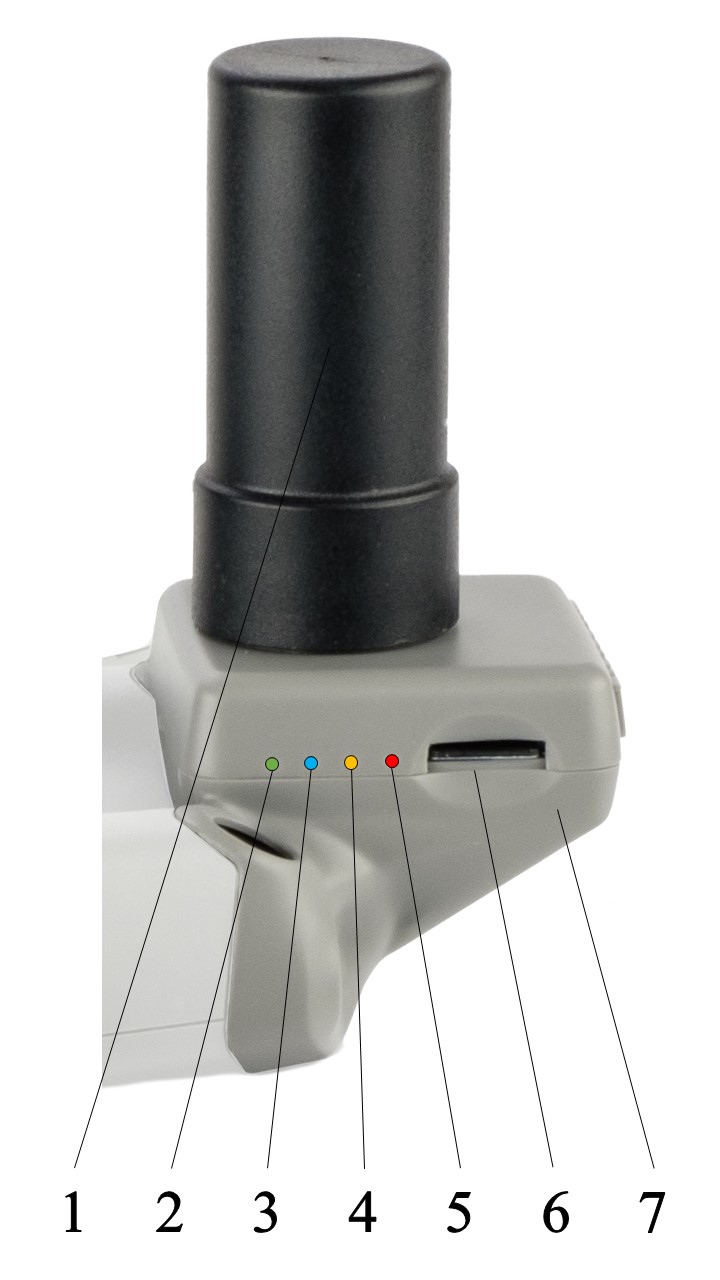
- Helix HX-CH6601A external GNSS antenna. This antenna is installed on the upgrade board to receive satellite signals from various navigation satellite systems. To perform aerial photography with high accuracy, this antenna must be securely fixed. The drone can be used without an antenna, but GNSS data will not be recorded when updating.
- The green light indicates that the DJI Air 2S drone is powered on. This LED is solid green to indicate that the upgrade is powered on. If the green LED on an installed upgrade does not light up when power is turned on, it means that the upgrade is not installed correctly or is defective.
- The blue light indicates the GNSS signal quality level of the external GNSS antenna. It may light up constantly, blink with different frequency, or not light up at all. A quality GNSS signal corresponds to a constant blue LED signal. It is switched on only after initialization.
Status Description
Not lit
PDOP>10 Slowly flashing
3<PDOP<10 Fast flashing
2<PDOP<3 Continuously lit
PDOP<2 - The Orange LED indicates the status of recording to the memory card. The LED blinks rapidly during recording. Each blinking corresponds to the recording of 4 Kb of data. The blinking frequency is proportional to the amount of data being written to the memory card. It is switched on only after initialization.
- The Red LED indicates the presence of errors in the system. The most common error is the inability to write data to the memory card, if the card is missing, full or damaged. In this case all other LEDs light up together with the red one. If this error occurs, check the memory card and clean the connector. If replacing, reconnecting or formatting the Micro-SD card in FAT32 format does not solve the problem, please contact technical support.
- Micro-SD memory card slot. Card capacities from 4 GB to 64 GB are suitable. It is recommended to use Class 10 UHS-U1 speed class. A 16 GB memory card of the appropriate speed class and format is always supplied with the upgrade. The file structure of the memory card must be formatted in FAT32 format with a standard cluster size.
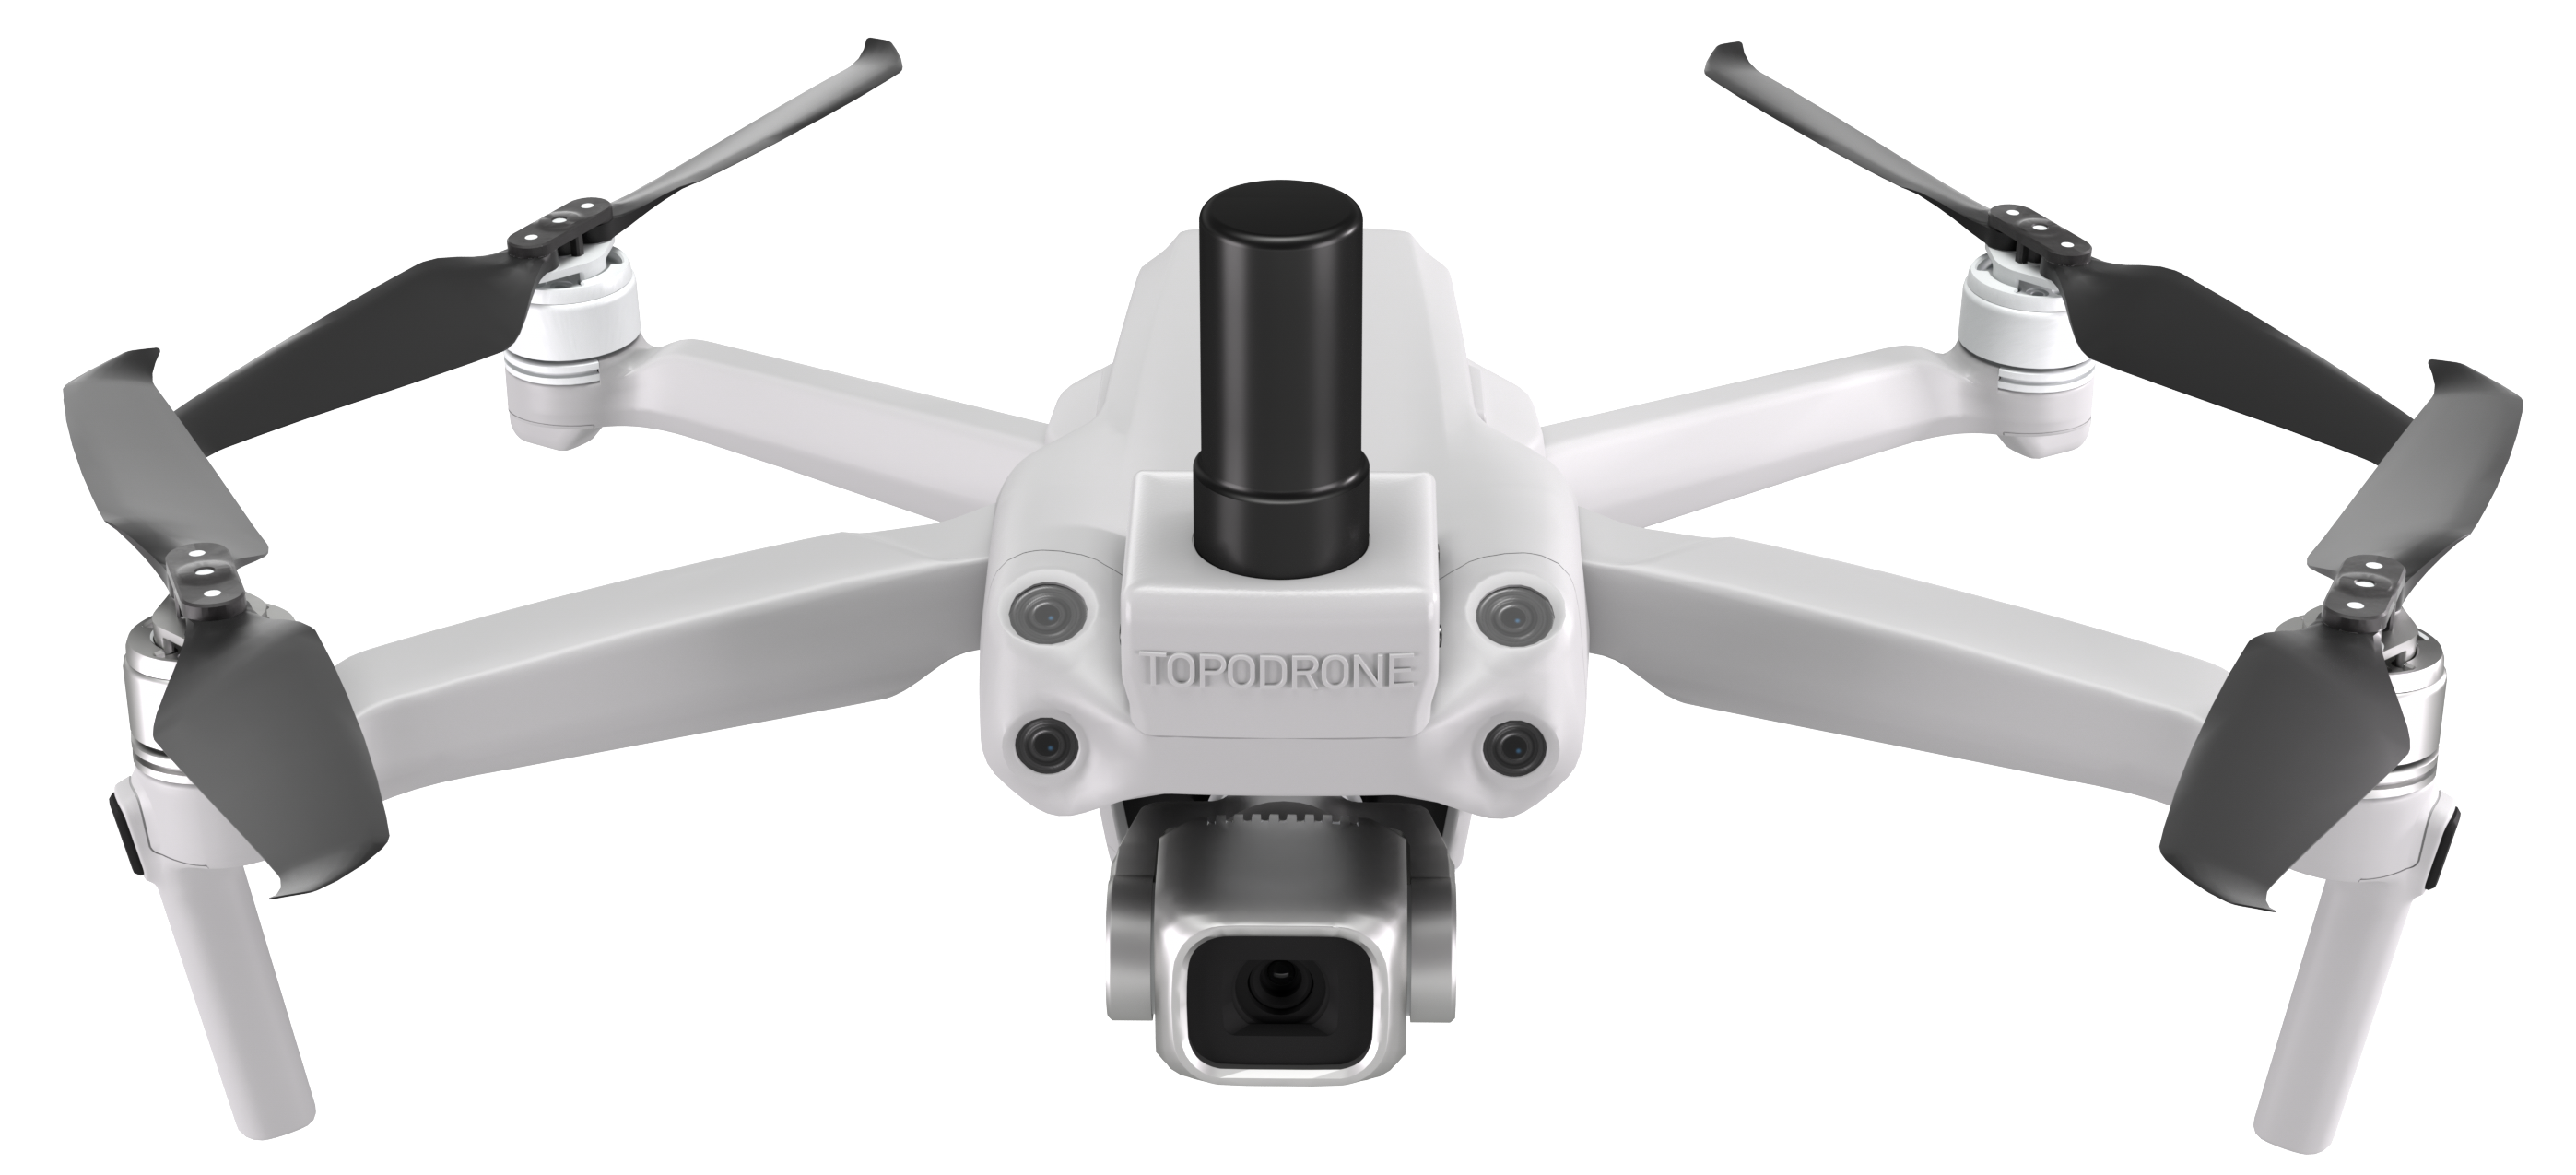
- TOPODRONE DJI AIR 2S PPK Upgrade is installed in the front of the DJI Air 2S drone, attached to the drone with two screws and plastic clips. All parts of the upgrade are securely attached to the drone body and are the same color. The TOPODRONE DJI AIR 2S PPK upgrade body has 4 round holes to allow the front sensors of the visual positioning system to work. The compact size of the upgrade does not cover the working angles of the front visual positioning system, as well as not to cover the GNSS navigation antenna of the drone itself
- Helix HX-CH6601A external GNSS antenna. This antenna is installed on the upgrade board to receive satellite signals from various navigation satellite systems. To perform aerial photography with high accuracy, this antenna must be securely fixed. The drone can be used without an antenna, but GNSS data will not be recorded when updating.
-
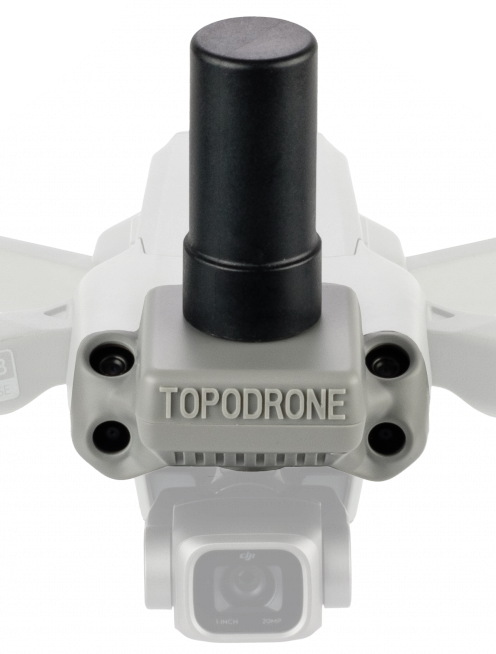
TOPODRONE Air 2S PPK Upgrade case, front view
TOPODRONE AIR 2S Features
Upgrade TOPODRONE DJI AIR 2S PPK
| Цeight with GNSS antenna (g) | 68 |
| Raw measurement recording frequency, Hz | 10 |
| Number of GNSS Receiver Channels | 184 |
| Supported memory card formats | microSD, microSDHC, microSDXC |
| Maximum Memory Supported, Gb | 64 |
| Memory card file system | FAT32 |
| Min. number of visible satellites to pass initialisation | 8 |
| Dimensions (WxDxH) (mm): | 73 x 44 x 112 |
| Operating temperature range: | от -20°C до +60°C |
| Storage temperature range | от -40°C до +60°C |
| Operating humidity range: | от 20% до 95% |
| Country of manufacture: | Russia |
| Max. Base station installation range, km | 25 |
| Recommended Base Station Installation Range, km | 10 |
| Supported GNSS systems and frequencies: | GPS: L1C/A, L2C; GLONASS: L1OF, L2OF; GALILEO: E1B/C, E5b; BEIDOU: B1I, B2I |
Drone TOPODRONE DJI AIR 2S PPK
| Weight with propellers, g | 663 |
| Max. Take-off speed, m/s | 6 (Sport / Normal Mode) |
| Max. Descent Rate, m/s | 6 (Sport / Normal Mode) |
| Max. horizontal speed*, m/s | 19 (Sport) 15 (Normal) |
| Max. Flight altitude, m | 5000 |
| Max. Flight time* | 25 |
| Max. hovering time, min* | 24 |
| Recommended mission time, min* | 20 |
| Maximum Track Length, m* | 12000 |
| Max. ALS wind strength (m/s): | 10 |
| Operating temperature range | 0...40 °C |
| Minimum Practice Temperature** | -20 °C |
| Satellite positioning systems | GPS + GALILEO + GLONASS |
| Operating Frequency Range, GHz | 2,400–2,4835 |
| Connections | USB-C, MicroSD |
| Country of origin: | China |
Remote control DJI RC-N1
|
Power supply slot |
USB-C |
| Built-in battery | Li-ion |
| Maximum Operating Time*, h | 4 |
| Operating Temperature Range | 0...40 °C |
| Charging temperature range | 5...40 °C |
| Max. Signal transmission range*, km | 5 |
| Recommended operating range *, km | 1 |
| Basic drone control software | DJI Fly |
| Types of supported operating systems | Android, iOS |
Camera DJI AIR 2S PPK
|
Model |
FC3411 |
| Format, Resolution and main sensor | 1 inch, CMOS, 20 mp |
| The shutter type of the main camera | Electronic |
| The focal length of the camera, mm | 22 |
|
Supported memory card format |
Micro-SD exFAT до 256 GB |
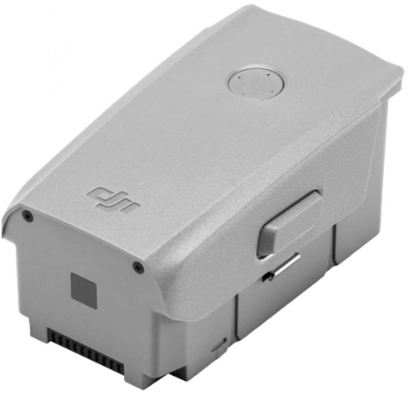
Accumulator DJI AIR 2S PPK
| Capacity (mAh) | 3500 |
| Rated Voltage (V) | 11,55 |
| Battery Type | Li-Po |
| Weight (g) | 198 |
| Charging temperature range | 5 °C…40 °C |
| Charge time from 10% to 100% (min) | 110 |
* Data obtained under ideal conditions in the Switzerland during laboratory tests at an air temperature of +20°C in calm weather. Actual performance may vary depending on operating conditions.
** Data obtained when using a heated battery and aircraft to a temperature of +20°C
TOPODRONE PPK Upgrade operation guide
TOPODRONE PPK upgrade is a compact GNSS receiver based on the uBlox chip, integrated with the camera shutter. TOPODRONE PPK is installed in front of the drone, inside a plastic case, it has four holes for the front visual positioning system cameras.
The TOPODRONE PPK upgrade writes data to a Micro-SD memory card formatted in FAT32 format. When the receiver is turned on and initialized, the upgrade creates a folder called YY-MM-DD (year-month-day) with a *.ubx file inside, called HH-MM-SS (hours-minutes-seconds). The time is recorded in UTC.
The *.ubx file logs raw GNSS measurement data from an external GNSS antenna, as well as high-precision shutter triggers of the drone camera, also called timestamps or events. One timestamp is assigned to each photo from the moment of initialization. Based on the *.ubx file, as well as the source photos and the base station file, it is possible to geotag the received images using the PC method using TOPODRONE Post Processing software. By processing the source photos, the *.usb file and the base station file, using the PPK method, the TOPODRONE Post Processing program can perform geotagging of the received images.
Initialization of the TOPODRONE PPK upgrade and the start of recording the *.ubx file is performed when the GNSS antenna receives a signal within a few seconds, while the drone is in a static state. After initialization, the *.ubx file will be written until the aircraft is powered off.
After initialization, the *.ubx file will be written until the aircraft is powered off. The *.ubx file will continue to be written even if the GNSS signal is lost. The TOPODRONE PPK upgrade cannot be initialized after the drone has already taken off.
After the drone is powered off, the *.ubx file is automatically stopped being written. With normal operation, a stable satellite signal and a runtime of 20-30 minutes, the size of the *.ubx file should be 20-40 MB.
The indicator of successful initialization is a flashing orange and a constant light - blue LEDs. If the blue LED is flashing, it is recommended to put the drone in a more open space until the blue LED is a constant light.
It is strongly recommended to check the initialization status every time before and after each drone flight. Data recording may stop due to poor GNSS antenna contact, satellite signal interference, free memory overflow, or memory card failure. If there is no *.ubx file or timestamps for photos, their further post-processing and obtaining high-precision coordinates are impossible.
Description of the TOPODRONE DJI AIR 2S PPK
Preliminary preparation and verification of the drone
Before you start using the TOPODRONE DJI Air 2S PPK, it is strongly recommended to read the instructions for the DJI Air 2S drone. It is available on the official website at the link. This instruction and any forms of training do not cancel the recommendations described in the official instructions from the manufacturer.
In order to properly prepare the drone, it is necessary to strictly follow the rules to ensure flight safety and obtain the best quality and accuracy of the final materials. Safety is the main priority in operation.
Checking the integrity of the equipment:
- Body and beams: it is necessary to check for damage, clean from dirt and dust. Check and eliminate looseness on folding mechanisms.
- Propellers: In case of the slightest damage, it is necessary to replace the propellers with new ones. Flying on damaged propellers is strictly prohibited, as this can lead to strong vibrations and a drone crash. Use only original DJI propellers. In case the propellers are not removed from the drone when stored in the case, it is recommended to remove and check the blade mounted realize every 5 flights. Folded propellers of the front beams, in the stowed position of the drone, can press the battery button in a certain position. It is recommended to remove the propellers of the front beams when transporting in a case bag.
- Motors: remove the propellers, and turn them with a sharp movement of your fingers. The motors should turn with the same force. Any extraneous noise indicates a malfunction of the engine and requires contacting the Service Center. Try vacuuming the motors on maximum mode. It is not recommended to use a can to blow out photographic equipment.
- Gimbal with camera: make sure that nothing interferes with the gimbal motors when starting, make sure that the camera lens is clean: free of dust and fingerprints.. If necessary, wipe with a special cloth or soft paper towel.
- Batteries: Check the batteries for damage and swelling before use, and the contact terminals must be intact and clean. Batteries must be fully charged before flying!
- Memory Card: Check if there is enough free space to take aerial photos on the drone's memory card and upgrade. The format of the drone's memory card is exFAT, the format of the upgrade memory card is FAT32. It is recommended to have multiple memory cards.
- Obstacle Avoidance System: check the cleanliness and integrity of the eight lenses of the Visual Positioning System stereo cameras. In sunny weather, the front sensors can be illuminated from the sun directly or due to reflection from water surfaces. It is recommended to turn off the system when flying at a safe altitude relative to the terrain (AGL). It has been experimentally established that on the DJI Air2S drone, the enabled visual positioning sensors are often illuminated by the sun, which leads to a halt in the flight at points.
- Remote Control: Check the remote's battery level, the presence of removable remote control sticks, the integrity of foldable antennas, and whether there is sufficient free space in the remote control's internal memory, such as screen recording.
- Power supply and hub: Check the integrity and cleanliness of cables and terminals. It is recommended to remove the protective film from the power supply to ensure better cooling.
Charging. Charge all of your drone's batteries, remote controller, and mobile device to 100%. Never use less than 90% charged DJI Intelligent Battery batteries, especially if the process of self-discharge has already begun. This can lead to premature termination of the flight mission due to the occurrence of the "critical battery voltage" error.
Locality. Before starting flights, study the territory where flights are planned in geoservices according to your location. Flights should not be conducted in no-fly zones: near airports, prisons, stadiums. Such objects as military bases, government agencies, objects of strategic importance (thermal power plants, hydroelectric power plants, nuclear power plants,, etc.) and a number of others belong to the category of objects near which flights should also not be conducted.. Power lines located near the flight area can cause electromagnetic interference when flying nearby.
Setting up the drone.
Install the original DJI Fly app. Set up the drone. In general, this setting is performed once, but some parameters will need to be changed periodically. To set up the TOPODRONE DJI Air 2S PPK, turn on the drone, remote control, connect your mobile device, launch the DJI Fly App software and select the following options.
Safety.
- Obstacle avoidance action – "Brake" or "Off" (if the front sensors begin to light up from the sun and the flight is constantly interrupted). This parameter changes depending on the flight conditions.
- The height of the automatic return home is 100 meters or higher. The height of the return home should be at least 20-30 meters higher than any obstacles located in the flight area, when choosing an altitude, the terrain difference should be taken into account. In the future, this parameter can be set when planning the route.
- The maximum height is "500 meters". If the flight altitude along the route is set above this value during planning, the flight will not be possible. This parameter is set once.
- The maximum distance is "Unlimited". The use of distance limitation can cause difficulties when performing linear missions. This parameter is set once.
Advanced security settings.
- Loss of signal is a "Return home". Using other options may result in the loss of the drone. This parameter is set once.
- An emergency stop of the propellers is an "Emergency". This option allows you to turn off the drone's motors in flight. "Emergency" activates this feature only in the event of an impact that is not typical for a real flight. This parameter is set once.
- AirSence – "Disabled". This option consumes energy and is not needed to perform aerial photography tasks in third-party point-to-point flight software. This parameter is set once.
Management.
- The unit of measurement is meters. This parameter is set once.
- Target scanning - "Off". This parameter is set once.
- Stabilizer mode is "Follow Mode". This parameter is set once.
- Stabilizer centering – in the event that the camera loses horizon, roll stabilization must be performed. This function is used when necessary.
- The joystick mode is "Mode 2". We don't recommend using a different joystick mode because it can cause you to lose your drone! This parameter is selected by default and does not need to be changed.
- Calibration of the remote control – it is necessary to perform only if the remote control with a normally charged battery beeps when turned on. This beep indicates the need to calibrate the sticks and tilt wheel of the remote control camera. The function is used when necessary.
Camera.
- The format is JPEG. Using the RAW format will increase the amount of data by 3-4 times, and increase the time for photogrammetric postprocessing by 1.5-2 times. The accuracy of the final aerial photography materials does not increase. This parameter is set once.
- The aspect ratio is 3:2. Using the 16:9 aspect ratio cuts off part of the photo, so the photos lose resolution. This parameter is set once.
- White balance. It is recommended to set it to "Auto" or during the flight, first to "Auto", then to "Manual" in order to use a fixed value under constant lighting conditions.
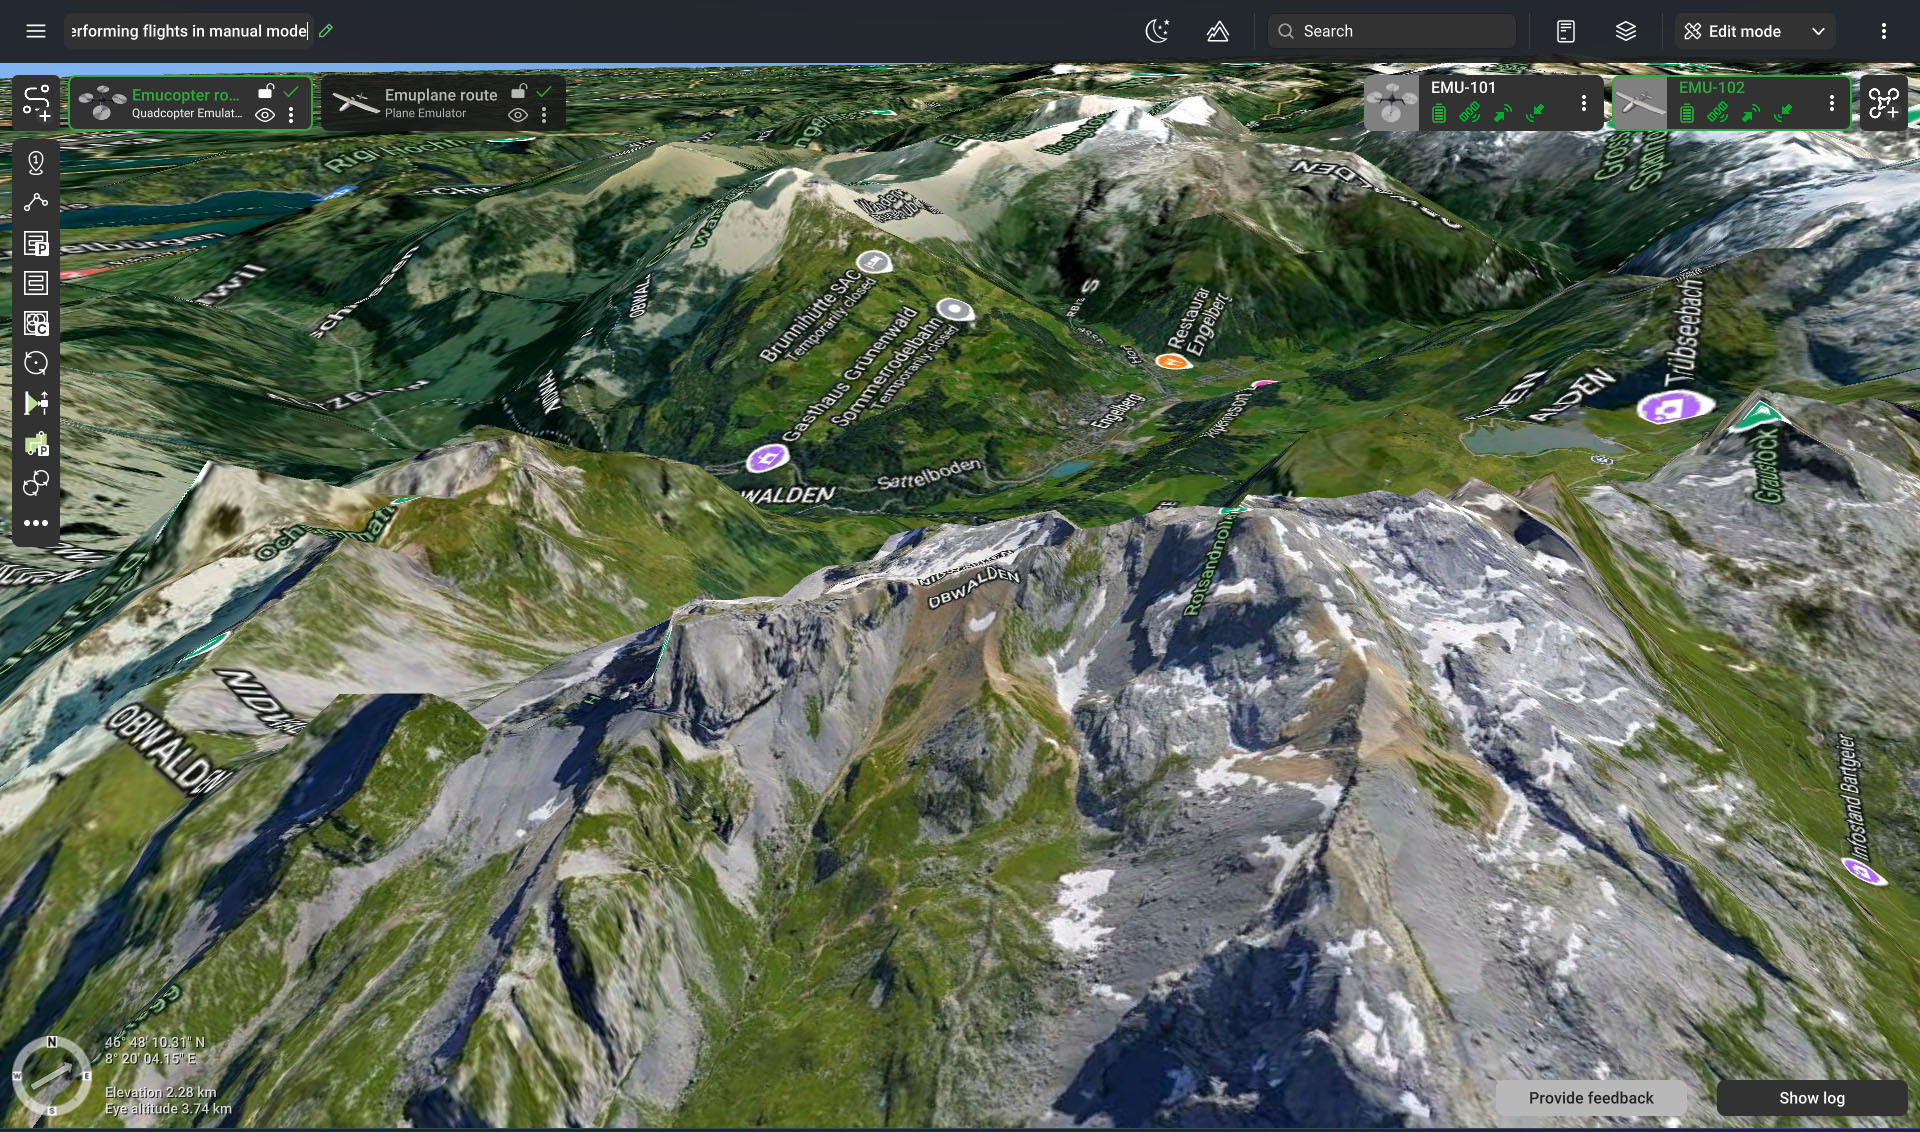
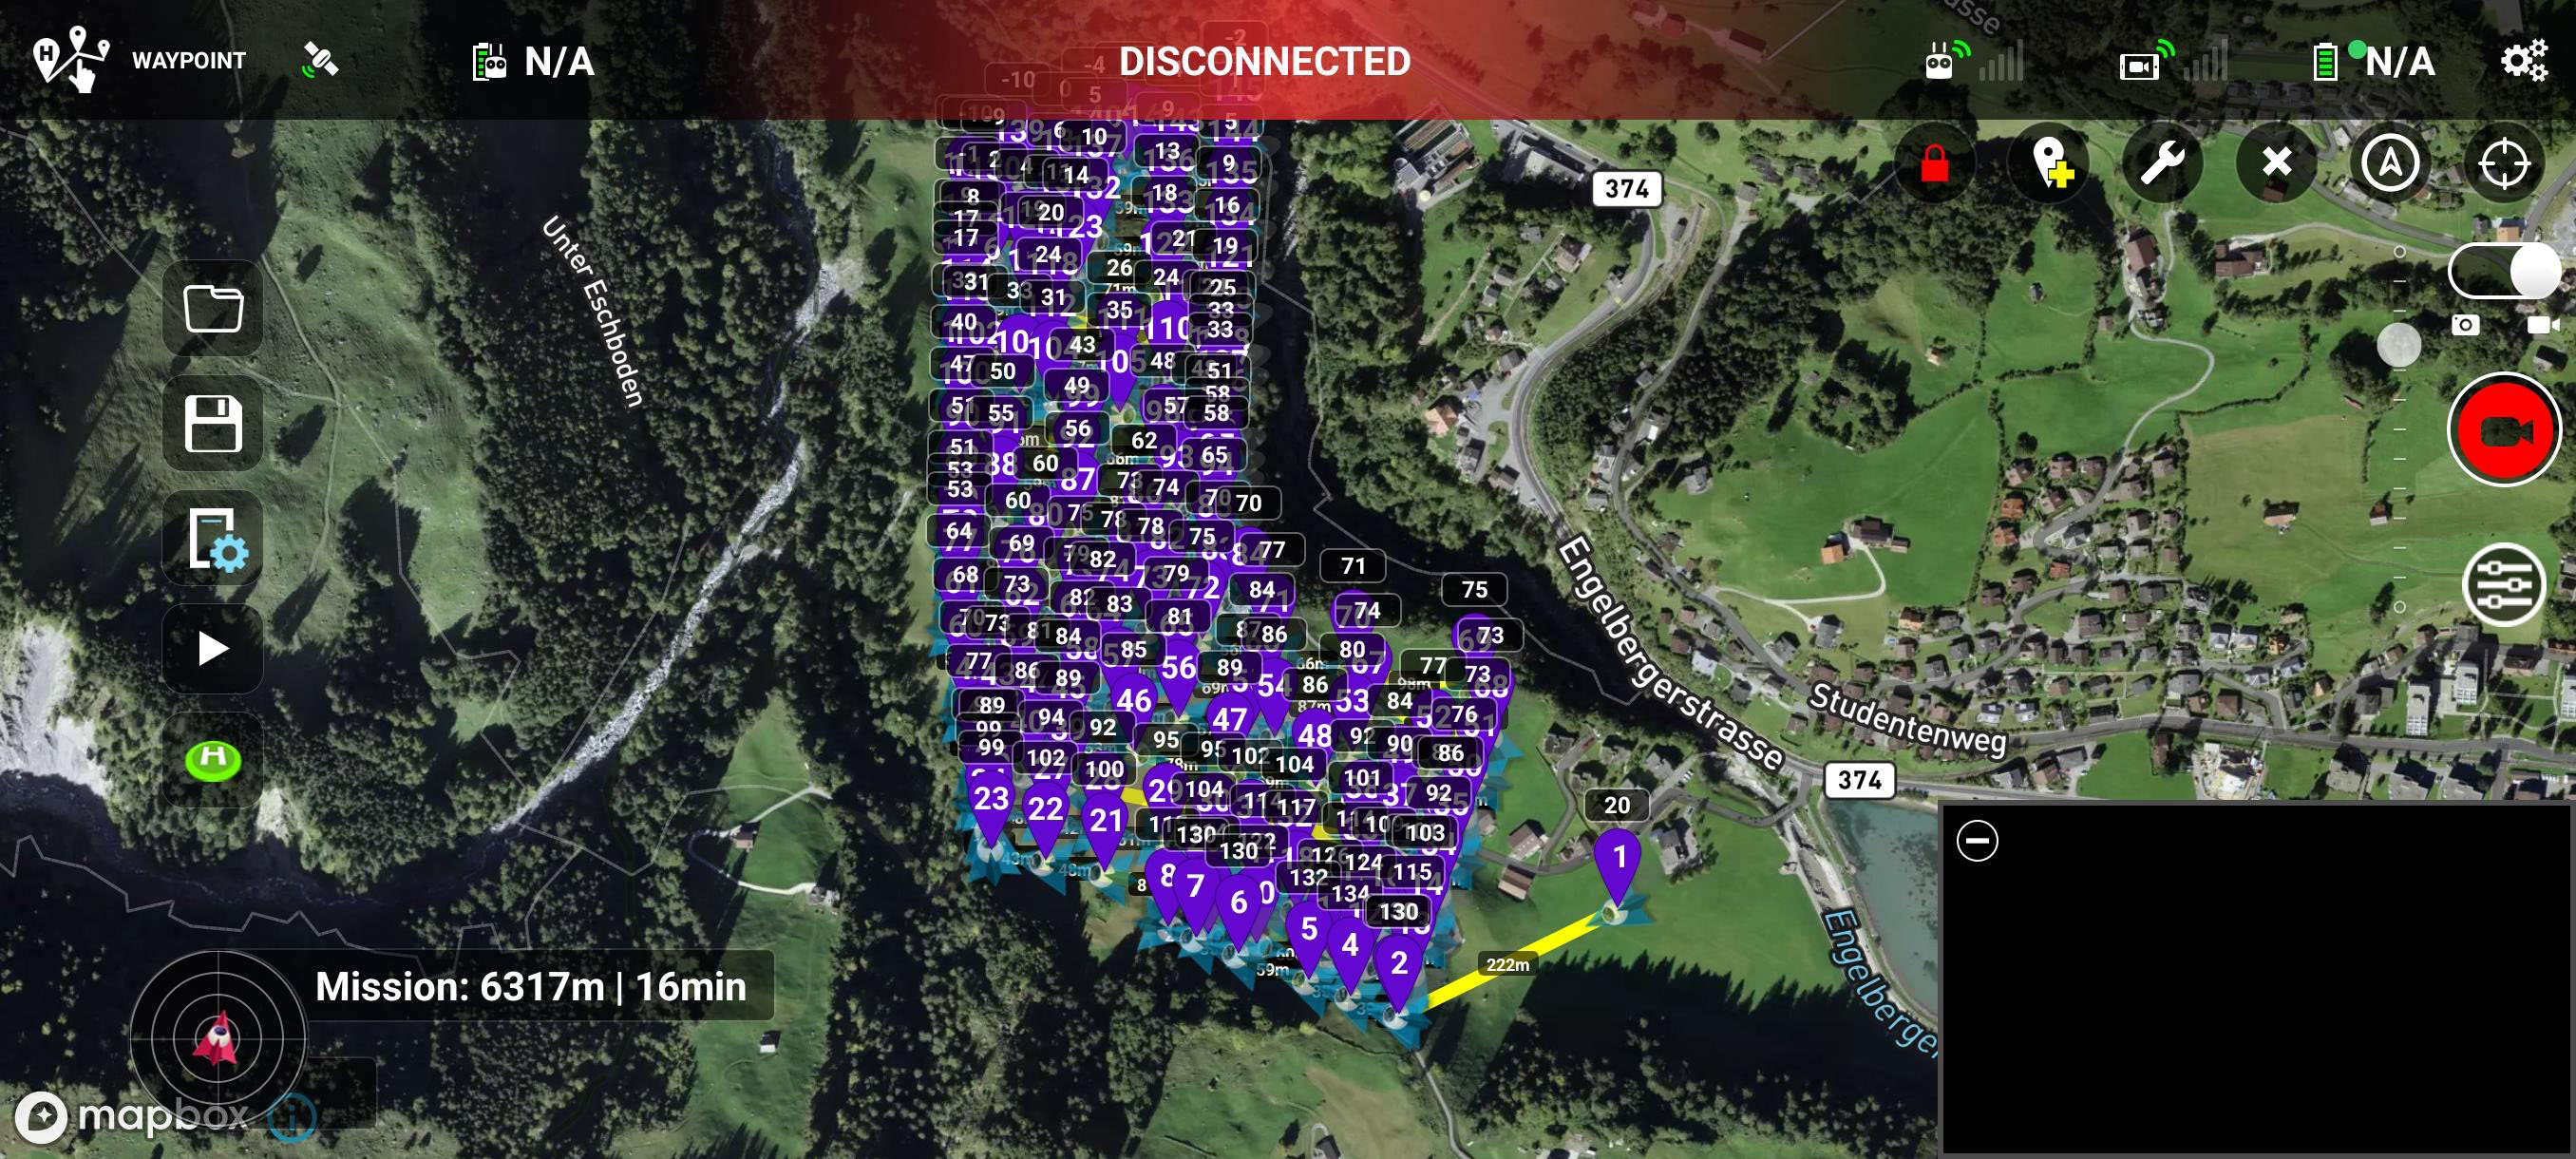
Route Planning for TOPODRONE DJI Air 2S PPK
Initially, the DJI Air 2S PPK drone does not have the function of flying along the route in automatic mode. However, with the help of third-party software, flight along the route for the AFS is possible using the technology of "virtual sticks". With this technology, during the flight in automatic mode, it is necessary to constantly maintain radio communication between the control panel and the drone. However, with the help of third-party software, flight along the route for aerial photography is possible using the technology of "virtual sticks". With this technology, during the flight in automatic mode, it is necessary to constantly maintain radio communication between the control panel and the drone.
For planning and executing routes for aerial photography, including terrain bending, the most convenient solution is to use UgCS Pro software for route planning and Litchi for DJI software for their direct execution.
After passing all the above stages, it is possible to fly along routes for aerial photography, including with terrain circumference in the absence of an Internet connection at the facility. However, an internet connection is required to make changes to the route.
| 1. DJI FLY software* | 2. UgCS Pro software | 3. flylitchi.com/hub | 4. Litchi for DJI** software |
|
|
|
|
Route Planning for TOPODRONE DJI Air 2S PPK in UgCS Pro Software
- Run UgCS Pro software. To plan routes for aerial photography with terrain circumference, connect an Internet connection.
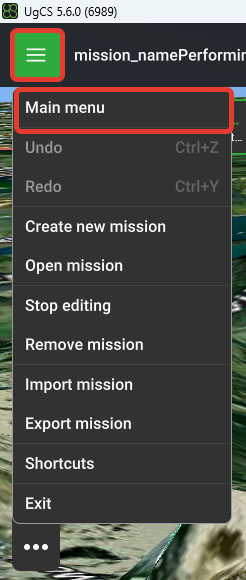
- Click on the icon with three horizontal stripes at the top left. Select the "Main Menu".
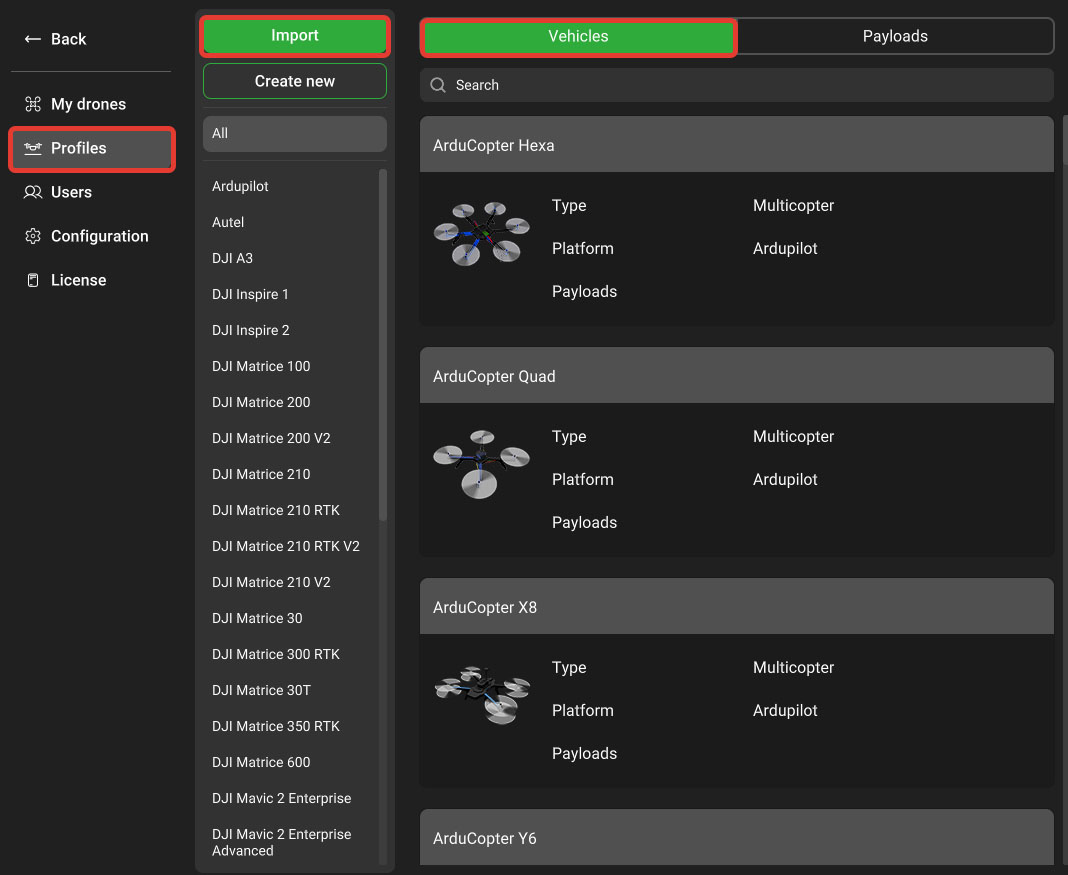
- Go to "Profiles/Vehicles / Import and choose a.profile DJI Air 2S
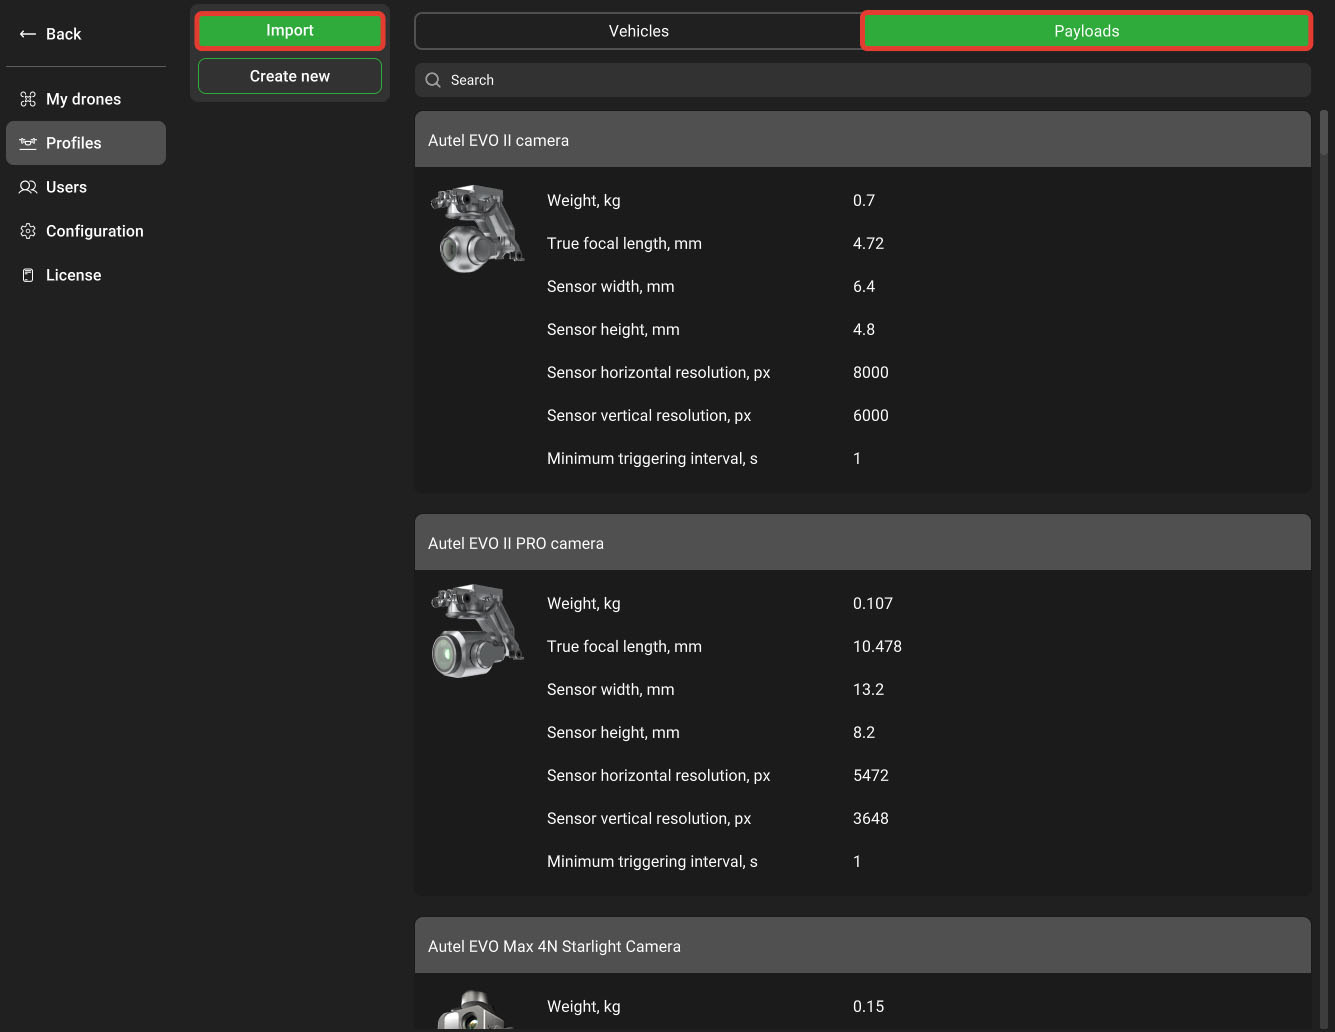
- Go to Payloads/Import and select the camera profile DJI Air 2S camera
- In the upper-left corner, click on the name of the Mission and enter a name. After that click Create new route and set the route name and press the key Next.
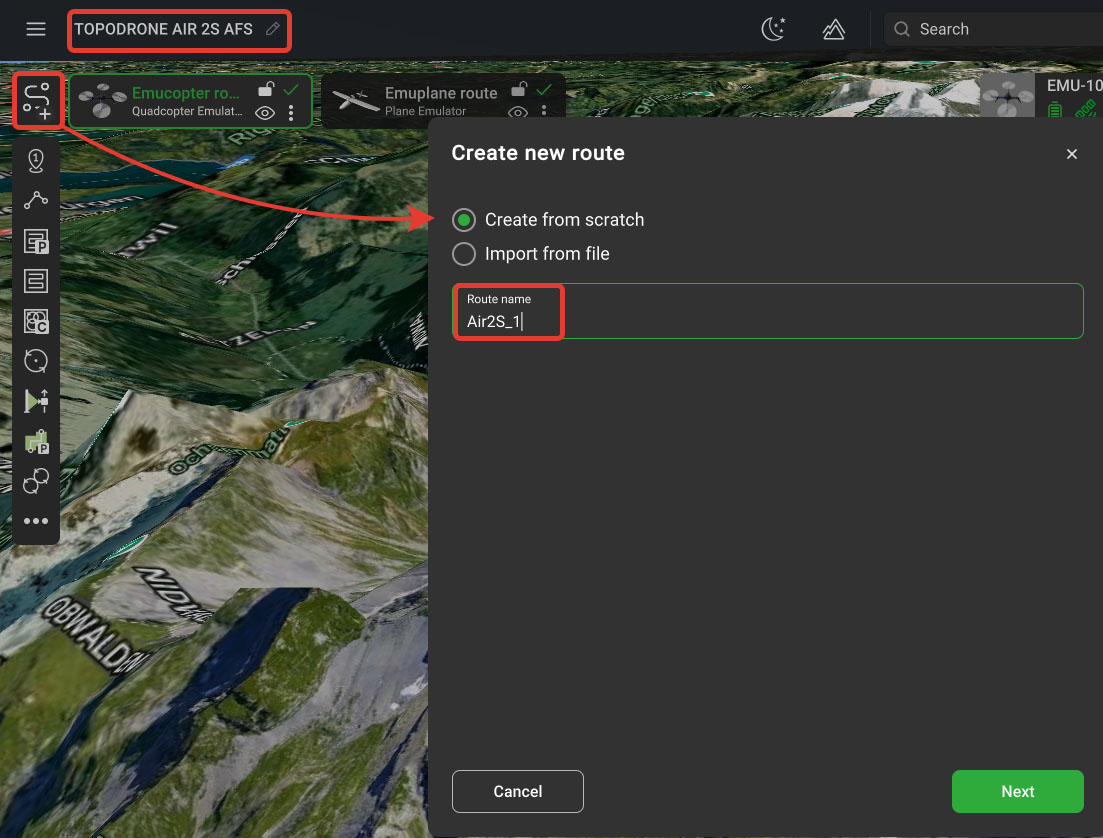
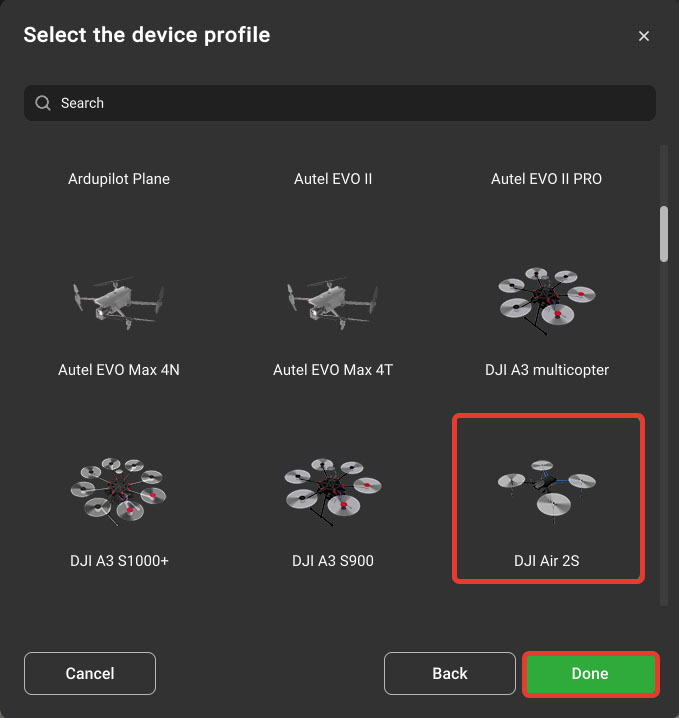
- Select the profile "DJI Air 2S". After that, click "Next".
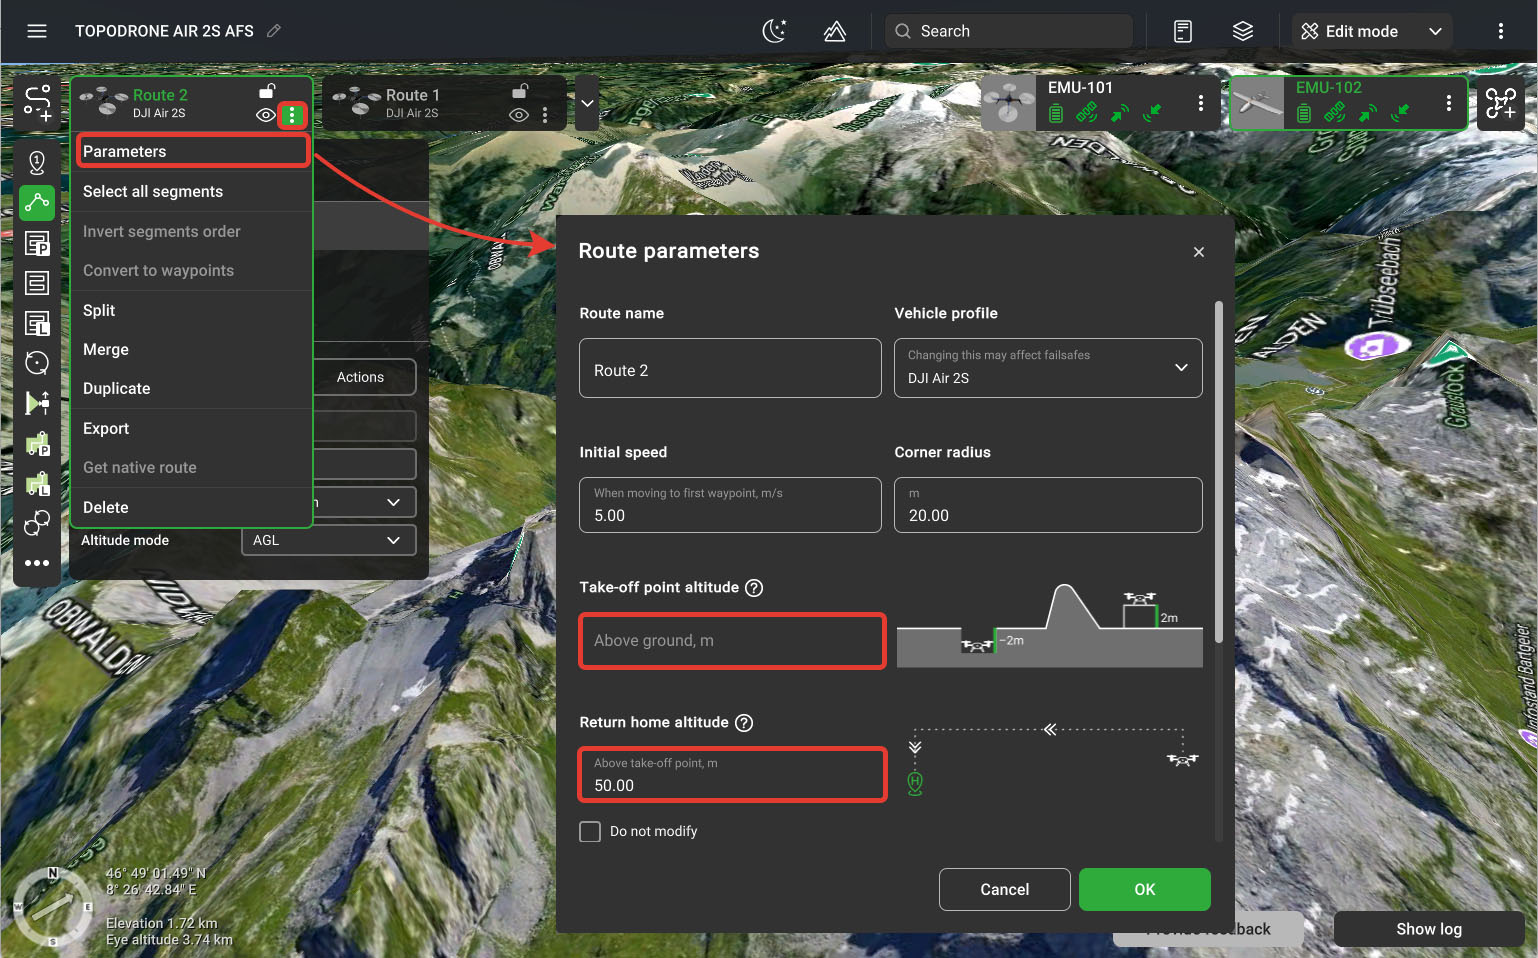
- Leave the "Take-off altitude" field empty! Set the height of the return home. It must be above any obstacles and terrain in the place of flight. Click OK.
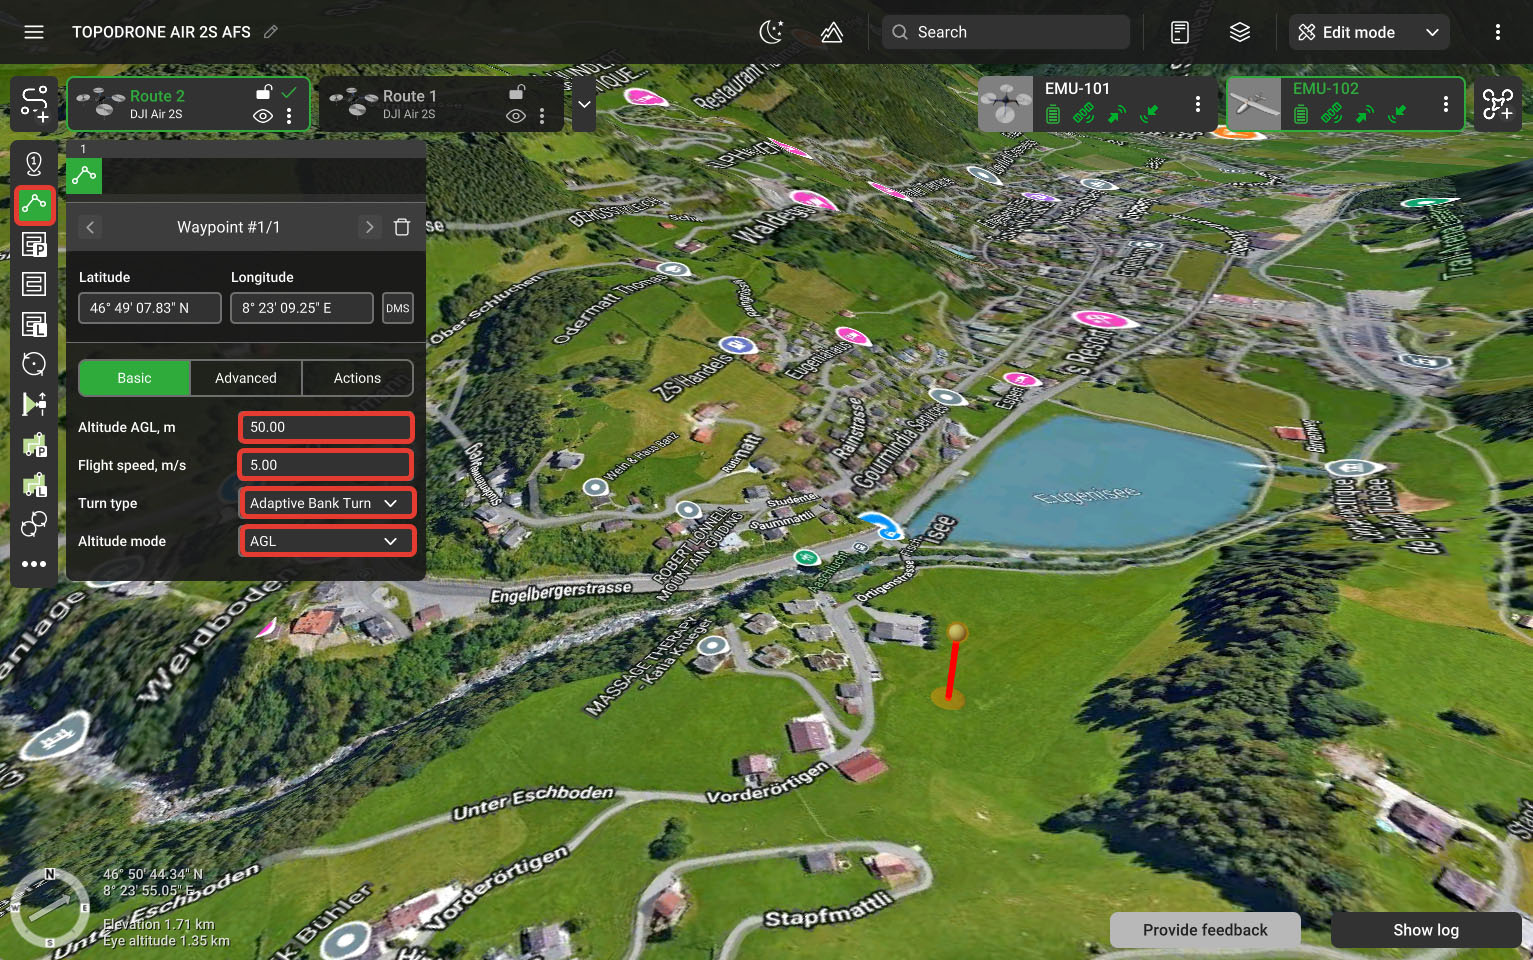
- Use the map to determine the approximate take-off location. Select the Point tool and double-click on the map to set the planned takeoff location. This point will be the starting point of the route. After launching from the any other location, drone will rise to the height of this point and fly to it in a straight trajectory. If necessary, change the altitude and speed. If the take-off location is unknown, skip this step.
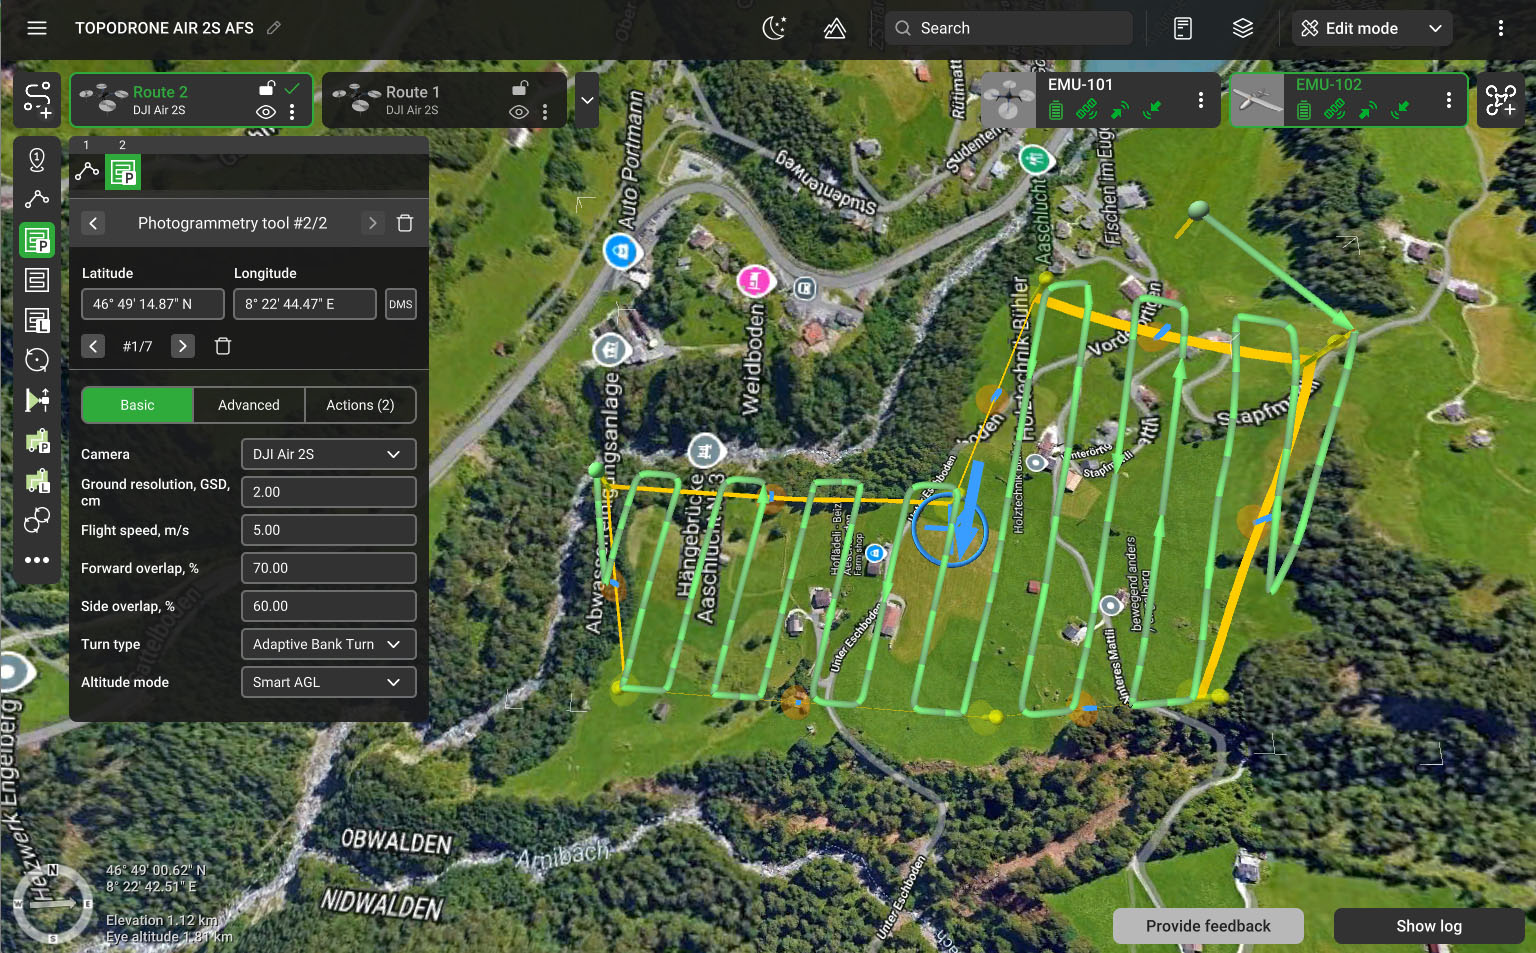
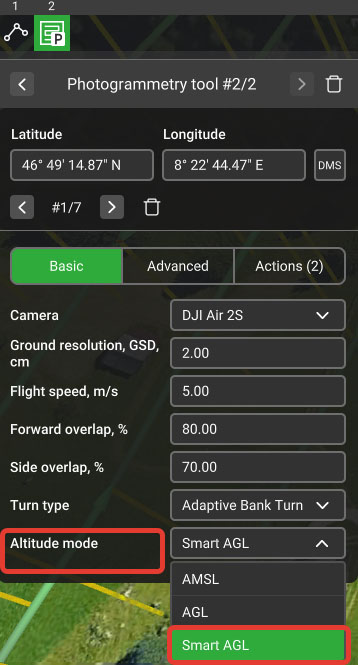
- Select the "Photogrammetry Tool" and double-click the left mouse button on the map to set the boundaries of the route territory. It is recommended to form rectangular routes. However, routes can be a closed polyline of any shape if needed. To close the boundary of the area, hover over the first point and right-click. After that, the boundary of the route area closes. When building a route for the first time, select "Camera" - DJI Air2S. Make sure that the rotation type for the photogrammetry tool is also set to "AGL" or "Advanced AGL". It is possible to set the flight speed in the UgCS software, but the flight speed parameter along the route will need to be reinstalled in the Litchi software later. Therefore, you can set the speed only to estimate the duration of the flight mission.
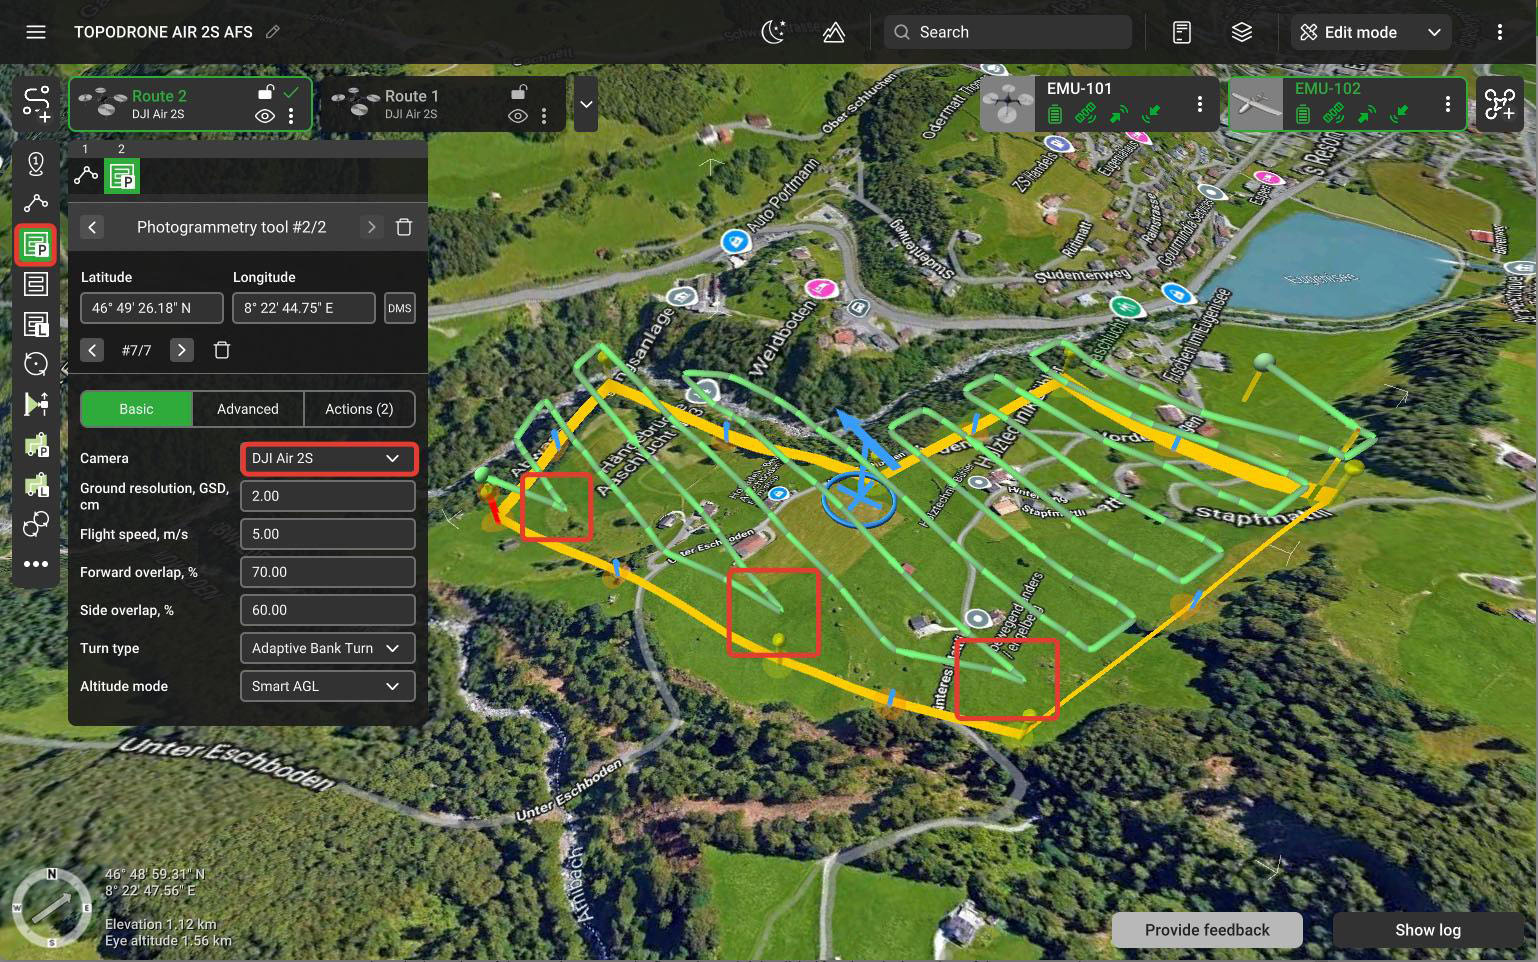
- Change the trajectories direction using the arrow in the middle. In large square routes number missions use the constant direction angle value. Round up to the nearest whole and set it manually in Photogrammetry Tool settings.

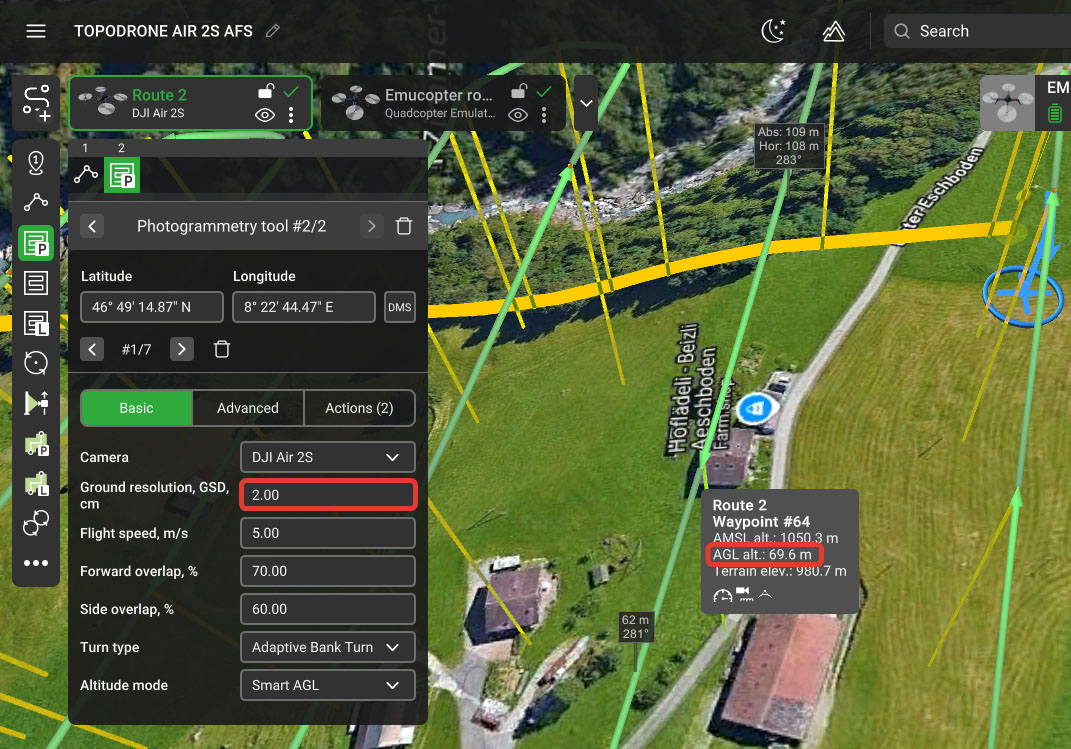
- Set GSD value, according to the required spatial resolution of images and flight altitude. In UgCS software, the flight altitude is defined by the GSD parameter. For DJI Air 2S drone, the flight height is calculated by the formula H = GSD * 34.75. For example, with GSD = 2 cm/pix, the drone's flight height will be approximately 69.5 meters from the ground. To refine the flight height, hover the cursor over any waypoint. The height from the ground is circled in the screenshot above.

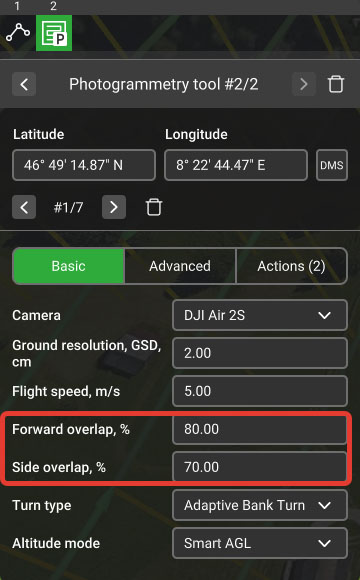
- Set the value of the side and front overlaps for adjacent photos. It is recommended to use an overlap value of at least 65%. Side overlap directly affects the number of tracks and, consequently, the estimated time of route execution. The frontal overlap is determined by the drone's flight speed and the frequency of photography. As a rule, to fly the drone in a single grid it is enough to set the value of 70% for the side overlap and 80% for the heading overlap.
- Set the "Altitude Mode" parameter to AGL or "Advanced AGL" for terrain follow flight.

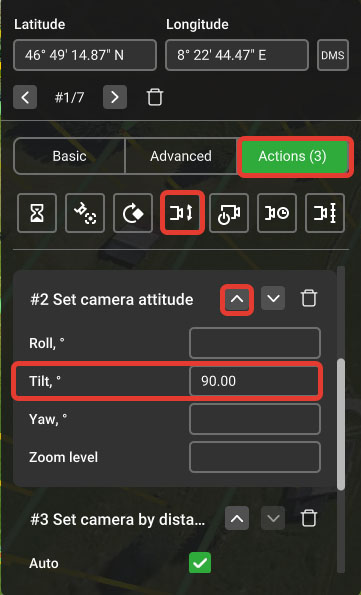
- Add the "Camera Position" action and set the Tilt value to 90 degrees to tilt the camera to the nadir. Then click the up arrow to move this action above the default “Distance Shooting” action.

-
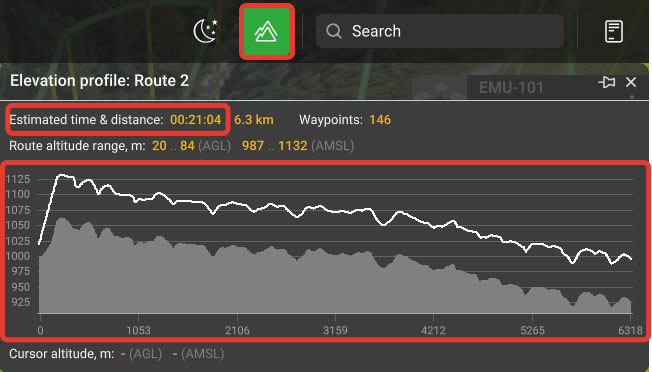
Click on the gear icon and select “Show Terrain”. Estimate flight duration and safety of the trajectory over the terrain. Close the terrain window.
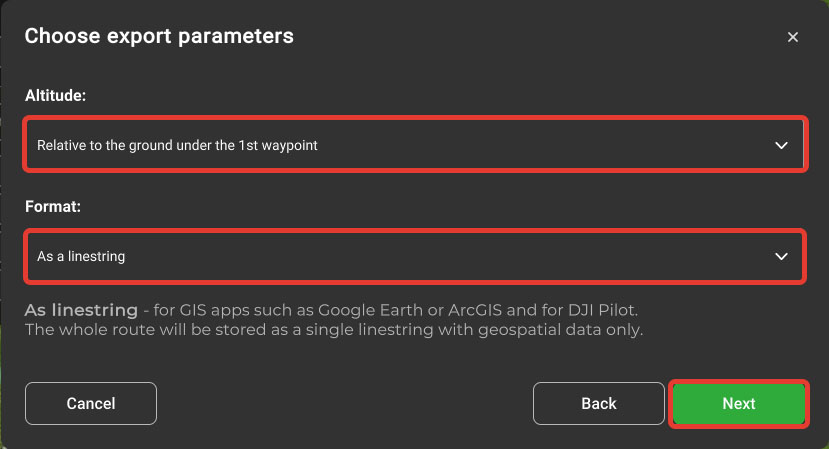
- Click on the gear icon next to the route, select "Export" and then "KML".
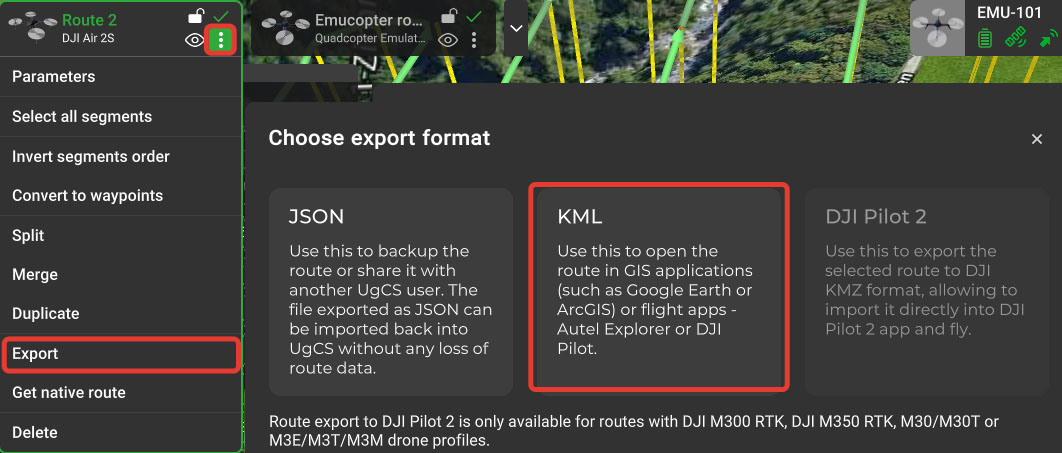
- For the "Height" field, select "Relative to the ground at the 1st point". For the "Format" field, select "As linestring". Click "Continue".
- Select a location to save the route file and a name. At this step, the planning of the base route in UgCS software is completed.
General recommendations on route planning for aerial survey in UgCS software.
- If the terrain difference in the flight area is more than 20 meters it is strongly recommended to use the Terrain Follow mode (for UgCS software - AGL or Advanced AGL mode.). Advanced AGL takes into account not only the height to the terrain, but also the distance to vertical objects with large height difference, such as rocks.
- If there is a forest area on the route, the flight altitude should be higher than 120 meters (GSD not less than 3.5 for TOPODRONE DJI Air 2S PPK), with side and frontal overlaps not less than 70%, because they are set relative to the ground, and the forest has a height of 20-40 meters higher, and the tops of trees are located closer to the camera, reducing the real % of overlap to 60% or less.
- It is recommended to use the “Double pass” option of the “Photogrammetry Tool” for aerial survey of the built-up area. This will increase the number of images and post-processing time by 2 times and will allow to perform more detailed photogrammetric post-processing.
- For correct photogrammetric postprocessing it is recommended to perform surveying at least in 3 passes. Performing aerial photography in 1 and 2 passes will lead to large errors in aerial triangulation.
- The calculated route time in UgCS software is always 10% less than the real time. Also the time calculation does not take into account wind speed and time of approach to the first waypoint from the start point. It is recommended to always form the flight time with battery charge reserve.
- Strong winds, large terrain differences, high drone speed, cold weather and old batteries reduce the flight time on a single battery of the drone.
- It is recommended to plan routes with the calculation of 1 route = 1 battery.
Importing routes into Litchi software.
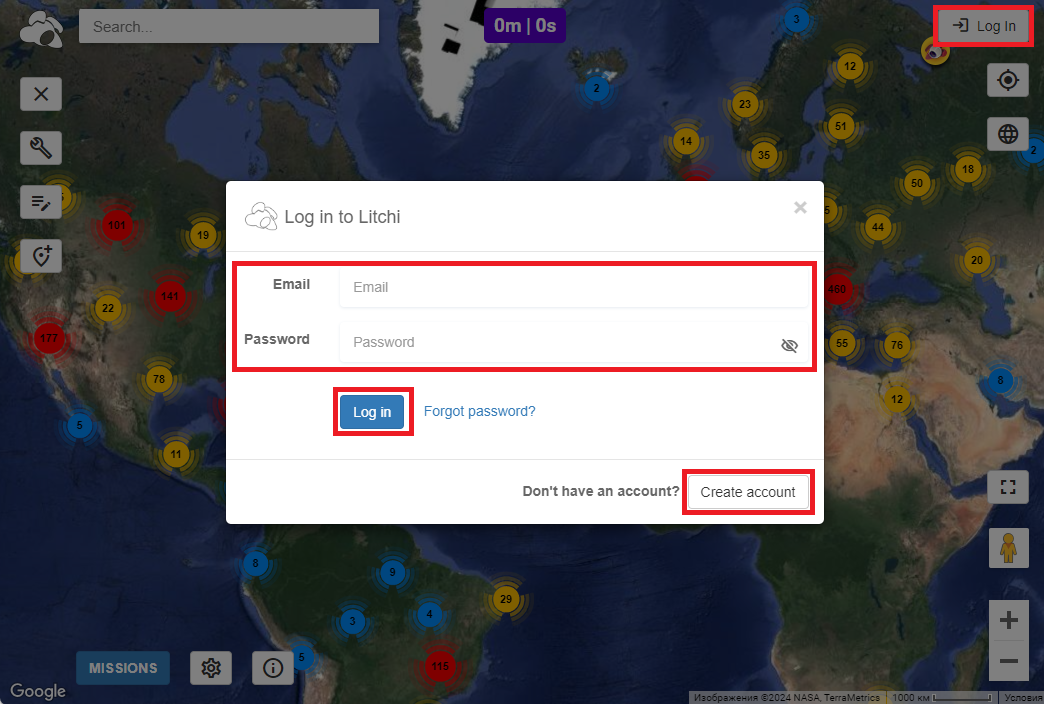
- Go to https://flylitchi.com/hub and log in to your account. If your Litchi account has not been created before - register by clicking on “Log In” and then “Create Account”.

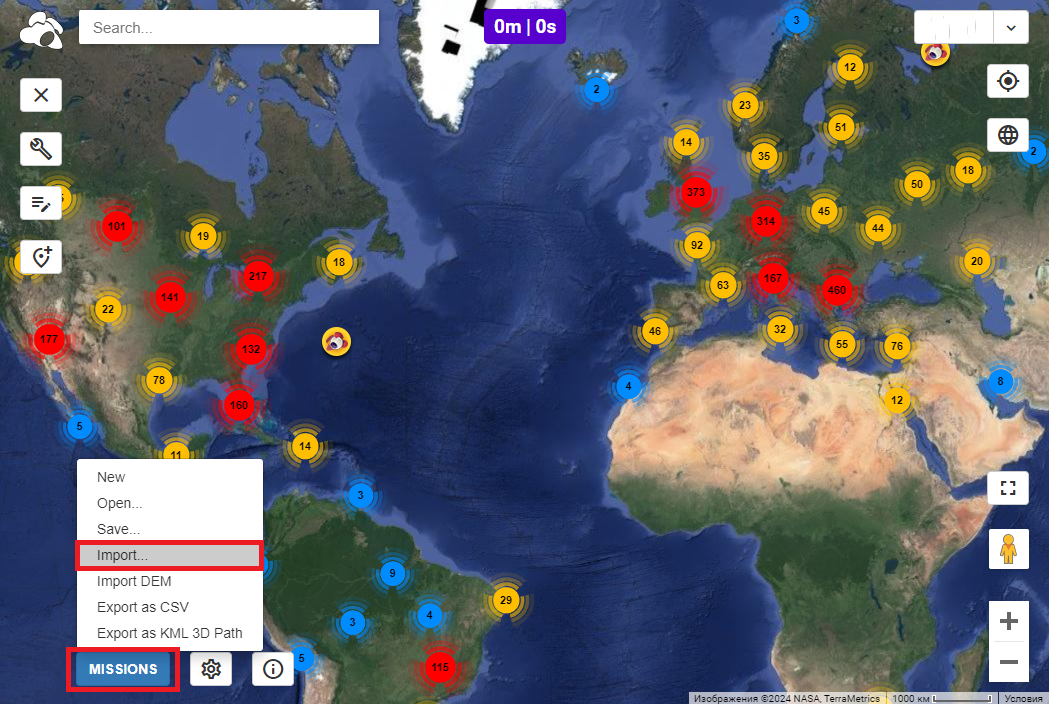
- Go to “Missions” and select “Import...”

- Click “Add Take Photo Action” and select the route file in *.kml format obtained in the previous step, then click “Import to new mission”

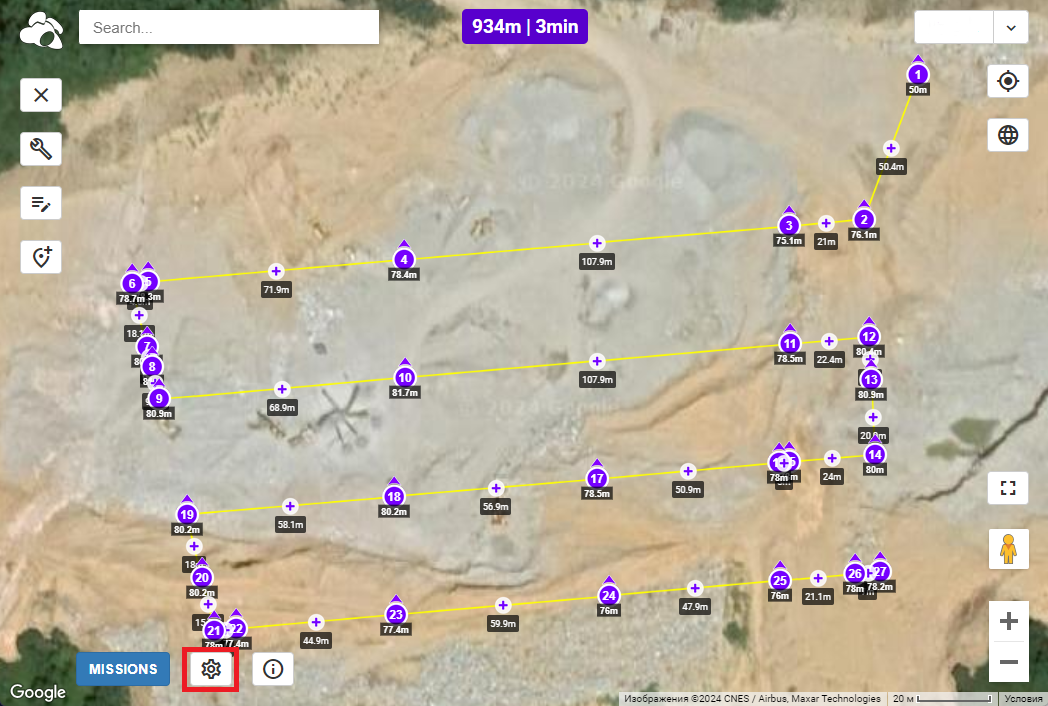
- The route obtained in UgCS software in the previous step is imported into Litchi software and displayed on the map. To change the route parameters, click on the “Gear” icon.

- Set all the settings as shown in the screenshot below and click “Close”. The “Photo Capture Interval” parameter is set automatically based on the route design parameters. Set the “Cruising Speed” parameter, which is responsible for the drone's flight speed along the main aerial photography route, to the required value.

- The appearance of the route will change according to the applied parameters. Select "Missions" and then "Save" to save the route.

- Enter a name for the route and press “Save”. This completes the work in the browser.

- Open the Litchi for DJI* software on your mobile device. *Sold separately.

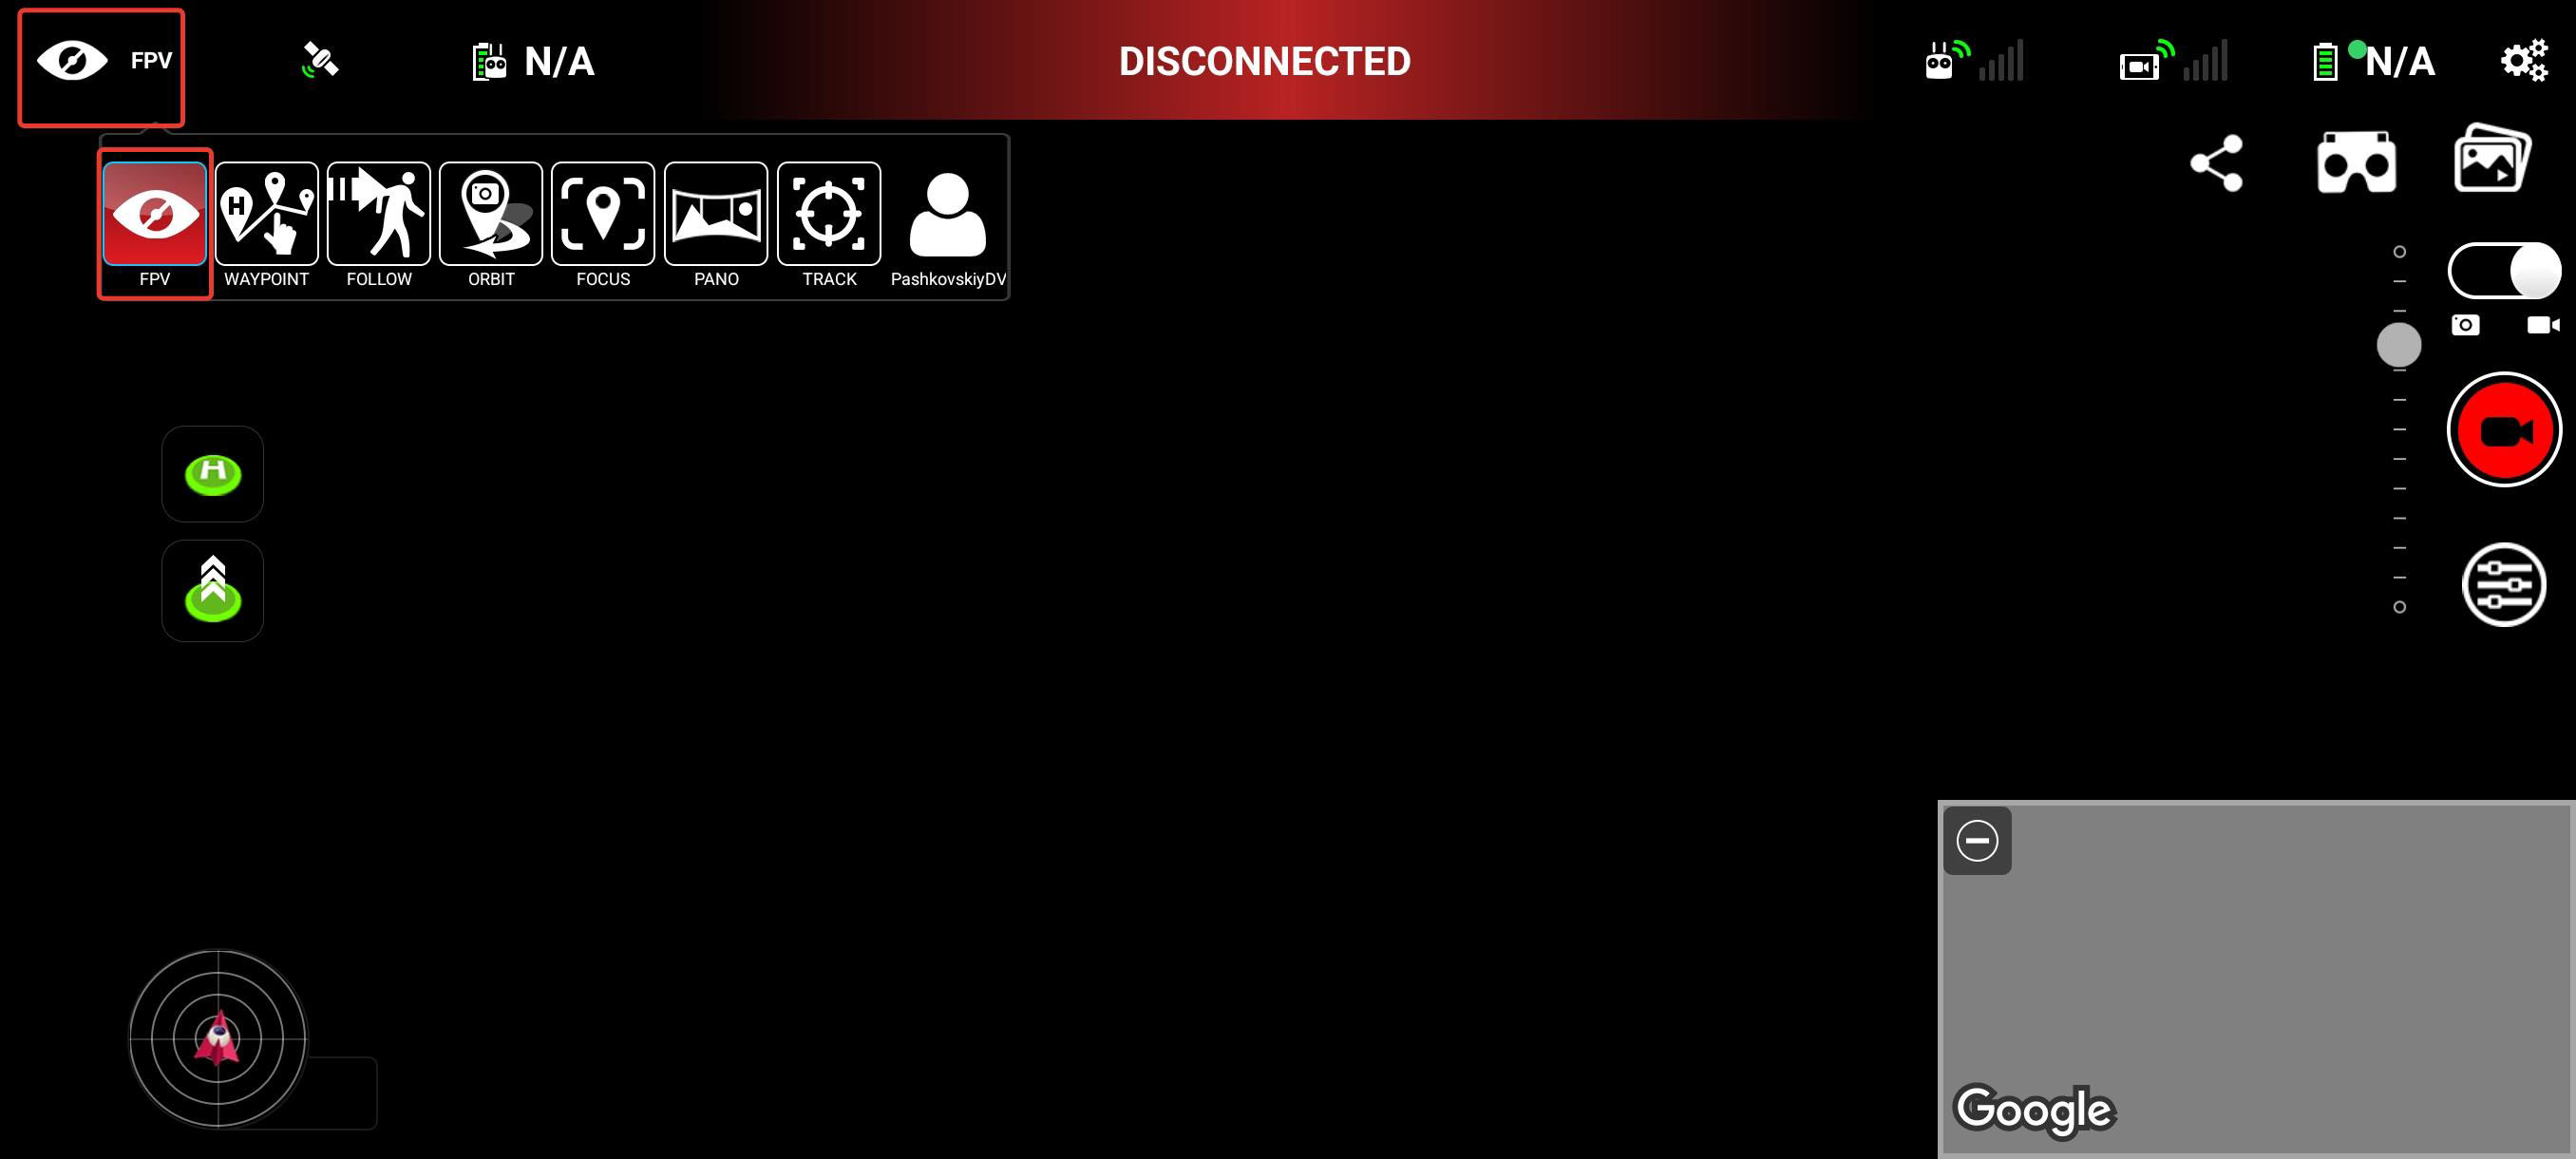
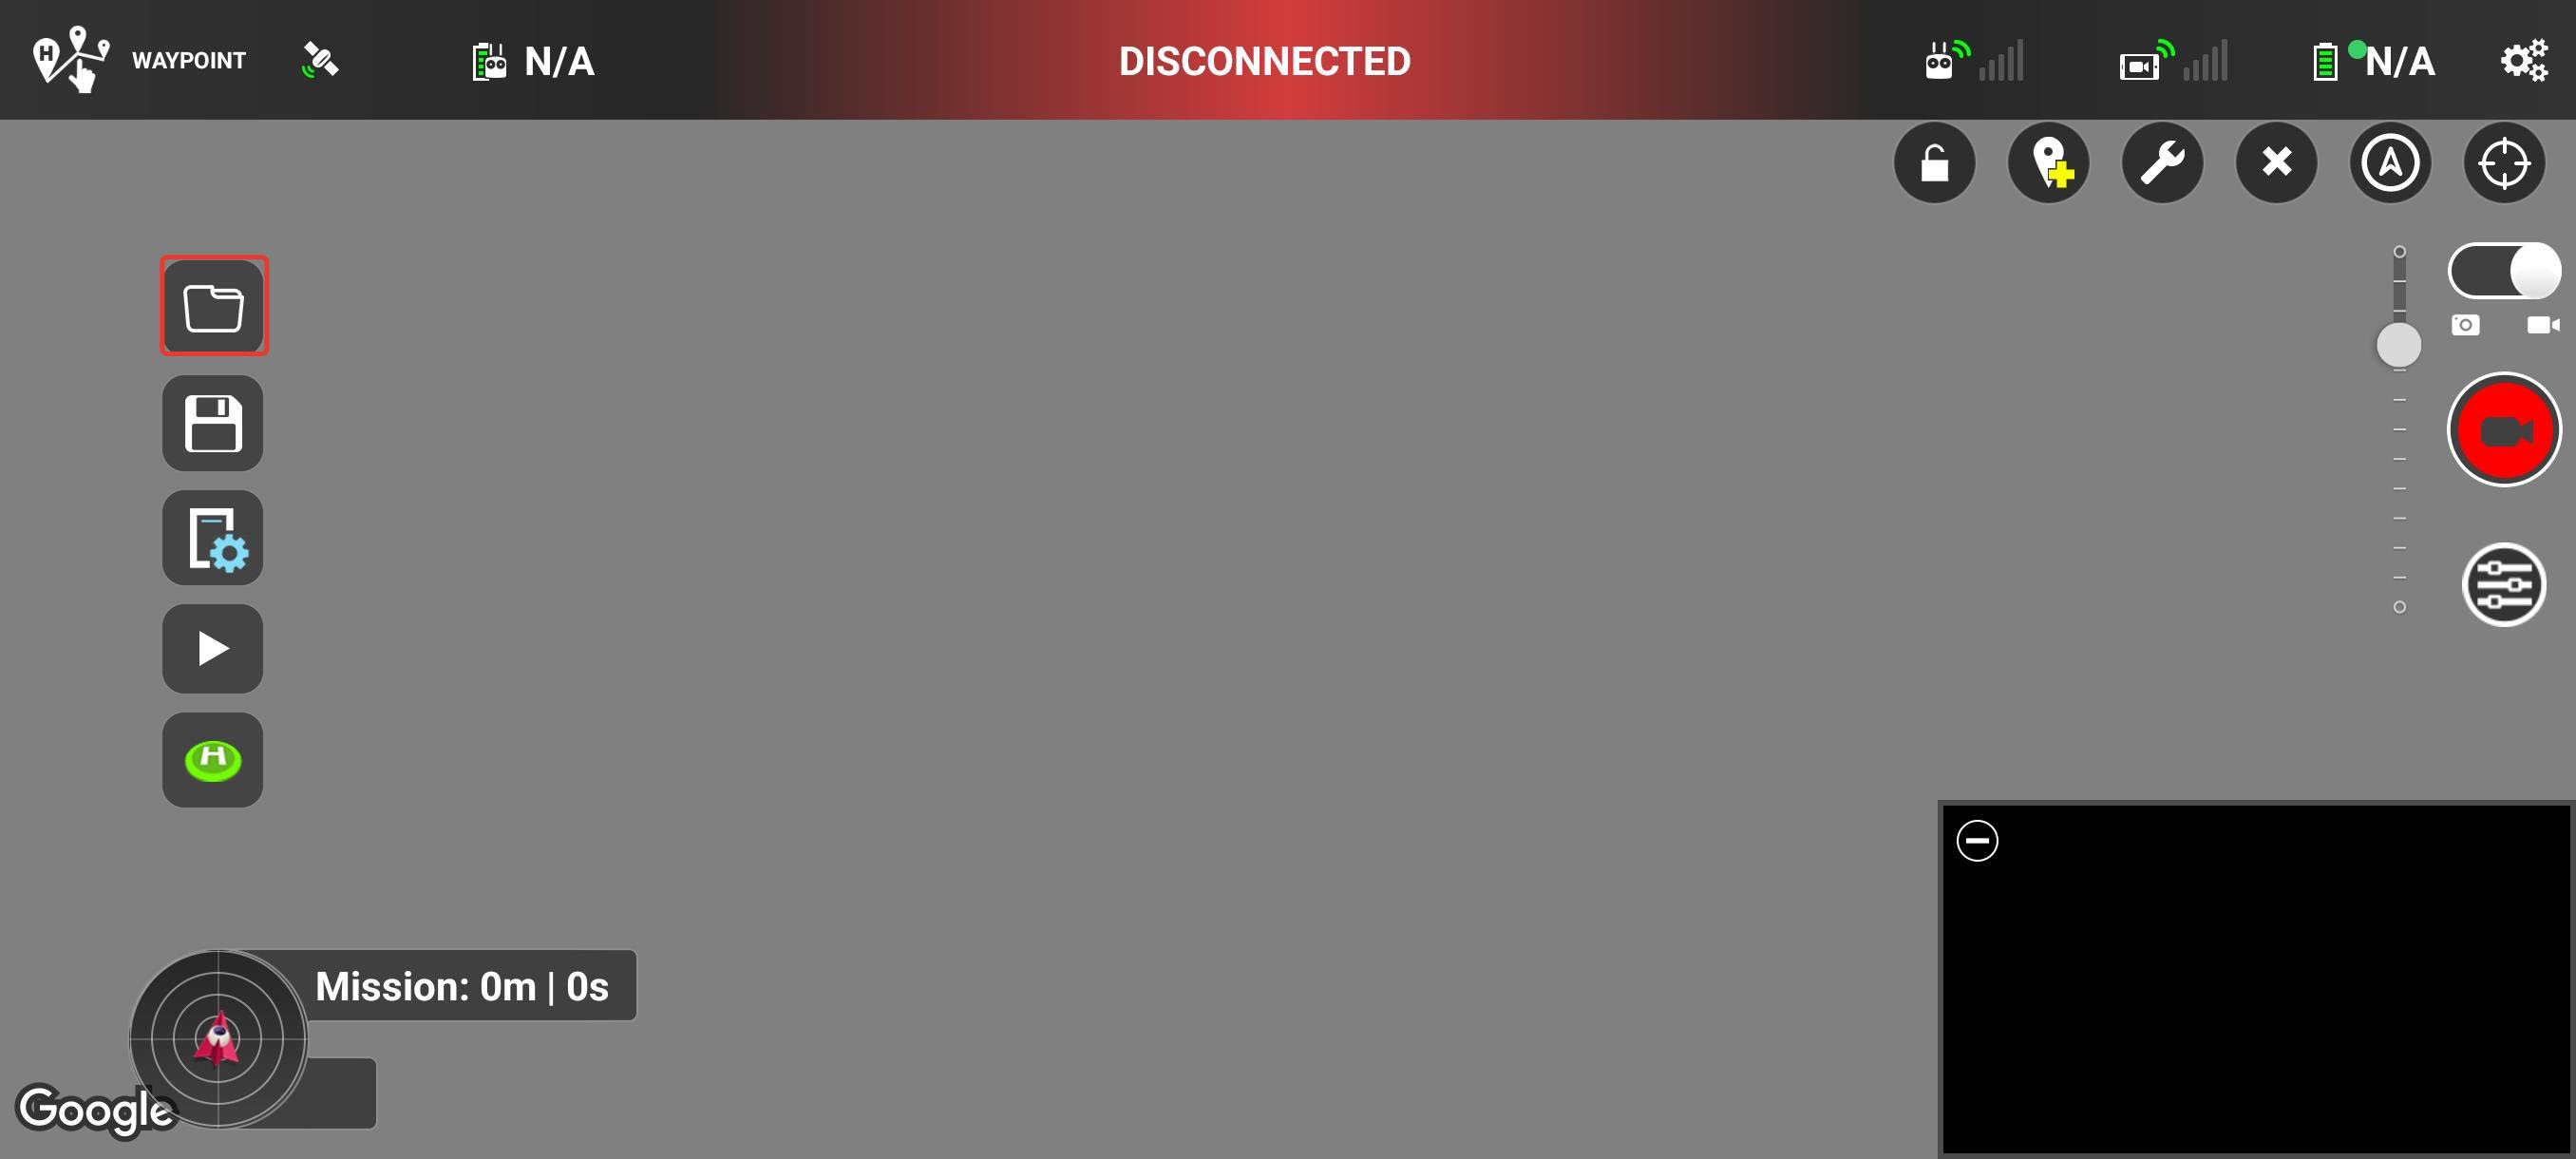
- Select "FPV" and then "WayPoint".

- Select "Upload Route"

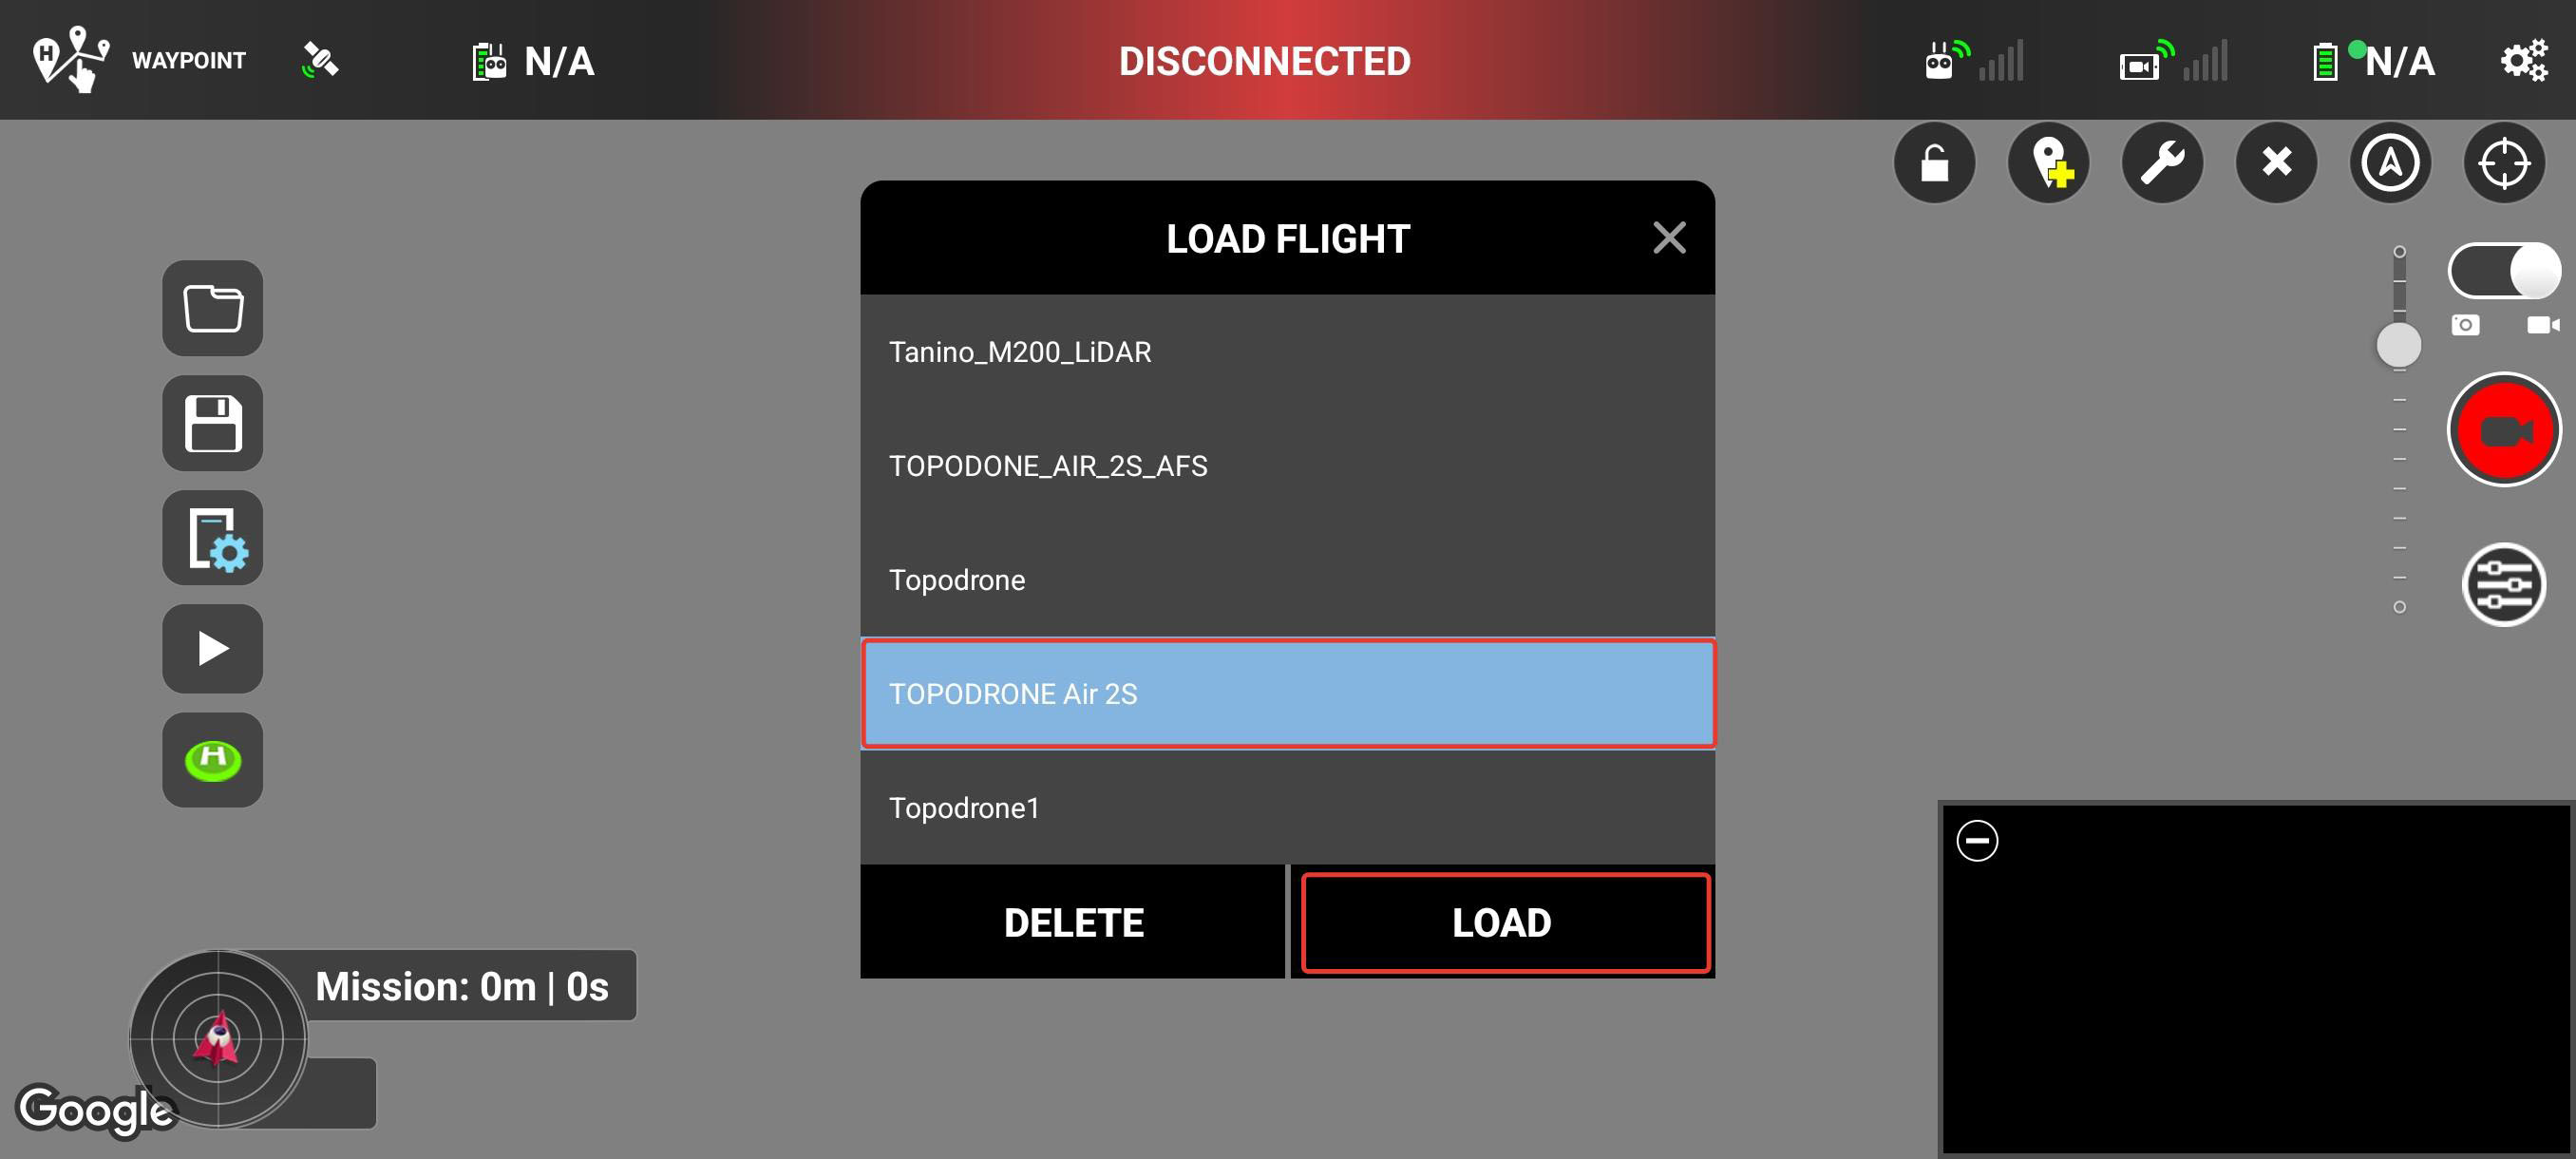
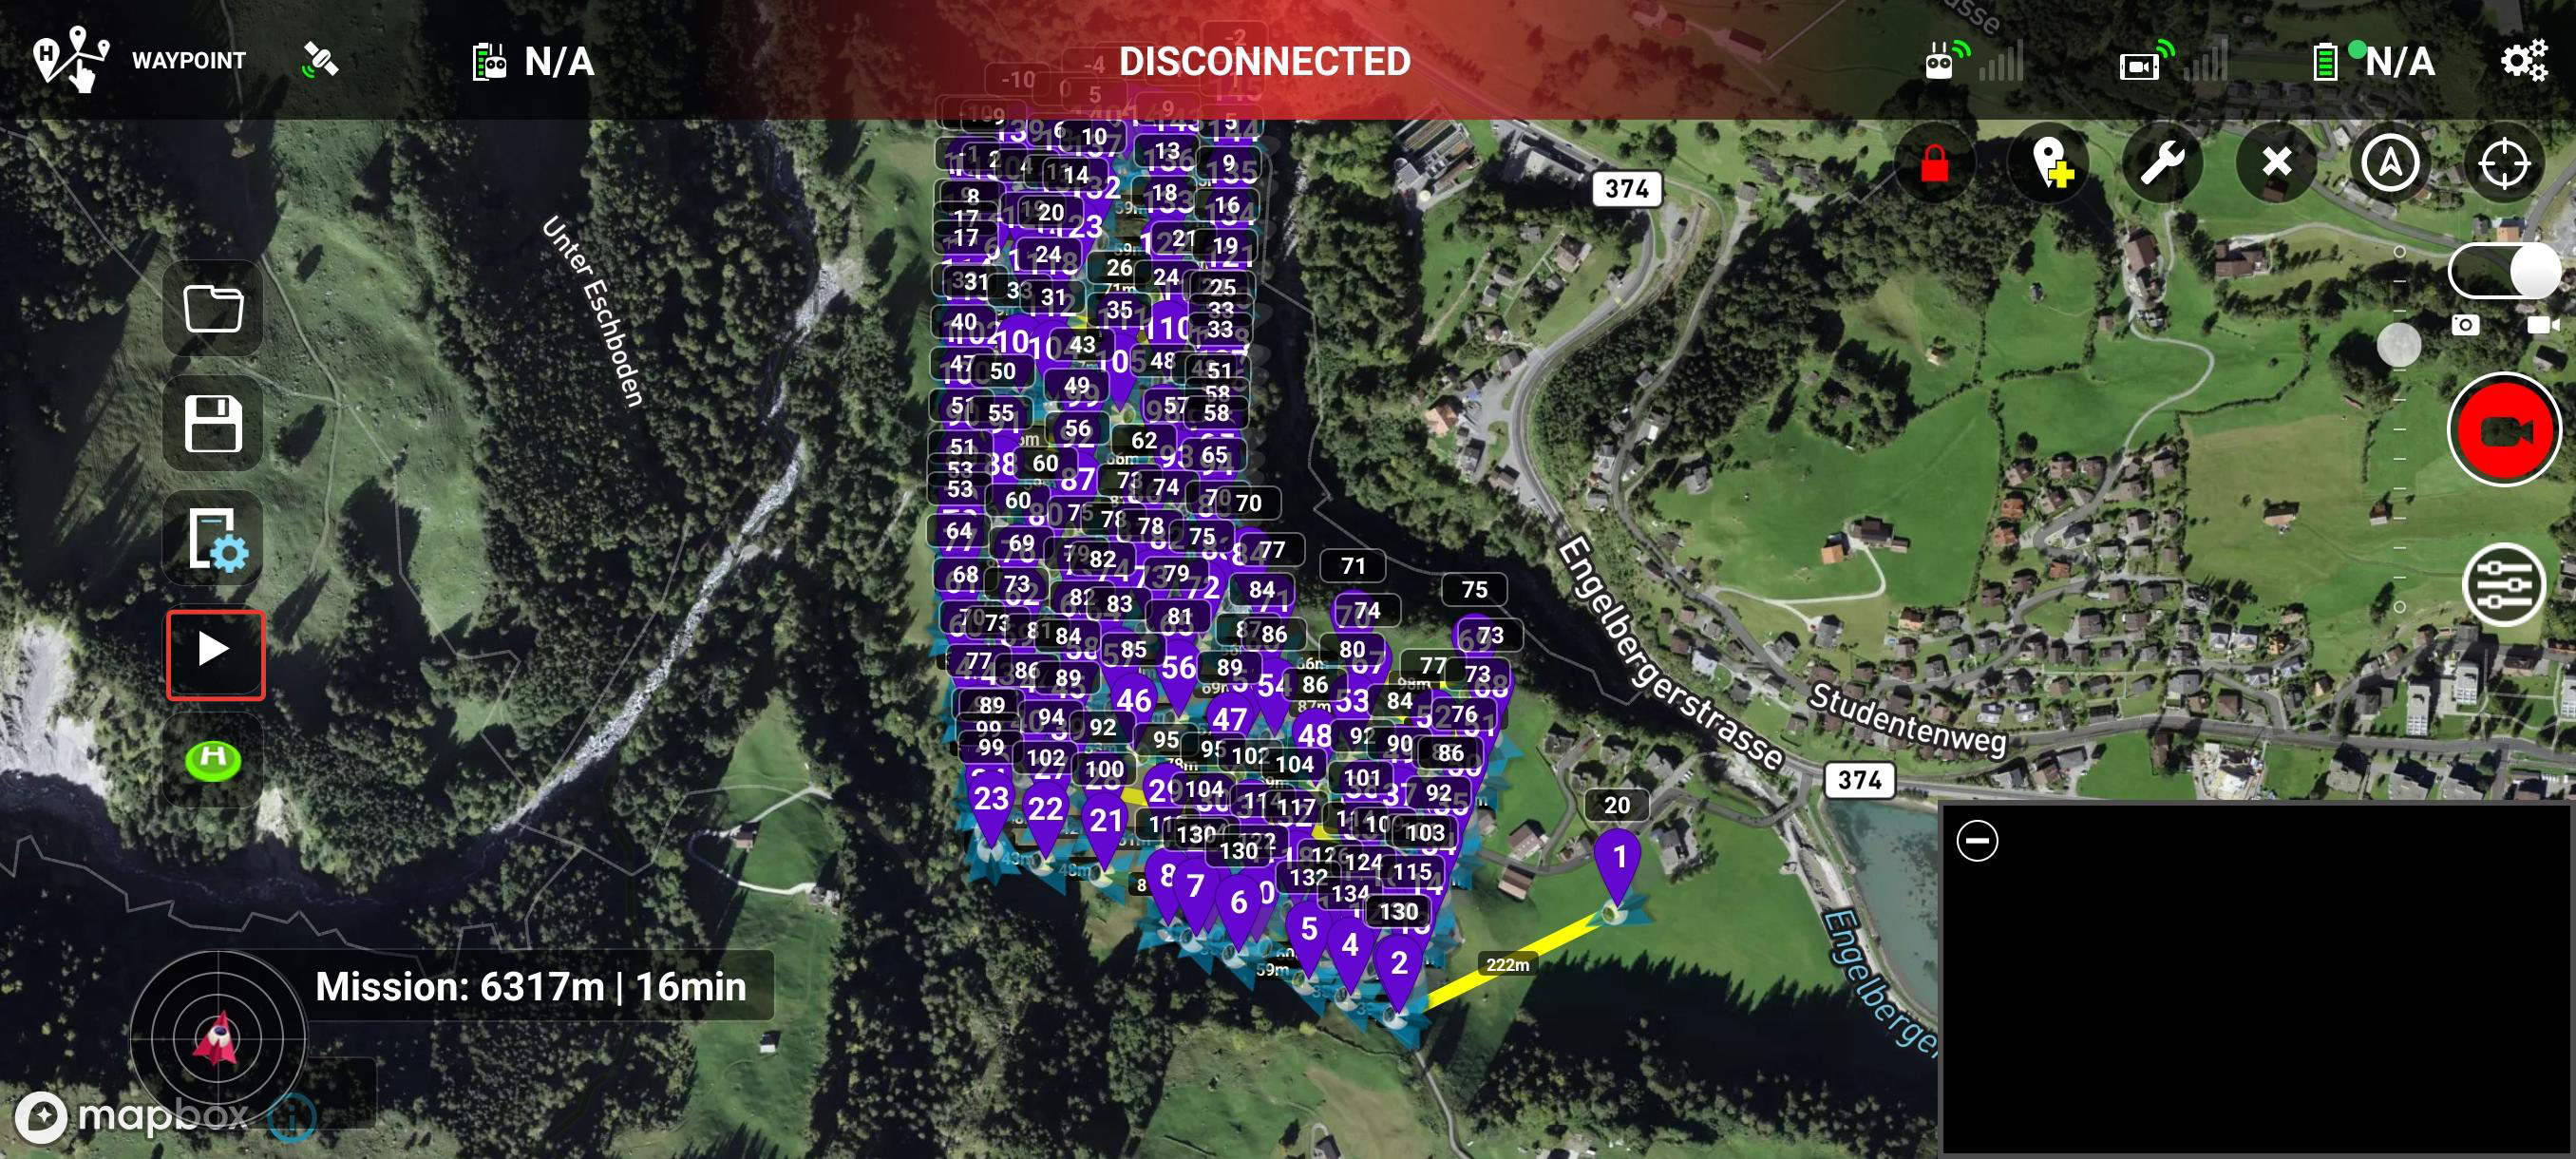
- Select the name of the route you imported earlier and click Upload.

- The route is imported into the Litchi for DJI software. To start the flight, you need to connect the remote control and the drone, initialize and configure the camera, and then press the "Start" button.


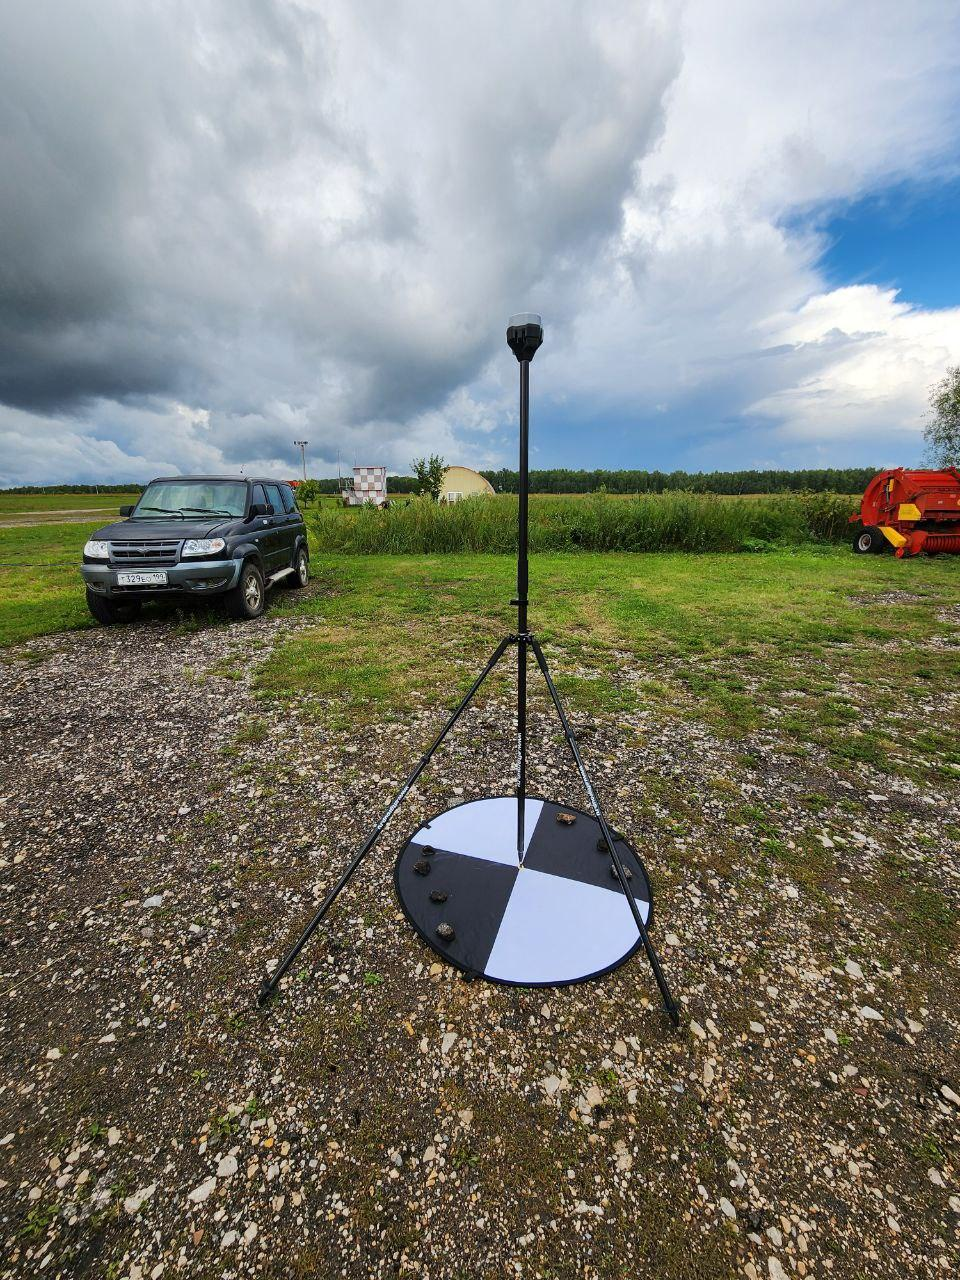
Base Station Installation and Phase Center Coordination
To post process data from the TOPODRONE DJI AIR 2 PPK using the PPK method, a working base station is required. The base station operating time should fully include the drone's operating time intervals. The base station is a GNSS receiver that performs static measurements while stationary.
Reach RS2 receiver operating in base station mode.
To perform correct data postprocessing, the following requirements apply to the base station:
- The base station operation time should include the drone operation time
- The maximum distance between the base station and the furthest point of the drone's route should be less than 25 km. To achieve the best accuracy and data quality, it is recommended to install the base station no further than 10 km from the flight location.
- The frequency of GNSS measurements data recording is 1 Hz.
- Base station output file format: RINEX
- Satellite groups: GPS / GLONASS. Optional: GALILEO, BEIDOU.
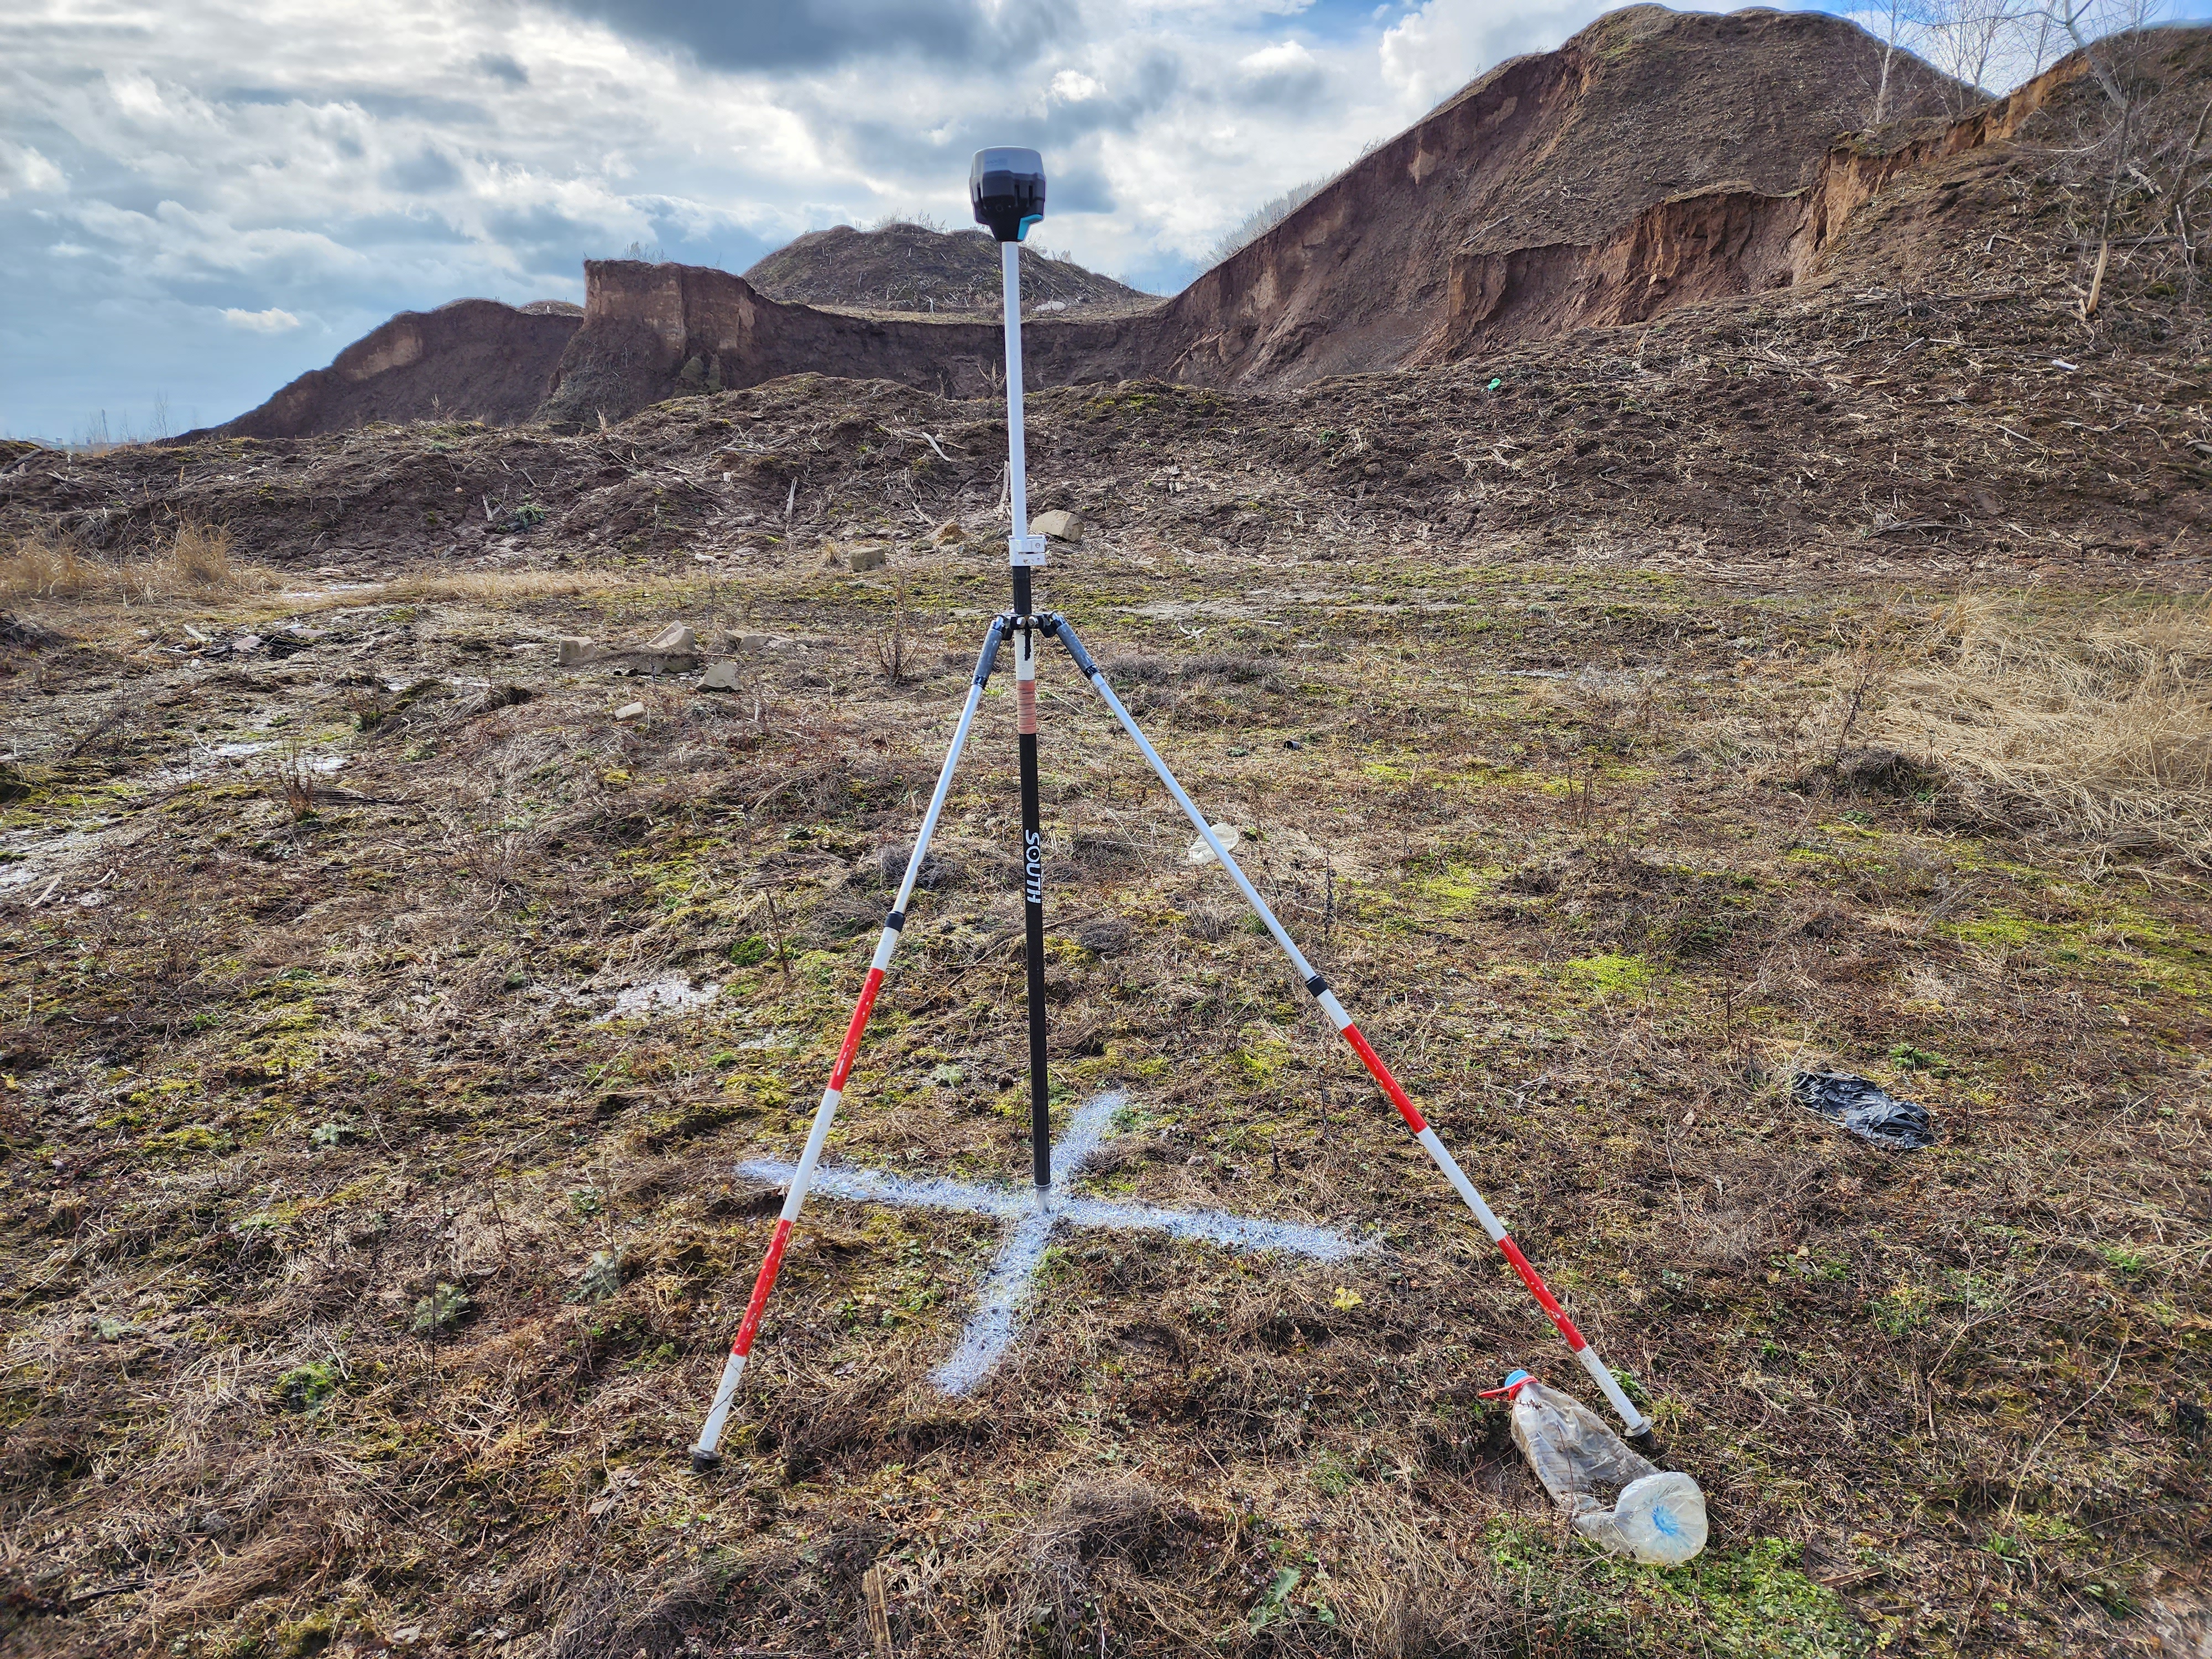
- The base station should not move during operation, optimally use a tripod or a milestone with a bipod.
- The base station should be located in a place with the maximum GNSS signal reception, in an open, elevated space, away from houses, hills, power lines, roads and railway tracks.
- Coordinates of the GNSS antenna base station phase center must be in the project coordinate system.
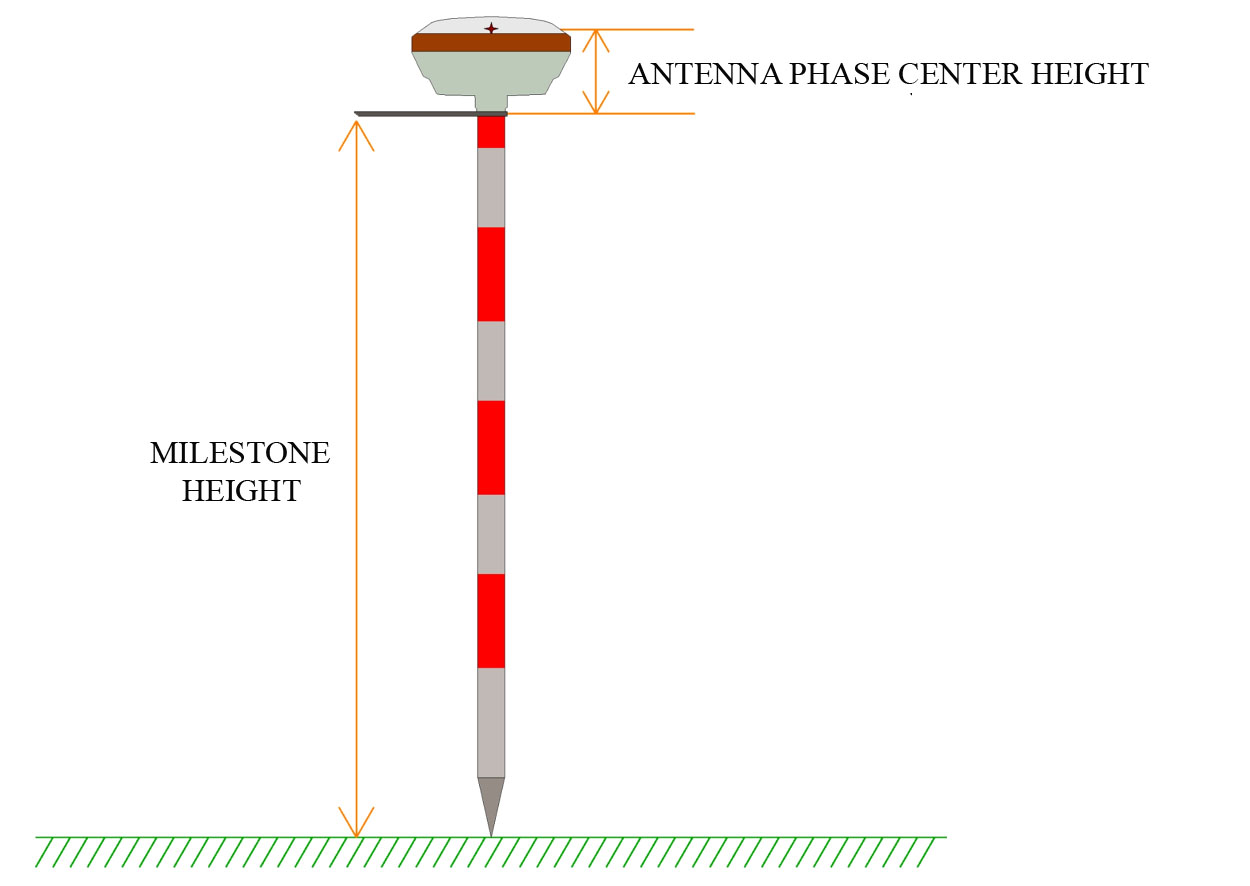
The difference in the height of the milestone and the height of the phase center
When coordinating the GNSS antenna base station phase center, the height of the milestone and the height of the Phase Center itself should be taken into account,, which is also offset from the lower plane of the GNSS receiver body, should be taken into account.
During the post processing of the moving objects data, using the PPK method - application of Galileo and Beidou satellite groups may decrease an accuracy of the project.
If the solutions accuracy for the photo centers coordinates is not high enough, only GPS should be used.
If you place an identification mark under the base station, then it can be used as a ground control point, with a height less than the base station phase center high accuracy coordinate at the height of the milestone and the phase center height.
Setting and coordinating control points
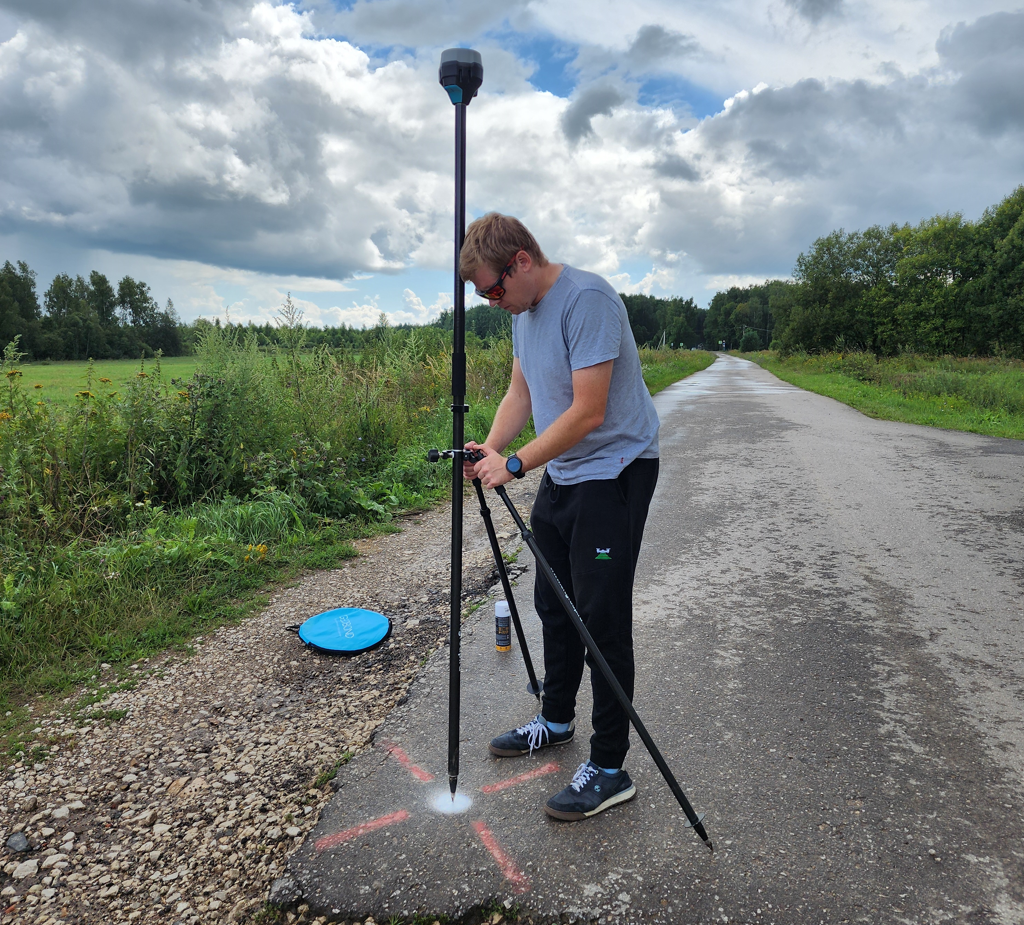
To determine the accuracy of the final point cloud after data post processing, it is necessary to place control points (GCP – Ground Control Points) at the field work stage. Сontrol points - well-defined on the point cloud relative to the relief and pre-coordinated with high-precision GNSS equipment. Control сontrol points are not involved in the processing and should not be confused with reference points. It is recommended to collect at least 3 control points in a section of one drone flight route.
To control the results of the aerial survey, it is recommended to coordinate the control points on any flat surface using GNSS measuring equipment such as a GNSS receiver mounted on a milestone using RTK or PPK methods.
Optimal surfaces for coordinating control points are roads, paths, paved areas and other such features that will be visible from different survey positions.
GCPs can be road marking elements, special folding identification signs or other self-contained signs.
The coordinate system of control points should be the same as the base station phase center coordinate system and the project as a whole.
A ground control point made with paint on the pavement is coordinated using the Reach RS2 GNSS receiver.
Ground control point of road markings, coordinated by the Reach RS2 GNSS receiver.
The ground control point, made of a folding identification sign, is coordinated by the Reach RS2 GNSS receiver.
Turning on the drone and initializing the TOPODRONE receiver
Surface preparation
TOPODRONE DJI AIR 2S PPK must be installed on a flat, hard and clean surface. We recommend using a piece of plywood, a folding drone takeoff pad or an asphaltic or concrete surface.
It is not recommended to take off from a sandy, unpaved, grassy or snow-covered surface, as this may contaminate the drone's camera or its engines, as well as damage the propellers.
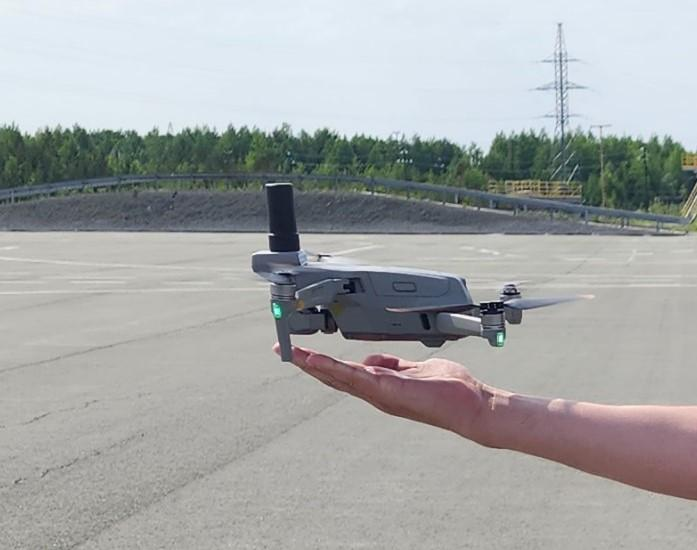
It is recommended to land the drone in your hand on a flat palm. This will significantly reduce the risk of damage to the propellers, dirt particles getting into the motors, as well as increase the service life of TOPODRONE DJI AIR 2S PPK.
Do not take off from the hood or roof of a vehicle, metal structures or rickety bases such as a boat.
Switching on and initialization
Before flying the TOPODRONE DJI AIR 2S PPK, the following steps are required:
- Remove the protective cap of the suspension.
- Place the GNSS antenna on the TOPODRONE receiver. The antenna should fit tightly to the upgrade housing, avoid applying excessive force.
- Check for a memory card in the TOPODRONE DJI AIR 2S PPK upgrade, as well as in the drone itself.
- Unfold the beams, check the integrity of the propellers.
- Turn on the drone, set it to the takeoff location and move away 1-2 meters.
- After 15-60 seconds, the TOPODRONE DJI AIR 2S PPK will display the following indication when the GNSS signal level is normal: steady green LED, blinking or steady blue LED and blinking orange LED. This indication corresponds to successful initialization of the upgrade.

-
If this is the first flight from this point, you should calibrate the compass and start the flight task. If you have already made a flight from this point, skip this step.
Compass calibration TOPODRONE DJI AIR 2S PPK
Every time the DJI Air 2S TOPODRONE PPK changes location, it needs to calibrate the compass.
Compass calibration allows the drone's flight controller to calibrate along local magnetic field lines according to current deviations and interference. The compass calibration mode is activated before takeoff on the ground using the remote control or flight software. During compass calibration, the accelerometer and compass must be rotated 380 degrees twice on two different axes. After that, the drone corrects the readings of both sensors. It is strongly recommended to calibrate the compass before each first flight in a new area, when moving to a new point, changing the location even for 1 km and after the drone is idle.
To calibrate the compass correctly, you need to follow these steps:
- Compass calibration is performed immediately before flying in an open area (It is pointless to calibrate indoors).
- Turn on the drone and remote controller, connect your mobile device.
- Make sure that there are no large metal structures and sources of magnetic fields (power lines, hangars, transformers, garages, bridges, etc.) within a radius of 50 m.
- Switch the drone to compass calibration mode. This can be done in two ways:
a) In the DJI Fly app, select the tab Safety/Sensors/Compass Working/Calibrate/Start.
b) In the middle of the remote, quickly move the switch to the C position, then the S position at least four times.

Quickly switching the flight mode lever 4 times or more puts the drone in compass calibration mode.
5. Make sure that the drone's rear LEDs are lit in a constant yellow, this means that the drone is in compass calibration mode!
6. To exit the compass calibration mode without performing it: (case 4a) - switch the flight mode toggle to N, in the case of method 4b - press "Cancel calibration" in DJI Fly software.
7. Take the remote control in one hand. Lift the drone with your other hand without tilting it. Hold the drone by the body from above in the area of the batteries.
8. Make a 380-degree turn to either side while holding the drone at arm's length (a little more than 1 full rotation). When the rear lights change color from solid yellow to solid green, stop.
9. Change the drone's orientation by turning it 90 degrees away from you.
10. Compass calibration is complete.
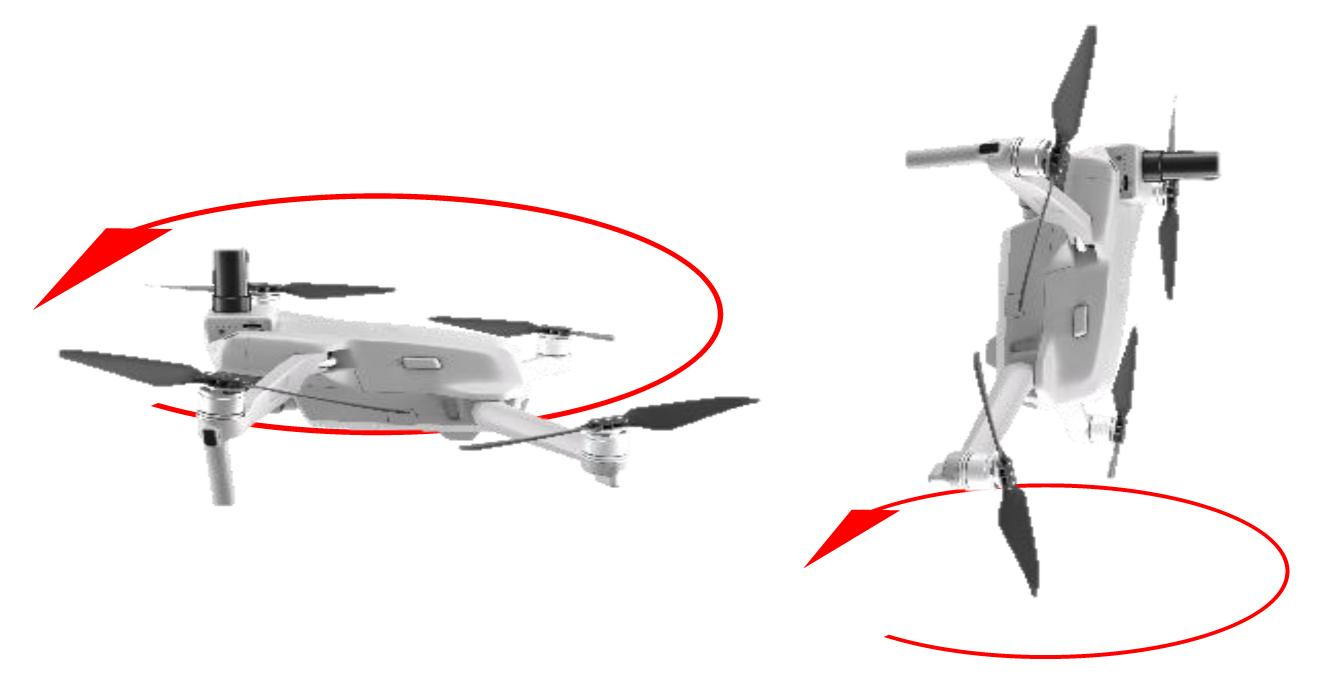
Turning the drone during compass calibration.
If the system gives an error after the compass calibration completing (the rear LEDs are flashing red), move 20-30 meters to the side and calibrate in another place nearby.
There shouldn't be any magnetic objects on the pilot's clothes, such as large jewelry, metal inserts, magnets on the iPad tablet, etc. Otherwise, even after successfully compass calibration, your drone will give a "Compass Error".
Compass calibration improves the drone's flight stability. However, the “Compass Error” may occur even after proper calibration. It is usually caused by other sources of interference, such as metal structures, large antennas, and power lines.
If the compass is successfully calibrated near powerful sources of electromagnetic interference, at a slight distance from them, the flight software may issue a compass error message caused by a change in magnetic field lines.
Despite the long distance of radio communication with the remote control (up to 4 km), it is not recommended to fly more than 1 km from the take-off point. This is due to the risks of switching between zones with different electromagnetic anomalies, which can cause a compass error even with all the actions performed correctly.
Photo settings and camera focus
It is recommended to do the following:
- Decide on the working height and GSD for shooting. Usually, the height for the TOPODRONE DJI AIR 2 PPK is from 40 to 120 meters. Its value depends on many factors: the resolution of the final orthophotoplane, the height of obstacles, terrain features, etc. the
- Select the 3:2 frame format and the JPEG file format. This format will allow you to use the entire area of the camera matrix and optimize the amount of data. Do not use the 16:9 format and shooting in RAW!
- Lift the drone to the working height and rotate the suspension 90 degrees (the camera looks at the nadir). Make sure that the focus method is set to AF. Tap on the center of the screen to make the camera focus on the surface. After changing the value of the focus method to MF, a scale for manual focus adjustment will appear. Don't change it! The drone's camera is now focused for the selected altitude. It will not change in the future.
- Now you need to configure the camera. By default, all parameters are determined automatically. In this case, the brightness and smoothing of the image will change during the flight. This complicates triangulation image processing: control points will be different on different images.
It is recommended to set the following camera image parameters to achieve the best shooting quality:
ISO: set or stick to a value from 100 to 200. Higher values will increase noise in the image and reduce the quality of the orthomosaic.
Aperture: This value for the TOPODRONE DJ AIR 2 PPK is constant and is 2.8, the aperture value cannot be changed.
Shutter: Set or stick to a value between 1/1600 and 1/640. Higher values increase blur, lower values decrease the amount of light transmitted, resulting in darker images.
Launching a drone on a flight mission
TOPODRONE DJI Air 2S PPK is launched on a flight mission after focusing and adjusting the camera.
Click on the “Start” button in Licthi for DJI software to start flying a route.
TOPODRONE DJI Air 2S PPK does not support point-to-point flight. The drone is controlled by a remote control and a connected mobile device. To perform a flight along the route, radio communication with the drone must be constant. The mobile device must be connected to the remote control without closing the Litchi software until the end of the flight.
Do not accept incoming calls, do not switch to other applications, and do not turn off your mobile device during the flight. This will cause the flight to stop and the drone will need to be re-run along the route from the beginning.
During the flight, the operator needs to direct the remote control antennas towards the drone to ensure better radio communication quality.
Avoid any obstacles between the remote control and the drone, such as power lines, buildings, terrain and landscape elements). This can lead to a sharp decrease in the quality of radio communication and stop the flight of the drone on a flight mission.
During the flight, the operator must carefully monitor the number of visible satellites, battery charge, radio quality and camera image quality.
It is recommended to land the drone after completing the route on the palm of your hand to avoid damaging the propellers.
At the end of each flight, be sure to check the initialization status of the TOPODRONE DJI Air 2S PPK receiver. If the LED indication does not match the correct operation, check the connection of the GNSS antenna to the receiver and the operability of the TOPODRONE DJI Air 2S PPK memory card. If necessary, perform this route again.
Charging, storage and operation of batteries
DJI Air 2S smart batteries are equipped with various functions and systems that simplify operation. The automatic discharge function helps to avoid damage to the battery from long-term storage when fully charged. The battery charge will automatically decrease from 100% to 96% after a day of downtime, and up to 60% if the batteries are not used for more than 5 days. Batteries may become slightly warm during the discharging process, this is normal. The battery cells are balanced during the charging process. The battery pack is equipped with protection functions against short circuit, overcharging and damage to one of the cells.
Recommendations for battery operation
- The day before the flights, charge up to 100% of all batteries that are planned to be used.
- It is forbidden to use batteries charged more than 5 days ago, switched to self-discharge mode, storage. In this case, a battery with, for example, 60% of the initial charge will not be able to perform a full flight and provide the necessary power. The flight can be interrupted by automatically lowering the drone to avoid an avalanche-like voltage drop and an accident.
- The battery charging temperature is from +5 ° C to +40 ° C. The optimal charging temperature is from +22 ° C to +28 °C. If the battery is overheated or overcooled (for example, immediately after a flight in hot weather, or after lying in the cold), charging will not begin until the battery temperature returns to normal.
- If the battery is not in use, it turns off after 20 minutes.
- The optimal flight characteristics of the battery are achieved at temperatures from 5 to 40 ° C.
- The battery capacity and its voltage characteristics decrease in cold weather at temperatures below 5 ° C. It is strongly recommended to warm up the battery before flight to a temperature of at least 20 ° C to ensure normal flight characteristics.
- DJ Air 2S batteries are not equipped with an automatic heating option, but the temperature of the batteries is maintained The battery heats up during flight by generating its own heat when discharged and by the drone's electronics. during flight.
- To warm up the drone's battery in field conditions, it is recommended to take off and hover on the drone for 1-2 minutes at a low altitude above the ground and then follow the routes.
- To store the battery for a long time, it is recommended to charge all batteries to 100% and leave them at room temperature for several weeks. After 2 weeks, the battery charge level will decrease from 100% to 60%, thus the batteries will switch to storage mode. If the battery is stored for more than 2 months, it is recommended to repeat this procedure once every 2 months.
- Try to operate the battery from 100% to 10% charge. Terminate the flight in a timely manner and leave enough power for the return home.
- If the battery charge level drops below 5%, then after the power is turned off, the battery goes into "Hibernation" mode for maximum energy conservation, which it will be in before connecting to charging. The battery will not respond to pressing the power button.
- The battery should only be charged using the supplied charger connected directly to one battery, or using a Hub that allows you to charge up to 3 DJI Air 2S batteries in series. The standard JET Air 2S power supply has an additional 1 USB connector and allows you to charge 1 remote control and 1 battery in parallel or up to 3 batteries in series when using the Hub.
- The battery capacity decreases over time. The age of the battery is determined by the number of charge/discharge cycles. On average, DJI batteries will operate for at least 150 cycles if the operating and storage conditions are met.
- Strong wind, altitude difference, low temperature, high flight speed of the drone, as well as the use of batteries with more than 100 charge/discharge cycles, reduce the flight time on one battery.

DJI Air 2S BATTERY
Precautions when working with the battery
- It is strictly forbidden to damage the battery case, to expose it to any mechanical influences not provided for by normal operating conditions. Any mechanical damage to the battery may cause the battery to fail or reduce its performance.
- It is strictly forbidden to expose the battery to moisture, dust, dirt, fire, acids, alkalis and other aggressive media.
- In case of deformation, swelling, or any mechanical damage to the housing or contact terminals, it is necessary to immediately stop using this battery and dispose of it.
- It is strictly forbidden to heat the battery to a temperature above 69 ° C.
- It is not recommended to cool the battery below -10⁰ C or expose the battery to sudden temperature changes.
- DJI batteries are non-repairable. It is strictly forbidden to disassemble DJI batteries yourself.
- If the sealed Li-Po cells are damaged, the battery will become hot, emit acrid smoke and flames may appear when exposed to air. If the battery is damaged indoors, immediately take it outside, ventilate the room and evacuate people. The burning temperature of lithium can reach 900 C, so use protective equipment when carrying the battery outside to ensure safety.
Tips and Warnings.
- Do not trust automation and always control the remaining battery charge yourself.
- Do not plan missions with the drone flying more than 1 km away from the takeoff point when you start operation.
- A strong tailwind can become a serious obstacle when returning the drone to the take-off point.
- Always maintain radio contact with the remote control by pointing the antenna surfaces towards the drone. If you lose signal, change the remote control direction or the antennas angle.
- Plan routes for the DJI Air 2S that last:- no more than 20 minutes in flat terrain (up to 20 m drop) in favorable weather;- no more than 17 minutes in hilly terrain (up to 250 m drop) in favorable weather;- no more than 14 minutes in hilly terrain (up to 500 m drop) in favorable weather;
- Fly more to better understand the drone's capabilities in specific conditions.
- Use ONLY 98-100% charged batteries for flying!
- If you disconnect the charging battery from the mains at a charging level of 90-99%, you will not be able to charge it to 100% when you turn it on again. First, you will have to reduce the charge to 89%. It is allowed to turn on DJI Air 2S indoors and wait 10-30 minutes or perform a short flight in manual mode with hovering at low altitude for 1-3 minutes.
- Number all batteries with stickers for uniform operation and convenience.
Requirements and recommendations for operating conditions.
TOPODRONE DJI Air 2S PPK is designed for use in open areas in weather without precipitation.
Do not operate the TOPODRONE DJI Air 2S PPK in rain, snow, sleet, hail or fog.
TOPODRONE DJI Air 2S PPK does not have IP protection, and if this recommendation is violated, moisture may get on the surface of the camera lens and inside the device. This may degrade the data received quality, as well as damage the internal structure of the TOPODRONE DJI Air 2S PPK. If precipitation starts during the flight, we recommend to stop operating, land the drone, and wipe it with paper towels and put it in the transportation case.

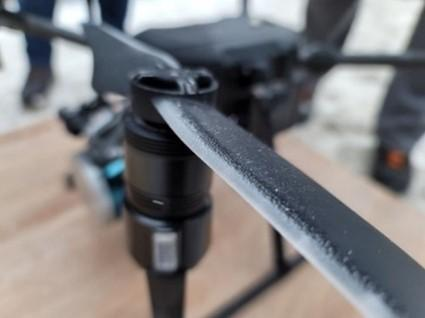
Icing of the drone during flight at -18 ° C Icing of the DJI M200 propeller
Operating the TOPODRONE DJI Air 2S PPK in sub-zero temperatures and high humidity (above 80%). It can lead to icing of the drone and camera, to deterioration of data quality, and even to a drone crash. Please note that in the case of geodetic aerial photography, the mission time and battery consumption may increase when the wind strength is higher than 5 m/sec. To obtain optimal images in terms of quality, it is recommended to fly in daylight under sufficient lighting conditions.
In case of insufficient or no GNSS signal quality, the TOPODRONE DJI Air 2S PPK cannot be used for high-precision aerial photography. The minimum visible number of satellites is 8.
It is strongly recommended to check the weather conditions and the number of visible GNSS satellites before the flight.
The main camera lens must be handled with care. Foreign objects can easily damage the sensor surface. Minor single scratches of the TOPODRONE DJI Air 2 PPK will lead to a noticeable deterioration in the quality of the data received. Always take off from a flat, clean, stable and non-metallic surface. Sand, dirt, dust and metal shavings trapped inside the electric motors of the drone itself or the suspension can lead to serious failures or the inability to perform the flight.
The manufacturer and the seller are not responsible for the equipment`s failure when it is used in violation of the recommended operating conditions.