# Turning on the drone and initializing the TOPODRONE receiver

##### <span style="color: rgb(45, 194, 107);">**Surface preparation**</span>

TOPODRONE DJI AIR 2S PPK must be installed on a flat, hard and clean surface. We recommend using a piece of plywood, a folding drone takeoff pad or an asphaltic or concrete surface.

<p class="callout warning">It is not recommended to take off from a sandy, unpaved, grassy or snow-covered surface, as this may contaminate the drone's camera or its engines, as well as damage the propellers.</p>

<p class="callout success">It is recommended to land the drone in your hand on a flat palm. This will significantly reduce the risk of damage to the propellers, dirt particles getting into the motors, as well as increase the service life of TOPODRONE DJI AIR 2S PPK.</p>

<p class="callout warning">Do not take off from the hood or roof of a vehicle, metal structures or rickety bases such as a boat.</p>

##### <span style="color: rgb(45, 194, 107);">**Switching on and initialization**</span>

 Before flying the TOPODRONE DJI AIR 2S PPK, the following steps are required:

1. <span class="EzKURWReUAB5oZgtQNkl" data-src-align="6:5">Remove</span> the <span class="EzKURWReUAB5oZgtQNkl" data-src-align="12:8">protective</span> <span class="EzKURWReUAB5oZgtQNkl" data-src-align="21:8">cap</span> of the <span class="EzKURWReUAB5oZgtQNkl" data-src-align="30:7">suspension.</span>
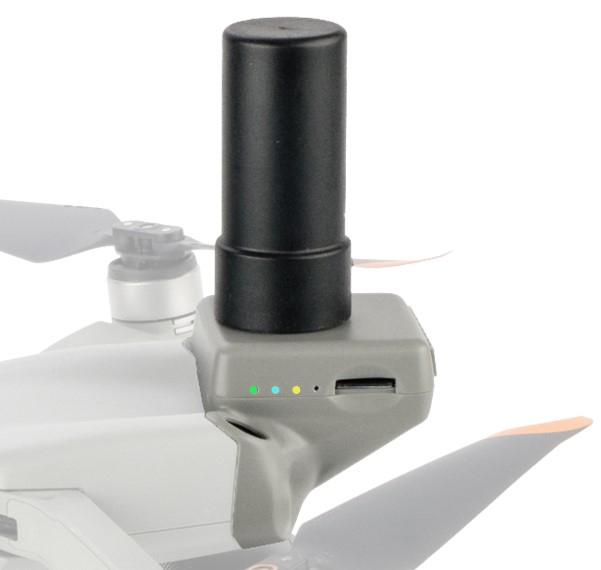
2. <span class="EzKURWReUAB5oZgtQNkl" data-src-align="30:7">Place the GNSS antenna on the TOPODRONE receiver. The antenna should fit tightly to the upgrade housing, avoid applying excessive force.</span>
3. <span class="EzKURWReUAB5oZgtQNkl" data-src-align="30:7"><span class="EzKURWReUAB5oZgtQNkl" data-src-align="6:9">Check</span> for <span class="EzKURWReUAB5oZgtQNkl" data-src-align="16:7">a</span> <span class="EzKURWReUAB5oZgtQNkl" data-src-align="30:6">memory</span> <span class="EzKURWReUAB5oZgtQNkl" data-src-align="24:5">card</span> <span class="EzKURWReUAB5oZgtQNkl" data-src-align="37:1">in</span> the TOPODRONE <span class="EzKURWReUAB5oZgtQNkl" data-src-align="58:3">DJI</span> <span class="EzKURWReUAB5oZgtQNkl" data-src-align="62:3">AIR</span> <span class="EzKURWReUAB5oZgtQNkl" data-src-align="66:2">2S</span> PPK <span class="EzKURWReUAB5oZgtQNkl" data-src-align="39:8">upgrade</span><span class="EzKURWReUAB5oZgtQNkl" data-src-align="48:9:71:1">,</span> <span class="EzKURWReUAB5oZgtQNkl" data-src-align="74:1">as</span> <span class="EzKURWReUAB5oZgtQNkl" data-src-align="76:5">well</span> as <span class="EzKURWReUAB5oZgtQNkl" data-src-align="82:1">in</span> <span class="EzKURWReUAB5oZgtQNkl" data-src-align="84:5">the</span> <span class="EzKURWReUAB5oZgtQNkl" data-src-align="90:5">drone</span> itself.</span>
4. <span class="EzKURWReUAB5oZgtQNkl" data-src-align="30:7">Unfold the beams, check the integrity of the propellers.</span>
5. <span class="EzKURWReUAB5oZgtQNkl" data-src-align="30:7">Turn on the drone, set it to the takeoff location and move away 1-2 meters.</span>
6. <span class="EzKURWReUAB5oZgtQNkl" data-src-align="30:7">After 15-60 seconds, the TOPODRONE DJI AIR 2S PPK will display the following indication when the GNSS signal level is normal: steady green LED, blinking or steady blue LED and blinking orange LED. This indication corresponds to successful initialization of the upgrade.![image.png](https://knowledge.topodrone.com/uploads/images/gallery/2024-11/scaled-1680-/1JKimage.png)</span>
7. If this is the first flight from this point, you should calibrate the compass and start the flight task. If you have already made a flight from this point, skip this step.