Performing a calibration maneuver with the TOPODRONE laser scanner
After successful initialization and before starting a route for ALS and MLS, a calibration maneuver must be performed. This maneuver is performed to calibrate the IMU module inside the TOPODRONE laser scanner. Without performing this calibration maneuver before starting a route, the data quality may not be satisfactory.
During the calibration process on the drone it is necessary to move in the plane at the working altitude on the circle once clockwise and once counterclockwise, the sequence does not matter. It is necessary to change the spatial position of the TOPODRONE laser scanner, so the option with rotation around its axis similar to the compass calibration on DJI drones is not suitable.
Performing calibration of the TOPODRONE laser scanner for ALS in automatic mode. There are two ways to perform the figure-eight calibration maneuver on DJI drones: automatic and manual. Whether automatic execution is possible depends on the flight task scheduling software used. UgCS Pro / Expert software allows you to perform the calibration procedure in automatic mode. The possibility of automatic execution depends on the flight planning software used. UgCS Pro / Expert software allows you to perform the calibration procedure in automatic mode.
To perform an automatic figure-of-eight flight in UgCS software, follow the steps below:
- Create a new route by selecting the desired drone profile and setting the necessary parameters for return altitude, actions in case of remote control signal loss, etc.
- Using the Waypoint tool, set the takeoff point, which will be the first waypoint of the route. Set the “height above ground” parameter according to the working altitude.
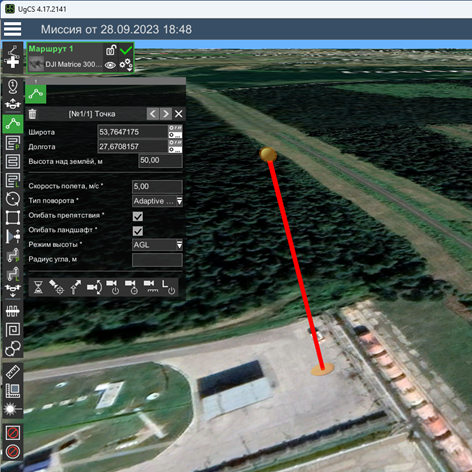
Setting the waypoint before starting the calibration maneuver “figure eight” in UgCS Pro / Expert software.
- Using the Circle Flight tool with a double left mouse click, create a circle flight so that it touches the first “Takeoff” waypoint. It is recommended to use/change the following parameters:
- Altitude: 60-120 meters according to the working altitude for your sensor
- Radius: 10-60 meters
- Airspeed: 6-10 meters per second
- Turn Type: Adaptive Bank Turn (this parameter smooths out corners)
- Clockwise traversal: yes (not for the second circle)
- Number of approximating points: 7
- Follow Terrain: no
- Elevation mode: AGL (elevation will be calculated relative to terrain)
- POI - delete (by default POI orientates the drone's front to the center of the circle
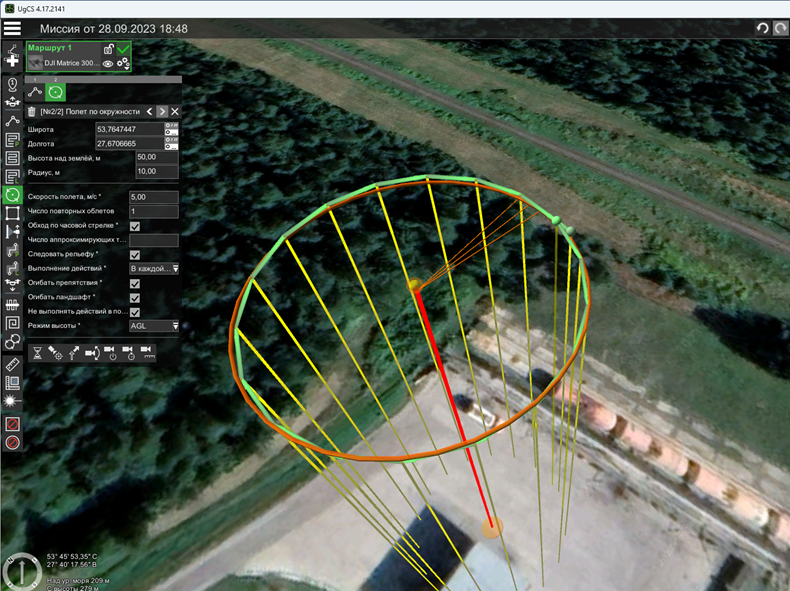
Setting the first circle of the calibration maneuver “figure eight” in UgCS Pro / Expert software. Please note the necessity to delete the POI action
- Double-click on the Circle Flight tool to create a second circular flight so that it touches the first waypoint and the first circle. It is recommended to use the same parameters as in step. 3, except for the “Clockwise traversal” parameter, which should be different for the two circles.
Clockwise traversal: no (yes for the second lap)
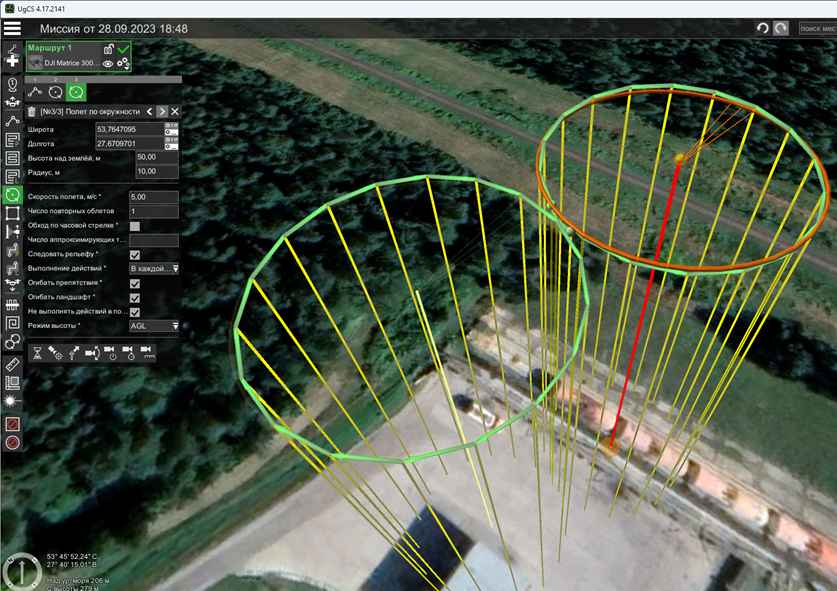
Setting the second circle of the calibration maneuver “figure eight” in UgCS Pro / Expert software.Note the need to fly in circles in different directions.
Calibration of TOPODRONE laser scanner for ALS in manual mode.
In case it is impossible to perform the calibration maneuver in automatic mode (no UgCS Pro / Expert software), it is necessary to perform this maneuver in manual mode before starting the flight along the main route. To do this, perform the following actions:
- Prepare the drone and TOPODRONE laser scanner for operation according to the manual. Check for a stable GNSS signal.
- Turn on the drone, wait for the drone and LiDAR initialization procedure.
- Perform compass calibration before you start the drone.
- Compass calibration must be performed each time before the first flight in a new area.
- Manually fly the drone to the working altitude in the “P” mode.
- When the drone reaches the working altitude, switch to “T” mode - Tripod (if available).
- Maneuver the drone using the control sticks. To fly in the first circle (clockwise), hold the left stick to the right and the right stick forward. This combination will allow the drone to circle while maintaining altitude. After the drone completes the first circle, without changing the position of the right stick (forward), change the position of the left stick to counterclockwise (left).
- In case of using the “T” - Tripod mode, you can maneuver the sticks by bringing them to extreme values. Speed limitation and smoothness will be achieved due to the flight characteristics of the “T” - Tripod mode. If the drone does not have Tripod mode as one of the flight submodes, we recommend performing stick maneuvering as smoothly as possible without sudden movements.
- После завершения прохода по второму кругу, калибровочный маневр выполнен. После завершения процедуры калибровки лазерного сканера TOPODRONE в ручном режиме выполните отправку полетного задания на квадрокоптер и начните выполнение основной части полета.
- В процессе выполнения полета по восьмерке можно контролировать радиус поворота дрона при помощи вида «Карта» в приложении на мобильном устройстве, а также визуально, смотря в небо на дрон в полете.
Выполнение калибровочного маневра для МЛС при использовании TOPODRONE BackPack.
- Подготовьте TOPODRONE BackPack и лазерный сканер TOPODRONE к эксплуатации на открытой местности, согласно инструкции, при наличии достаточного уровня ГНСС сигнала.
- Убедитесь, что в радиусе не менее 100 метров находятся любые объекты: здания, холмы, заборы, провода и т.п.
Включите питание лазерного сканера TOPODRONE при помощи входящего в комплект внешнего аккумулятора и кабеля питания. - Дождитесь процедуры инициализации лазерного сканера.
- Наденьте рюкзак на плечи оператора.
- Выполните проход с постоянной скоростью 5-9 км/ч по двум кругам с радиусом 10-15 метров по часовой и против часовой стрелки. Каждый круг должен быть замкнут до начала следующего этапа.
- После завершения прохода по второму кругу, маневр калибровки выполнен. Можно приступать к выполнению основного задания.
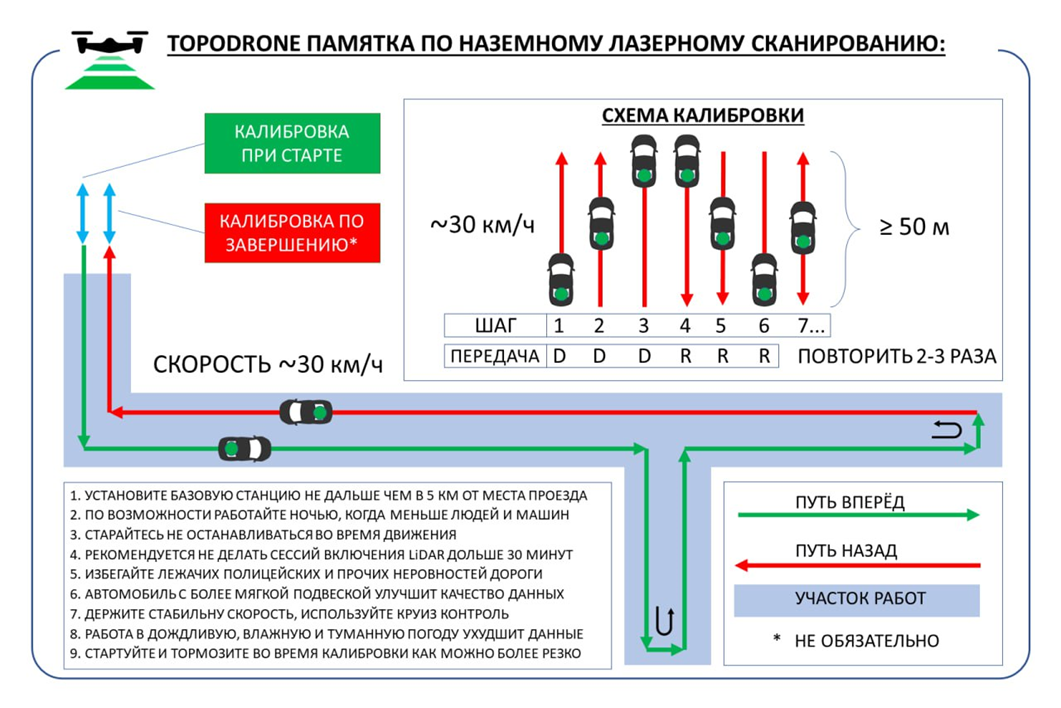
Выполнение калибровочного маневра для МЛС при использовании крепления на автомобиль.
- Подготовьте автомобильное крепление TOPODRONE и лазерный сканер к эксплуатации на открытой местности, согласно инструкции, при наличии достаточного уровня ГНСС сигнала.
- Убедитесь, что в радиусе не менее 100 метров находятся любые объекты: здания, холмы, заборы, провода и т.п.
- Установите автомобильное крепление вместе с лазерным сканером на крышу автомобиля таким образом, чтобы выходящий из сенсора кабель и идущий в корпус TOPODRONE должен смотреть назад по ходу движения.
- Включите питание лазерного сканера TOPODRONE при помощи входящего в комплект внешнего аккумулятора и кабеля питания.
- Дождитесь процедуры инициализации лазерного сканера.
- Выполните проезд с постоянной скоростью 20-30 км/ч вперед на дистанцию 50-100 метров с возвращением в исходную точку задним ходом с той же скоростью. Повторить данный этап 2-3 раза.
- После завершения проездов, маневр калибровки выполнен. Можно приступать к выполнению основного задания.