
Setting up the laser sensor
When using TOPODRONE LiDAR for ALS, the laser sensor Field-of-view angles are limited to 106 degrees due to the design feature of the applied drones (chassis). At the same time, the full view of the laser sensor (360 degrees) should be used to perform MLS. To change the angle of view of the laser scanner it is necessary to perform the procedure of connecting the TOPODRONE laser scanner to the Internet using a cell phone and the web-interface of the laser sensor with local connection via Wi-Fi.
The following components and conditions are required to perform the TOPODRONE laser sensor working angle adjustment procedure:
- Mobile Android device (smartphone or tablet) (Only Samsung, Honor, Xiaomi phones are tested, other manufacturers' mobile devices may not work correctly) with 3G/4G/5G mobile Internet or Wi-Fi network with Internet connection;
- USB Type-C OTG adapter (supplied with the package);
- USB cable for connection to a mobile device (supplied with the smartphone/tablet);
- TOPODRONE LiDAR;
- Power supply (supplied with the kit) or power from the aircraft via a cable with LEMO 6 pin connector or power cable from Li-Po battery (supplied with the mobile kit);
- Computer or other mobile device with any internet connection.
To connect to the web interface of the laser scanner via a local network, the following steps must be performed strictly in the following order:
- Make sure that the TOPODRONE LiDAR is securely located on the back cover on a flat, stable horizontal surface or attached to the aircraft / mobile vehicle mount on a standard mount. Due to the gyroscopic torque, the scanner may start to move if it is not securely positioned and fall down after it is turned on. Never place the laser scanner on an uneven, slippery surface or on its side with the lens touching the surface.
- Power up the TOPODRONE LiDAR by connecting it to a power supply unit or aircraft or to a external PowerBank. To power the TOPODRONE LiDAR from the PowerBank, it must be turned on with a short press of a button on a PowerBank.
- Wait for the TOPODRONE LiDAR to turn on and boot up (once the scanner has finished booting up, the LED should be solid green and the yellow LED should turn off).
- Using a computer or mobile device, go to the available Wi-Fi networks section and find the network with the name TOPODRONE_LIDAR
- Connect to this network using the password topodrone.
- Then on your computer or other mobile device, open your browser and click on the link: http://192.168.10.1:10977/
- In the web interface that opens, find the line with the values Azimuth FOV Start XXX / End YYY, where XXX – is the angle in degrees of the beginning of the scan are, YYY – angle in degrees of the end of the scanning area.
- For ALS set the FOV Start: 217 End: 323. With this values the field of view (FOV) will be 106 degrees to the bottom of TOPODRONE LiDAR (53 degrees to the left and right of the nadir). After entering the desired values, click the Save button.
- For MLS, set the FOV Start: 000 End: 359. With this values the field of view (FOV) will be 360 degrees. After entering the desired values, click the Save button.
- Make sure that all other settings except the recording start and end angles match those in the screenshots below:
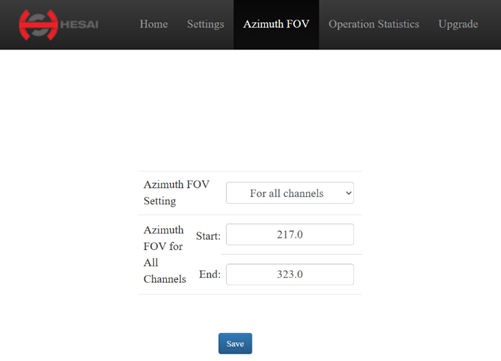
Setting the Laser Scanning Sensor Parameters for the ALS

Setting the Laser Scanning Sensor Parameters for the MLS
- The TOPODRONE LiDAR settings are now complete. Turn off the power to the laser scanner, disconnect all cables and put the equipment in the case if necessary.
The TOPODRONE LiDAR settings are saved until the next time you change them. It is strongly recommended to memorize or make a note of the currently set laser sensor angles. In case of incorrect initial settings, e.g. setting the VLS at the time of performing an MLS, the data from the excluded angles is not saved and cannot be retrieved in any way. On the contrary, if the laser scanner is set to 360 degrees when performing VLS, the data will be more than 3 times redundant.
To connect to the web interface of the laserTOPODRONE scannerLiDAR via the Internet, the following steps must be performed strictly in the following order:
Убедитесь,Makeчтоsureлазерныйthatсканерthe TOPODRONEнадежноLiDARустановленisнаsecurelyзаднююlocatedкрышкуonнаtheровнойbackустойчивойcoverгоризонтальнойonповерхностиaилиflat,закрепленstableнаhorizontalлетательномsurfaceаппаратеorнаattachedштатномtoкреплении.theЗаaircraftсчет/гироскопическогоmobileмоментаvehicleвращенияmountпослеonвключенияaсканерstandardможетmount.начатьDueдвигатьсяtoприtheненадежномgyroscopicрасположенииtorque,иtheупасть.scannerКатегорическиmayзапрещаетсяstartразмещатьtoлазерныйmoveсканерifнаitнеровной,isскользкойnotповерхностиsecurelyилиpositionedнаandбоку,fallкогдаdownлинзаafterкасаетсяitповерхности.is turned on. Never place the laser scanner on an uneven, slippery surface or on its side with the lens touching the surface.ВключитеPowerпитаниеupлазерногоtheсканераTOPODRONETOPODRONE,LiDARподключивbyегоconnectingкitблокуtoпитания,aилиpowerлетательномуsupplyаппарату,unitилиorкaircraftLi-PoorАКБ.toДляaобеспеченияexternalпитанияPowerBank.лазерногоToсканераpowerотtheLi-PoTOPODRONEАКБLiDARеёfromнеобходимоtheвключитьPowerBank,однимitкороткимmustнажатием.be turned on with a short press of a button on a PowerBank.ДождитесьWaitвключенияforиtheзагрузкиTOPODRONEлазерногоLiDARсканераto turn on and boot up (послеonceокончанииtheзагрузкиscanner has finished booting up, the LEDсветодиодshouldдолженbeгоретьsolidпостояннымgreenзеленымandсветом,theжелтыйyellow LEDсветодиодshouldдолженturnпогаснуть)off).- Соедините USB Type-C OTG переходник и USB кабель для подключения к мобильному устройству вместе через разъем USB Type-A (прямоугольный разъем)
- Подсоедините USB Type-C OTG переходник к разъему USB Type-C лазерного сканера TOPODRONE
- Подсоедините USB кабель для подключения к мобильному устройству к мобильному устройству (смартфону или планшету) под управлением ОС Android
- Убедитесь, что на мобильном устройстве имеется активное подключение к сети Интернет через 3G/4G/5G или через Wi-Fi.
- В мобильном устройстве пройдите по меню: настройки / подключения / мобильная точка доступа и модем / режим USB-модема.
- После этого на компьютере или ином мобильном устройстве откройте браузер и перейдите по ссылке: http://node.gnss.cloud:10977/
- В открывшемся веб-интерфейсе найдите строку со значениями Azimuth FOV Start XXX / End YYY, где XXX – это угол в градусах начала области сканирования, а YYY – угол в градусах окончания области сканирования.
- Для ВЛС для установите значения FOV Start: 217 End: 323. Таким образом угол обзора будет составлять 106 градусов в нижнюю часть TOPODRONE (по 53 градуса влево и право от надира). После ввода нужных значений нажмите кнопку Save.
- Для МЛС установите значения FOV Start: 000 End: 359. Таким образом угол обзора будет составлять 360 градусов. После ввода нужных значений нажмите кнопку Save.
- Убедитесь, что все остальные настройки, кроме углов начала и окончания записи соответствуют таковым на представленных ниже скриншотах:
Настройка параметров сенсора лазерного сканирования для ВЛС
Настройка параметров сенсора лазерного сканирования для ВЛС
- Настройка параметров лазерного сенсора TOPODRONE завершена. Отключите питание от лазерного сканера, отключите все кабели и уберите оборудование в кейс при необходимости
- Настройки параметров лазерного сенсора TOPODRONE сохраняются до момента следующего изменения. Настоятельно рекомендуется запоминать или делать пометки текущих установленных углов лазерного сенсора. В случае неправильных исходных установок, например настройка ВЛС в момент выполнения МЛС, данные с исключенных углов не сохраняется и не могут быть каким-либо образом извлечена. Напротив, при настройки лазерного сканера на 360 градусов при выполнении ВЛС данные будут более чем в 3 раза избыточными.
- Процедура подключения лазерного сканера к сети интернет(п.п. 1-8) так же может быть использована службой технической поддержки при проведении удаленной диагностики оборудования.