
Setting up the laser sensor
When using TOPODRONE LiDAR for ALS, the laser sensor Field-of-view angles are limited to 106 degrees due to the design feature of the applied drones (chassis). At the same time, the full view of the laser sensor (360 degrees) should be used to perform MLS. To change the angle of view of the TOPODRONE LiDAR it is necessary to perform the procedure of connecting the TOPODRONE LiDAR to the Internet using a cell phone and the web-interface of the laser sensor with local connection via Wi-Fi.
The following components and conditions are required to perform the TOPODRONE laser sensor working angle adjustment procedure:
- Mobile Android device (smartphone or tablet) (Only Samsung, Honor, Xiaomi phones are tested, other manufacturers' mobile devices may not work correctly) with 3G/4G/5G mobile Internet or Wi-Fi network with Internet connection;
- USB Type-C OTG adapter (supplied with the package);
- USB cable for connection to a mobile device (supplied with the smartphone/tablet);
- TOPODRONE LiDAR;
- Power supply (supplied with the kit) or power from the aircraft via a cable with LEMO 6 pin connector or power cable from Li-Po battery (supplied with the mobile kit);
- Computer or other mobile device with any internet connection.
To connect to the web interface of the TOPODRONE LiDAR via a local network, the following steps must be performed strictly in the following order:
- Make sure that the TOPODRONE LiDAR is securely located on the back cover on a flat, stable horizontal surface or attached to the aircraft / mobile vehicle mount on a standard mount. Due to the gyroscopic torque, the TOPODRONE LiDAR may start to move if it is not securely positioned and fall down after it is turned on. Never place the TOPODRONE LiDAR on an uneven, slippery surface or on its side with the lens touching the surface.
- Power up the TOPODRONE LiDAR by connecting it to a power supply unit or aircraft or to a external PowerBank. To power the TOPODRONE LiDAR from the PowerBank, it must be turned on with a short press of a button on a PowerBank.
- Wait for the TOPODRONE LiDAR to turn on and boot up (once the TOPODRONE LiDAR has finished booting up, the LED should be solid green and the yellow LED should turn off).
- Using a computer or mobile device, go to the available Wi-Fi networks section and find the network with the name TOPODRONE_LIDAR
- Connect to this network using the password topodrone.
- Then on your computer or other mobile device, open your browser and click on the link: http://192.168.10.1:10977/
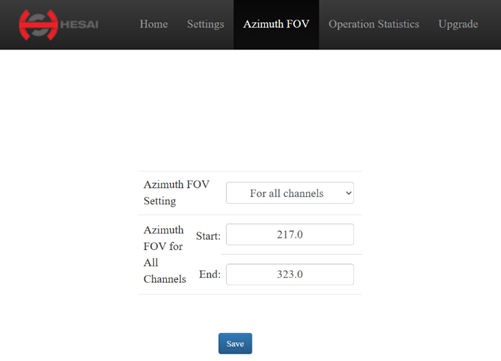
- In the web interface that opens, find the line with the values Azimuth FOV Start XXX / End YYY, where XXX – is the angle in degrees of the beginning of the scan are, YYY – angle in degrees of the end of the scanning area.
- For ALS set the FOV Start: 217 End: 323. With this values the field of view (FOV) will be 106 degrees to the bottom of TOPODRONE LiDAR (53 degrees to the left and right of the nadir). After entering the desired values, click the Save button.
- For MLS, set the FOV Start: 000 End: 359. With this values the field of view (FOV) will be 360 degrees. After entering the desired values, click the Save button.
- Make sure that all other settings except the recording start and end angles match those in the screenshots below:
Setting the Laser Scanning Sensor Parameters for the ALS

Setting the Laser Scanning Sensor Parameters for the MLS
- The TOPODRONE LiDAR settings are now complete. Turn off the power to the laser scanner, disconnect all cables and put the equipment in the case if necessary.
To connect to the web interface of the TOPODRONE LiDAR via the Internet, the following steps must be performed strictly in the following order:
- Make sure that the TOPODRONE LiDAR is securely located on the back cover on a flat, stable horizontal surface or attached to the aircraft / mobile vehicle mount on a standard mount. Due to the gyroscopic torque, the scanner may start to move if it is not securely positioned and fall down after it is turned on. Never place the TOPODRONE LiDAR on an uneven, slippery surface or on its side with the lens touching the surface.
- Power up the TOPODRONE LiDAR by connecting it to a power supply unit or aircraft or to a external PowerBank. To power the TOPODRONE LiDAR from the PowerBank, it must be turned on with a short press of a button on a PowerBank.
- Wait for the TOPODRONE LiDAR to turn on and boot up (once the scanner has finished booting up, the LED should be solid green and the yellow LED should turn off).
- Connect the USB Type-C OTG adapter and USB cable to connect to your mobile device together via the USB Type-A connector (rectangular connector).
- Connect the USB Type-C OTG adapter to the TOPODRONE LiDAR's USB Type-C connector.
- Connect the USB cable for mobile device connection to a mobile device (smartphone or tablet) running Android OS
- Make sure your mobile device has an active Internet connection via 3G/4G/5G or Wi-Fi.
- In your mobile device, go to the menu: settings / connections / mobile hotspot and modem / USB modem mode pr Tethering mode (may differs in different languages).
- Then, on your computer or other mobile device, open your browser and click on the following link: http://node.gnss.cloud:10977/
- In the web interface that opens, find the line with the values Azimuth FOV Start XXX / End YYY, where XXX – is the angle in degrees of the beginning of the scan are, YYY – angle in degrees of the end of the scanning area.
- For ALS set the FOV Start: 217 End: 323. With this values the field of view (FOV) will be 106 degrees to the bottom of TOPODRONE LiDAR (53 degrees to the left and right of the nadir). After entering the desired values, click the Save button.
- For MLS, set the FOV Start: 000 End: 359. With this values the field of view (FOV) will be 360 degrees. After entering the desired values, click the Save button.
- Make sure that all other settings except the recording start and end angles match those in the screenshots below:
Setting the Laser Scanning Sensor Parameters for the ALS
Setting the Laser Scanning Sensor Parameters for the MLS
- The TOPODRONE LiDAR settings are now complete. Turn off the power to the TOPODRONE LiDAR, disconnect all cables and put the equipment in the case if necessary.
The procedure for connecting the TOPODRONE LiDAR to the Internet (steps 1-8) can also be used by TOPODRONE Technical Support for remote diagnostics.
The TOPODRONE LiDAR settings are saved until the next time you change them. It is strongly recommended to memorize or make a note of the currently set laser sensor angles. In case of incorrect initial settings, e.g. setting the ALS at the time of performing an MLS, the data from the excluded angles is not saved and cannot be retrieved in any way. On the contrary, if the TOPODRONE LiDAR is set to 360 degrees when performing ALS, the data will be more than 3 times redundant.
No Comments