
Setting the shooting options
Setting shooting parameters
All camera parameters are required for correct calculation of longitudinal and transverse overlap between images during mission planning and en-route imaging.
The focal length value may vary depending on the lens used.
|
TOPODRONE P61 Focal length, mm Ширина сенсора, мм Sensor height, mm Horizontal sensor resolution, pix Vertical sensor resolution, pix Minimum response interval, with |
21 или 24 35,7 23,8 9504 6336 1 |
Adjusting the parameters using the Smart Controller
- Once your aircraft is powered on, the camera will be powered up, initialized and displayed as a TOPODRONE payload in the DJI Pilot 2 app.
- To activate the camera control buttons, press the AF button on the remote control screen, then press the MF button. These buttons are responsible for auto and manual focus.
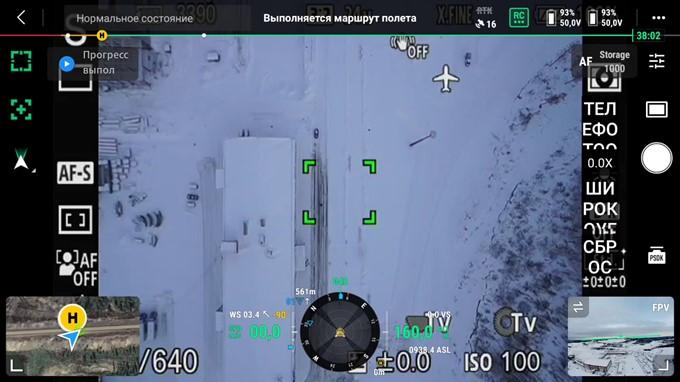
- Photogrammetric camera TOPODRONE P61 works in shutter speed priority mode, the user needs to select shutter speed manually, and the aperture changes depending on the illumination of the object.
- To set the required shutter speed, use the control roller. Rotating the roller clockwise will decrease the shutter speed and counterclockwise will increase the shutter speed. The shutter speed will be displayed on the screen.
- To change the ISO setting, press the down button on the control roller, then use the roller to select the desired value and confirm your selection by pressing the center button on the control roller.
- Pressing right on the control roller opens a menu where you can change exposure steps and confirm changes by pressing the center button.
- To change the white balance, press the “Fn” button on the camera, select “White Balance”, then use the roller to set the value you want.
- Check the initialization on the TOPODRONE UAV PPK UPGRADE Kit or on your laser scanner. The LED indication for TOPODRONE UAV PPK UPGRADE Kit is shown in the table below.
LED light Description Green LED
Indicates the status of the Power Module
Blue LED
PDOP>10 not lit
Flashing slowly 3<PDOP<10
Flashing rapidly 2<PDOP
PDOP illuminates continuously
Orange LED
Indicates the status of recording to the memory card. The LED blinks rapidly during recording. Each blinking corresponds to the recording of 4 kB of data
Red LED
Indicates if there are any errors in the system. If an error occurs, check the memory card
- Raise the drone to operating altitude, focus on the ground surface in “AF” mode and set the camera to “MF” mode. Launch the drone for the mission.
It is necessary to repeat all points before each flight.
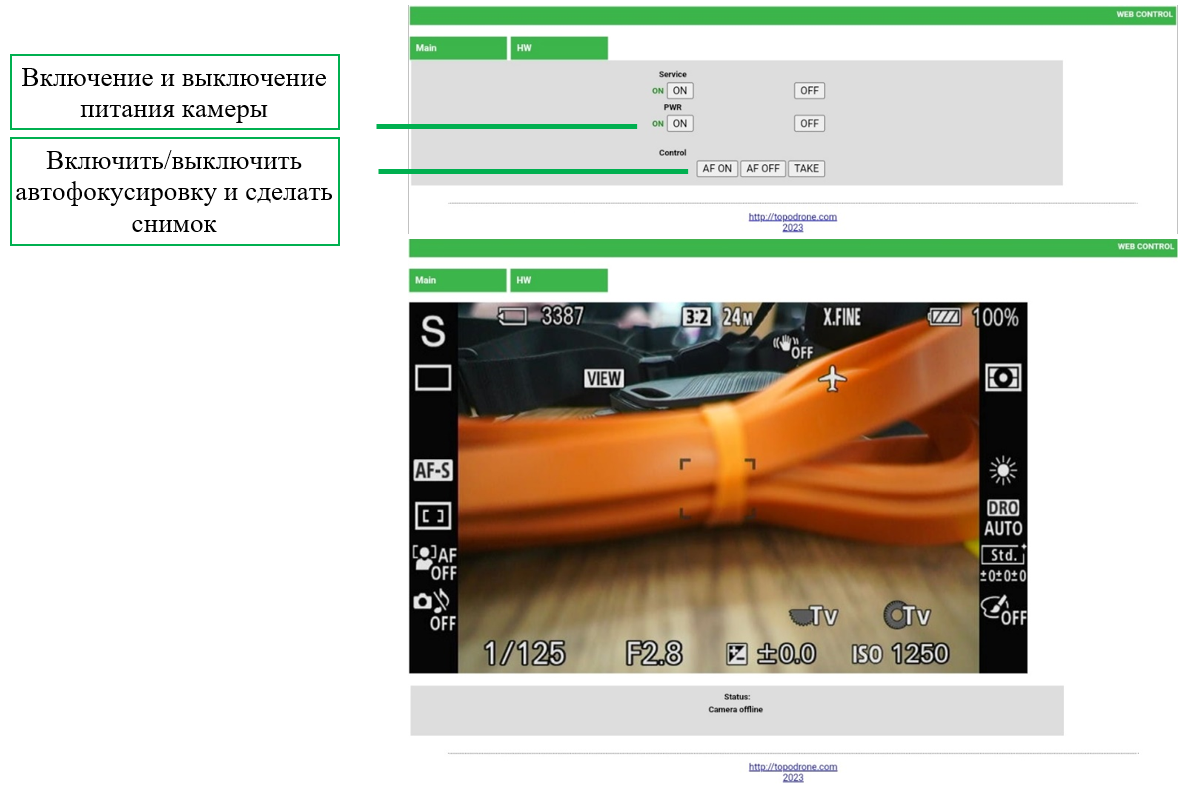
НастройкаCustomizing параметровshooting съемкиsettings сusing помощью подключения поa Wi-Fi connection
ВThe зависимостиcamera отhas ревизииan камерыoption естьto возможностьdisplay вывестиthe видеолинкimage отображенияon информацииthe сscreen камерыof наyour экранmobile вашегоdevice.
After устройстваyou дляturn настройкиon параметровthe съемки:camera, an access point with the name of the Wi-Fi network - TD_61mp - will appear. You can connect to the network using the password: topodrone.
ПослеAfter того,successful какconnection камераto включилась,the появитсяnetwork точкаin доступаthe сbrowser названиемwindow Wi-Fiyou сетиshould TD_61mp,enter кthe которой можно подключиться, используя пароль: topodrone.
После того, как подключение было успешно выполнено, в окне браузера необходимо ввести адрес:address: 192.168.10.1
РекомендуемыйRecommended диапазонrange параметровof съемкиshooting дляparameters камерыfor TOPODRONE P61
| ISO | 100 … 200 | 200 … 600 | 600 … 800 |
| 1/4000 … 1/2000 | 1/2000 … 1/1000 | 1/1000 … 1/800 | |
| 8 … 10 | 6 … 8 | 4 … 8 | |
БолееFor подробнуюmore информациюinformation поon настройкеcustomizing параметровyour съемкиshooting можноsettings, узнатьcheck вout нашемour Telegram каналеchannel поat ссылкамthe ниже:links below:
Настройка изображения камеры. Введение. Часть 1 из 3
Настройка изображения камеры. Введение. Часть 2 из 3
Настройка изображения камеры. Введение. Часть 3 из 3
Вывод TOPODRONE P61 в сеть интернет для выполнения диагностики
Для выполнения процедуры вывода камеры TOPODRONE P61 в сеть интернет при выполнении диагностики потребуются следующие компоненты и условия:
- Мобильное устройство (смартфон или планшет) под управлением ОС Android (Протестированы только телефоны марки Samsung, Honor, Xiaomi мобильные устройства остальных производителей могут работать некорректно)
- 3G/4G/5G мобильный интернет или Wi-Fi сеть с подключением к сети Интернет
- Кабель USB – LEMO 6 PIN (поставляется вместе с TOPODRONE P61)
- USB кабель для подключения к мобильному устройству (поставляется вместе со смартфоном/планшетом)
- Фотограмметрическая камера TOPODRONE P61
- Летательный аппарат для подключения питания через кабель от разъема Skyport
- Установите камеру TOPODRONE P61 в соответствии с вашим комплектом поставки
- Включите питание TOPODRONE P61, подключив его к дрону.
- Дождитесь включения и загрузки камеры.
- Соедините кабель USB – LEMO 6 PIN и USB кабель для подключения к мобильному устройству вместе через разъем USB Type-A (прямоугольный разъем)
- Подсоедините кабель USB – LEMO 6 PIN к разъему LEMO 6 PIN камеры TOPODRONE P61
- Подсоедините USB кабель для подключения к мобильному устройству к мобильному устройству (смартфону или планшету) под управлением ОС Android
- Убедитесь, что на мобильном устройстве имеется активное подключение к сети Интернет через 3G/4G/5G или через Wi-Fi.
- На мобильном устройстве зайдите в меню: настройки / подключения / мобильная точка доступа и модем / режим USB-модема.
- Камера TOPODRONE P61 выведена в сеть интернет.